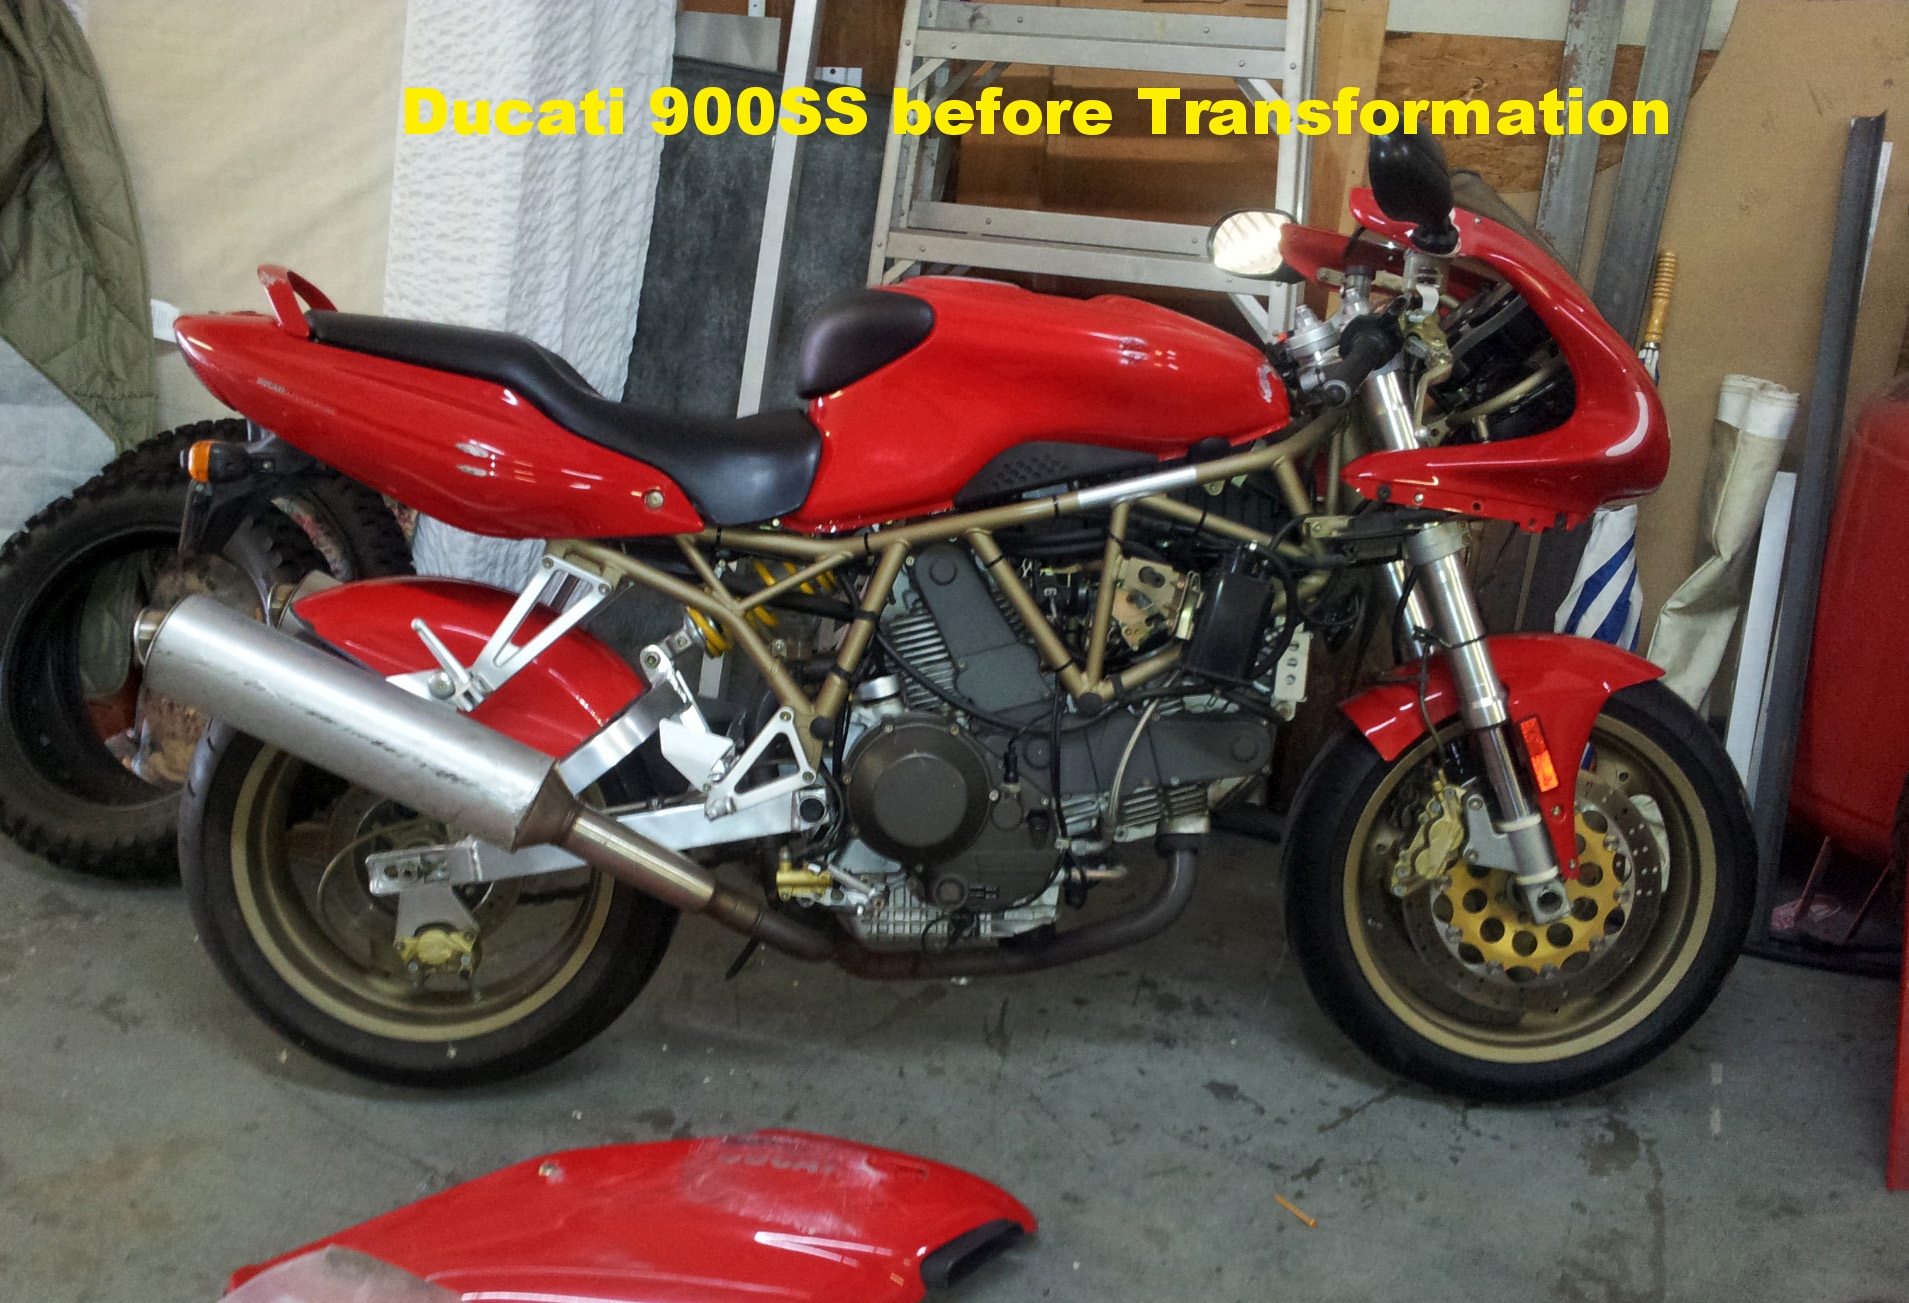
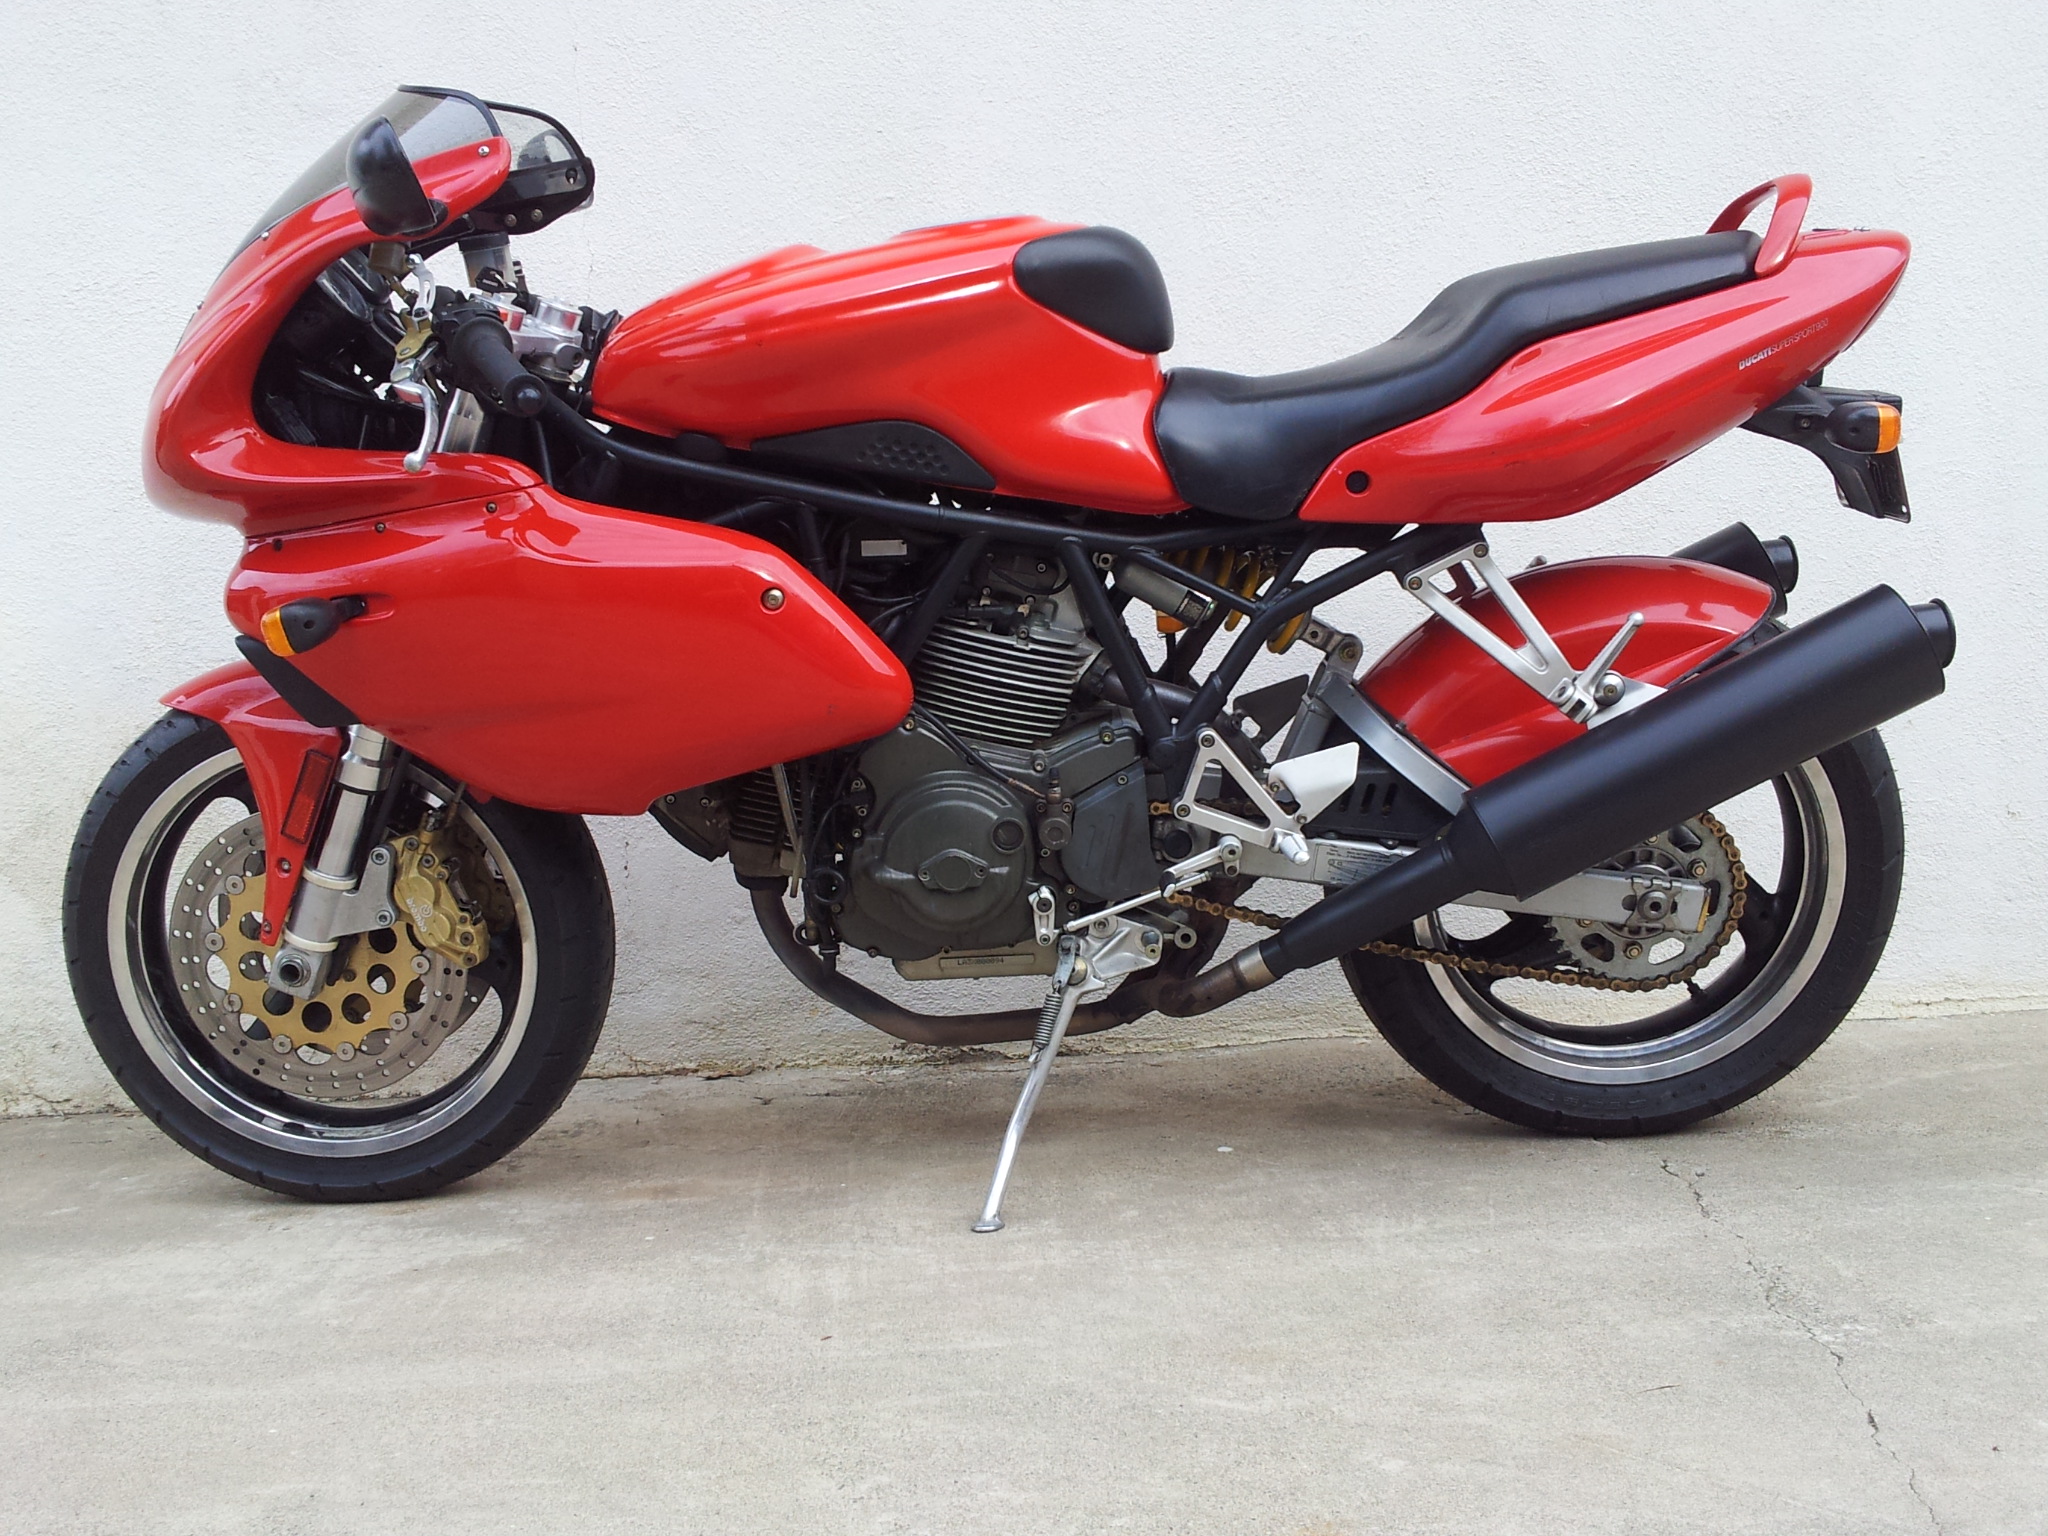
This is the story of how a Ducati 1999 900SSie was transformed into a 944SL Superlight
The tale starts with finding a random Craig’s List ad for a Ducati 1999 900SSie. It was in a sorry state when I went to see it. Every body part had some damage except for the fenders; the good news was that the bike was totally stock and it had 10K miles on it. The fairings were off and in a box and both sides of the original fairings were scratched, and the bike had obviously been in a crash.

900SSie Before Shot
The engine started right up, but the clutch didn't work (bad slave cylinder). Additional damage included a kinky chain, rough mirrors, dirty air filter and the lower R/S fairing stay was broken off at the cylinder. The threaded part of the horizontal cylinder where the stay threads in was busted out - not a pretty picture. They offered me a ride on the bike, but I declined. It had obviously been sitting for a while and I later found out that the bike had belonged to the family's son who had died a year earlier (not from riding the Duc).
A funny thing happened while I was looking for parts that changed the course of this project. At first, the plan was to fix the 900SS to make it a runner. I planned to do maintenance on the bike and slowly upgrade it for better performance. I was thinking it might be fun to ride on the street and do some casual track days. At about the same time a 750SSie with a slew of great parts (Ohlins, Marvic, ETI, Sharkskinz, etc.) was found for sale, and the plan for the 900SS was changed.

750SSie Parts Donor Bike
To make the 900 a better bike, I decided to take all of the good parts off of the 750 and put them on the 900. When I got the 750SS in the shop, I removed all the trick parts and built the 750 SS back into a completely stock 750SS, as the original parts were included in the sale.
750SSie with Stock Parts Replaced
I wanted to verify that the clutch was OK and installed a new clutch slave cylinder, and the clutch seemed to work fine. Once the clutch worked I was able to test ride the bike; the dry chain was acting up, but the clutch, gear shift and most importantly, the brakes worked ok.
At this point, the 900SS was sitting on the work stand without any body work.

900SSie on Stand, No Body Parts
I bought a Ducati Performance CF front fender from eBay that needed refinishing and a pair of full-floater iron rotors.
As the 900 was coming apart, I knew that I was going to do something about the exhaust header appearance. The standard pipe looks ugly as it gets old, and I used the CF mufflers (no brand name) from the 750SS as they looked very nice and ceramic coat the front and rear header pipes. Another area of concern was the flange part of the pipe where it goes into the cylinder head. It should be matched as closely as possible to the inner dimension of the port. In other words, the welding bead needs to be ground down so it isn't impeding the outflow of exhaust.
I'm not a fan of the body color rear fenders on these bikes and prefer black or CF. I found a good price on a sun-faded CF rear hugger.

Carbon Fiber Rear Wheel Hugger
The drill was the same; remove the old finish and add the new clear coat. Wet sand and polish; done.
One of my project goals was to keep the weight of the Duc down by using CF, Titanium and magnesium parts, and I wanted a nicely set-up suspension system and strong brakes. Based on other project bikes I have built, the forks had to come off and be sent to Racetech. Based on the Racetech spring rate calculator, the front springs were changed to a .95 kg/mm rate and the rear to a 8.0 kg/mm rate spring. The standard 900SS rates are: F-.62 Kg/mm, R-8.5 kg/mm. It’s funny, but the standard springs in most street bikes are soft in the front and hard in the rear (for passenger use). As I set the bikes up for solo use, the extra rate in the rear wasn’t needed. The Ohlins rear shock had been recently serviced so I just changed the spring to a new Eibach unit. Racetech went over the forks doing a gold valve kit/re-valve, full service with new seals/fluid.
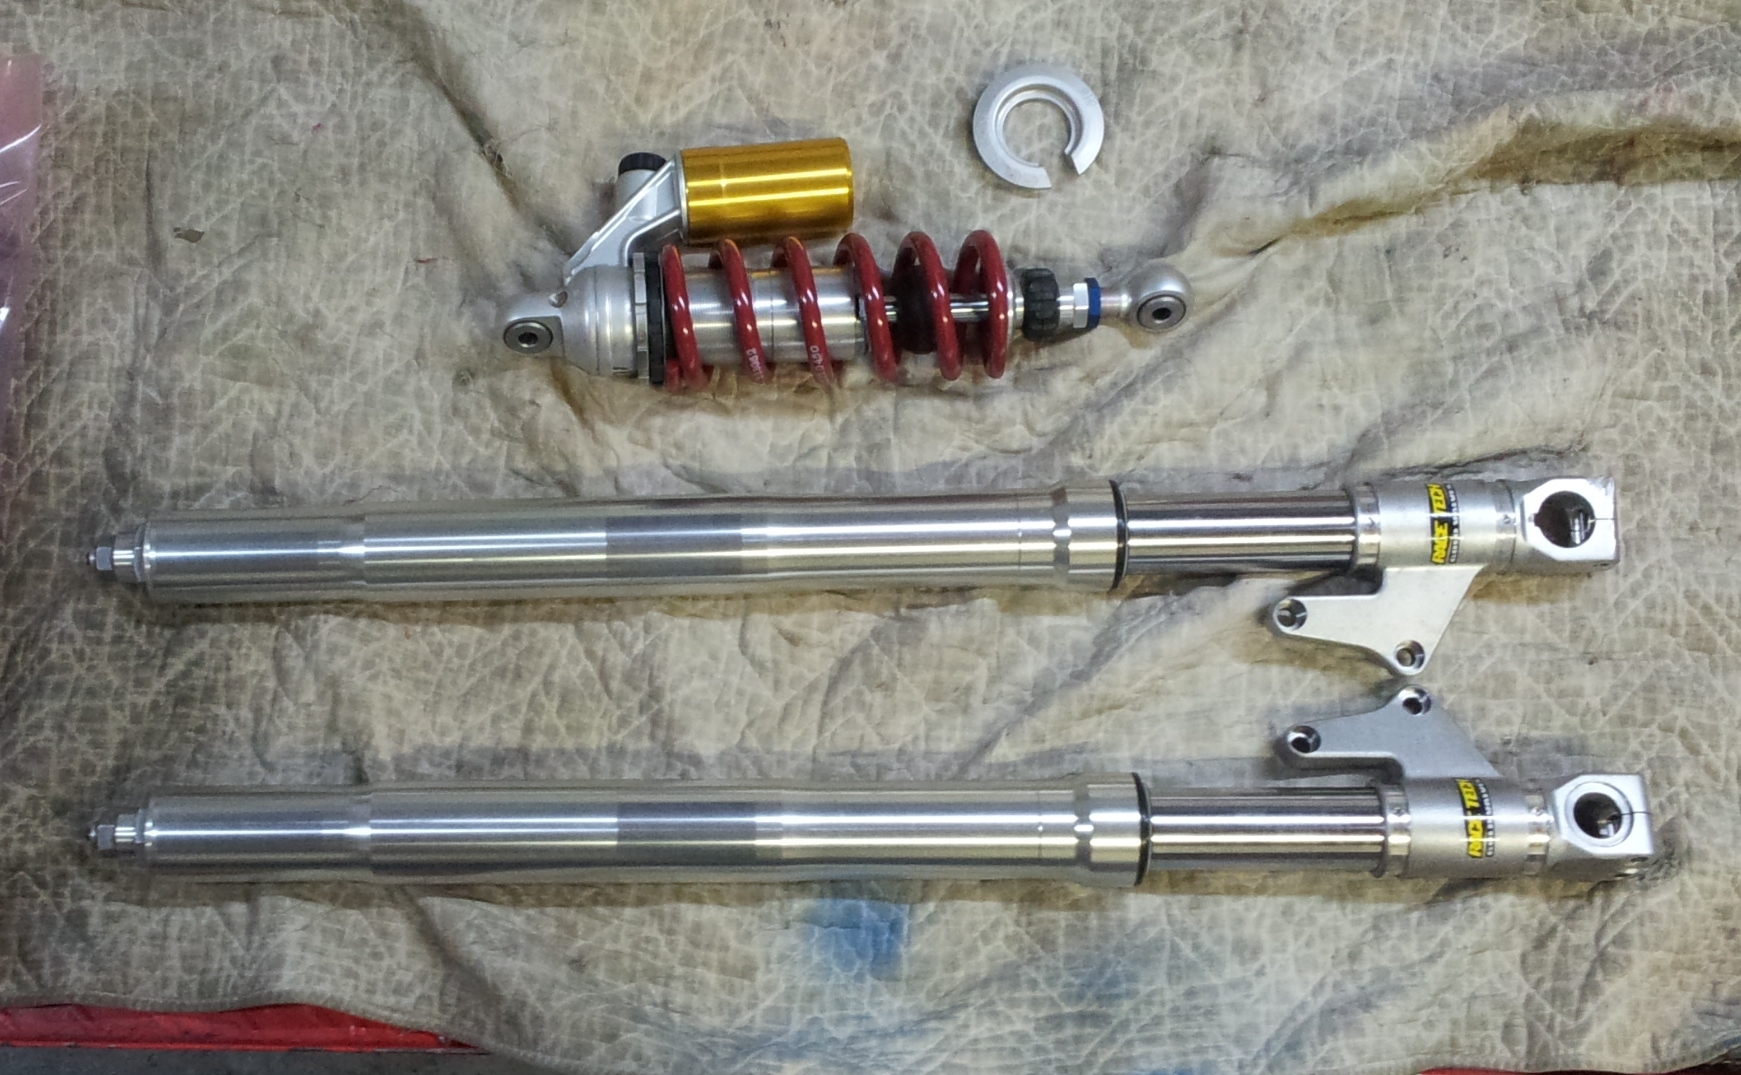
Rebuilt Front Forks and Rear Ohlins Shock
By now the chassis was a lump on a dolly.

900SSie Stripped on Dolly
The plan for the brakes was to run soft pads against the iron rotors for maximum feel. I also had my eye on the Brembo 19RSC forged radial master cylinder. The price had me choking a bit, but I wanted a solid front brake. I was to later find out that installing that M/C necessitated tossing the stock switch gear and replacing it with a pricy Ducabike 2-button unit. Also, the throttle needed to be rotated to clear everything.

Front Brake Master Cylinder
The brake calipers were cleaned and inspected then loaded with the new pads (soft compound) to match the iron rotors. At the same time, I changed the steering head bearings. At 10K miles, the stock ones were junk. Overall, I wanted the suspension/brakes/steering to be as new feeling as possible.
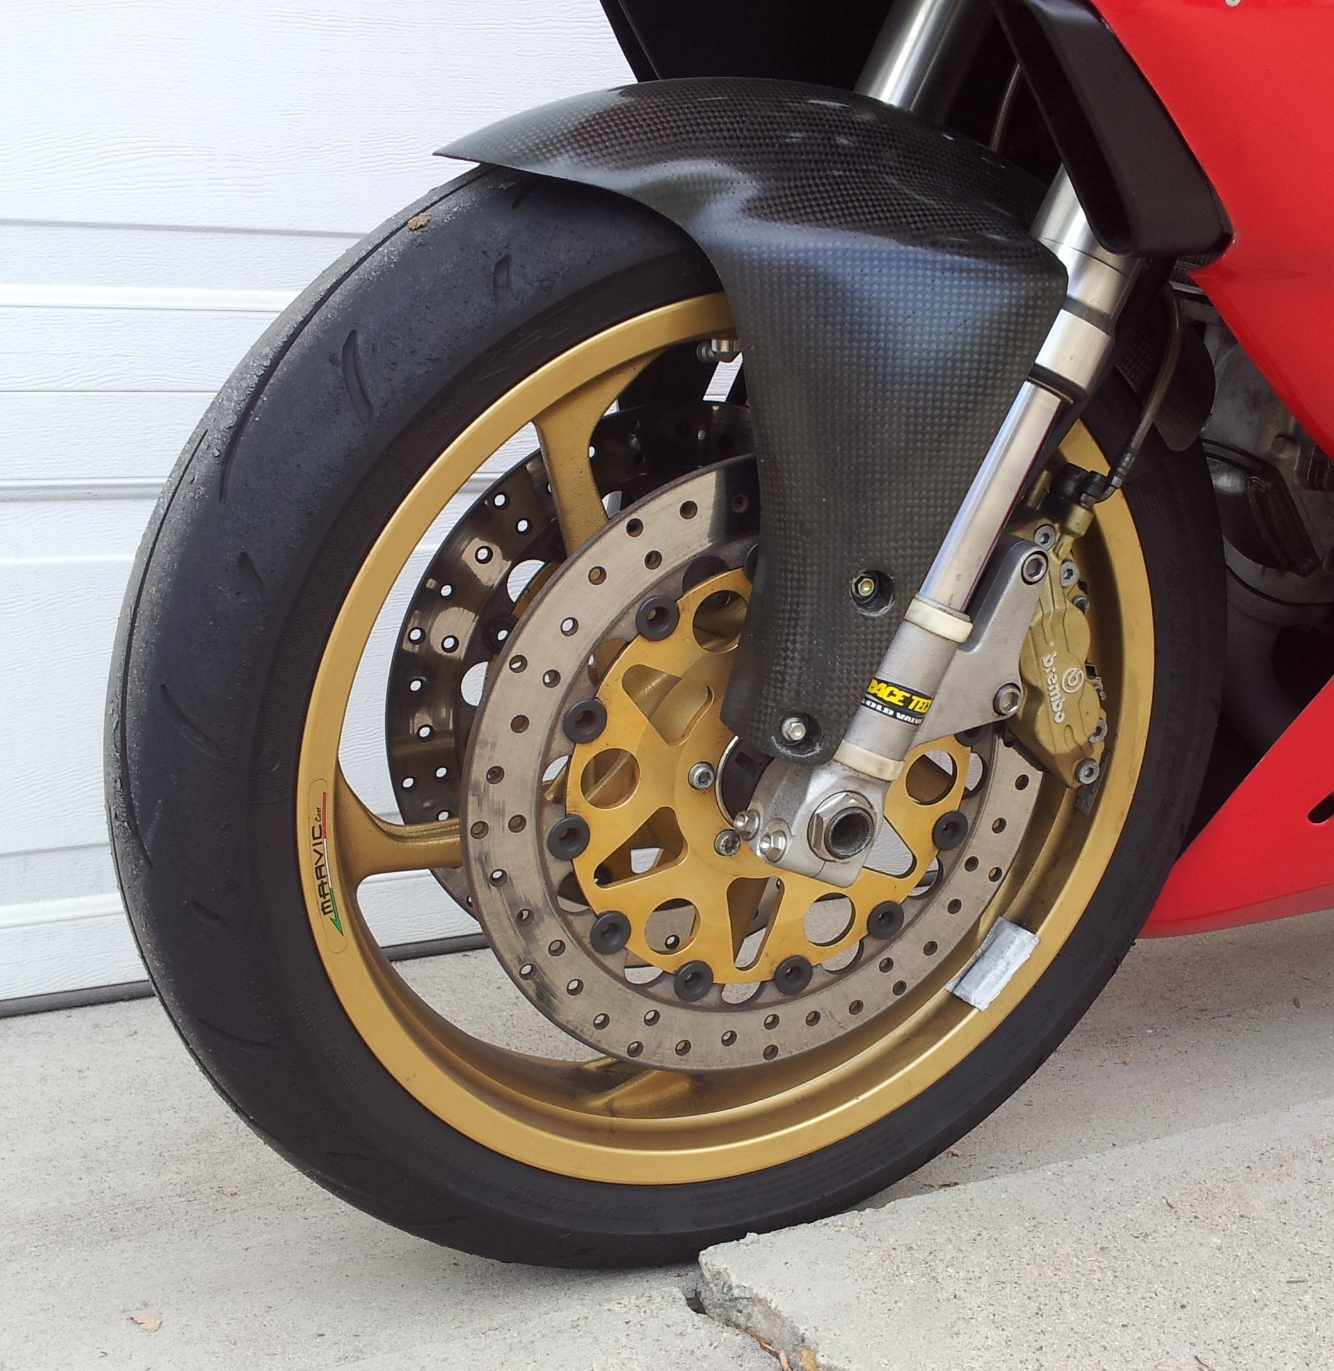
Full-Floating Cast Iron Brake Rotors
Part of the effort to lighten the bike was to add some titanium fasteners. I have often appreciated the advantage that titanium has over steel (approximately 40% less mass and about the same strength as steel). The primary disadvantage has always been cost. The 750SS donor bike had some titanium bolts holding the various engine covers on. While I pirated some of those bolts for the 900SS, I knew that it was hardly worth the trouble as not much weight was being shed. When I thought about it, the better plan would be to replace the larger fasteners to get more bang-for-the-buck.
I wanted to replace the axles with titanium, but they seemed too expensive for the weight benefit so I concentrated on the larger bolts (8 - 10 mm). The triple clamp bolts were changed including the stem pinch bolt and the front brake caliper bolts. A nice front axle titanium nut was available so that went on too, but it was more for cosmetic fun then actual weight savings.
The small bolts in the adjustable cam drive sprockets are now titanium. In this case, the high rotating speed change made the substitution worthwhile. Finally, I used a titanium banjo bolt for the Brembo brake master cylinder.
A non-titanium modification was designed and built for the rear axle spools/crash buffers. A length of all-thread rod was used in the hollow axle to join the spools together. I liked this solution because it can be easily disassembled. On some of my other motorcycles, the spools are attached to the swingarm.
Originally, I wasn't going to modify the engine at all aside from external tuning with free-flow mufflers, open airbox and a re-flashed ECU. That and the usual service items like new cam belts, valve adjustment, etc. From my experience with cars, I thought that some head porting would help the power. One thing lead to another and before I knew it, I had found a set of new 94mm Wossner pistons on eBay. You can probably see where this is going. These are really nice, high-tech light weight forged pistons so I thought it was worth a try.
When I did the weights, the Wossner 94mm piston with pin weighed 354 grams while the standard Ducati 92mm piston/pin weighed 425 grams! Combining the weights of 2 pistons, the larger bore pistons saved 142 grams over the standard parts.

94mm Wossner Piston
I thought this was as far as I wanted to go. Big bore high-compression pistons, ported head and dialed cams. As we will see, it is indeed a slippery slope.
During the time that the cylinders were being bored and plated, I researched the difference in gear ratio sets on various websites. It was evident that there was an option to put a close ratio gear set into the 900SS by using a gear set from an injected 900 Monster. I looked to see if any were available on eBay just for fun. Big mistake! Next thing I knew, I had bought an M900 transmission complete with shift forks and shift drum so the plan was to wait and see if I wanted to install it or not. I could always sell it if I didn't use it.
When I received the transmission, I measured all of the wear points against the factory specs and found that it was almost perfect with no discernible wear on the forks, sliders and drum. My own experience doing track days told me that any acceleration advantage possible on a long straightaway is important when riding an air-cooled Ducati. Long story, short, I took the engine cases apart.

Close Ratio Gear Set
I was actually looking forward to putting the heads on the flow bench. Before a head is ready for flow testing, a significant amount of work is involved. I was very focused on simulating all the conditions possible to replicate the environment of the head as it sits on the engine. Some cylinder head specialist just flow the head by itself. Others add the intake manifold and an exhaust stub.

Ducati 900SS Cylinder Head on Flowbench
When I designed the holding fixture for the Ducati heads on the flow bench, I used the actual cylinder from the engine along with the intake system out to the air horn and the header. The cylinder was already bored to 94mm. The actual throttle body intake system was not used; instead I used a internal sized spacer that was the same size.
Using a replica of the factory intake system on the flow bench helps keep the airflow measurements more accurate. If a head porter uses a radius inlet at the cylinder head port entrance, the flow bench readings can be too optimistic as the air can enter the port from side angles instead of from the intake manifold path. This is especially true with intake ports that are off axis from the valve centerline (like the air-cooled Ducs). For the exhaust, the opposite can be true. The header or test pipe can help improve the flow slightly. What is important here is that accurate data is recorded, especially when an engine simulation program is using that data.
I tested both the horizontal head and the vertical head and was surprised at how different they were above .300" of lift. Usually, the part of the flow curve below .300" represents flow influenced most by the valve/seat interface and the part of the curve above that is more influenced by the port shape and size. The horizontal head had a worse intake port than the vertical head. I had to work really hard to even them out.
I did use the larger 44mm intake valve so I could make a better seat profile. The test results showed that I was more successful in that area of improvement than in the port itself, which explains why some head guys resort to welding up the ports. I just didn't want to go there. The goal was to improve the intake flow because I knew the weak point was the intake.

Ducati 900SS Ported Cylinder head
I didn't work much on the exhaust; the target for the exhaust to intake flow ratio is .75 and I got close.
One of the parts I definitely wanted on the 900SS was a slipper clutch – if the engine hadn’t been modified a stock clutch would have worked fine, but I figured a high-compression twin cylinder 944cc engine needed a back-torque limiting device for track use. This was one of my concessions to paying for something extra.

Ducabike 900SS Slipper Clutch
Back at the shop, the new slipper clutch went in smoothly. I used the factory shop manual and the Ducabike instructions. The main difference was the order of clutch plates, and the spring pre-load, which is adjustable with washers. I had to be careful loading the small ball bearings into the unloading ramps, and lots of grease helped hold them in place.
To cover the clutch, I bought a SpeedyMoto cover from Craig’s List. I decided to get it powder coated a flat bronze color which went well with the standard Ducati side cover color and toned down the bright red Ducabike clutch plate. The clutch cover was heavy duty to protect the expensive clutch parts in case of a tip-over.
On that same trip, I picked up a Lithium battery (YB16AL-A2) at the Antigravity warehouse. I saved 8.7 lbs. from this alone. It is a very inexpensive weight reduction especially since it is mounted up high on the bike.

Ducati 900SS Adjustable Cam Pulley
I decided to add adjustable cam sprockets to the engine. I was able to buy a pair of late model Ducati adjustable sprockets on eBay and proceeded to modify them. My machinist milled out lightening slots in the back part of the 2-piece sprocket and then I added some titanium bolts to hold it together and I saved some weight doing this.
I knew I wanted to replace the output shaft bearing when I replaced the transmission as it takes a beating. The other bearings I guessed would be ok as the bike had low miles on it (10K).
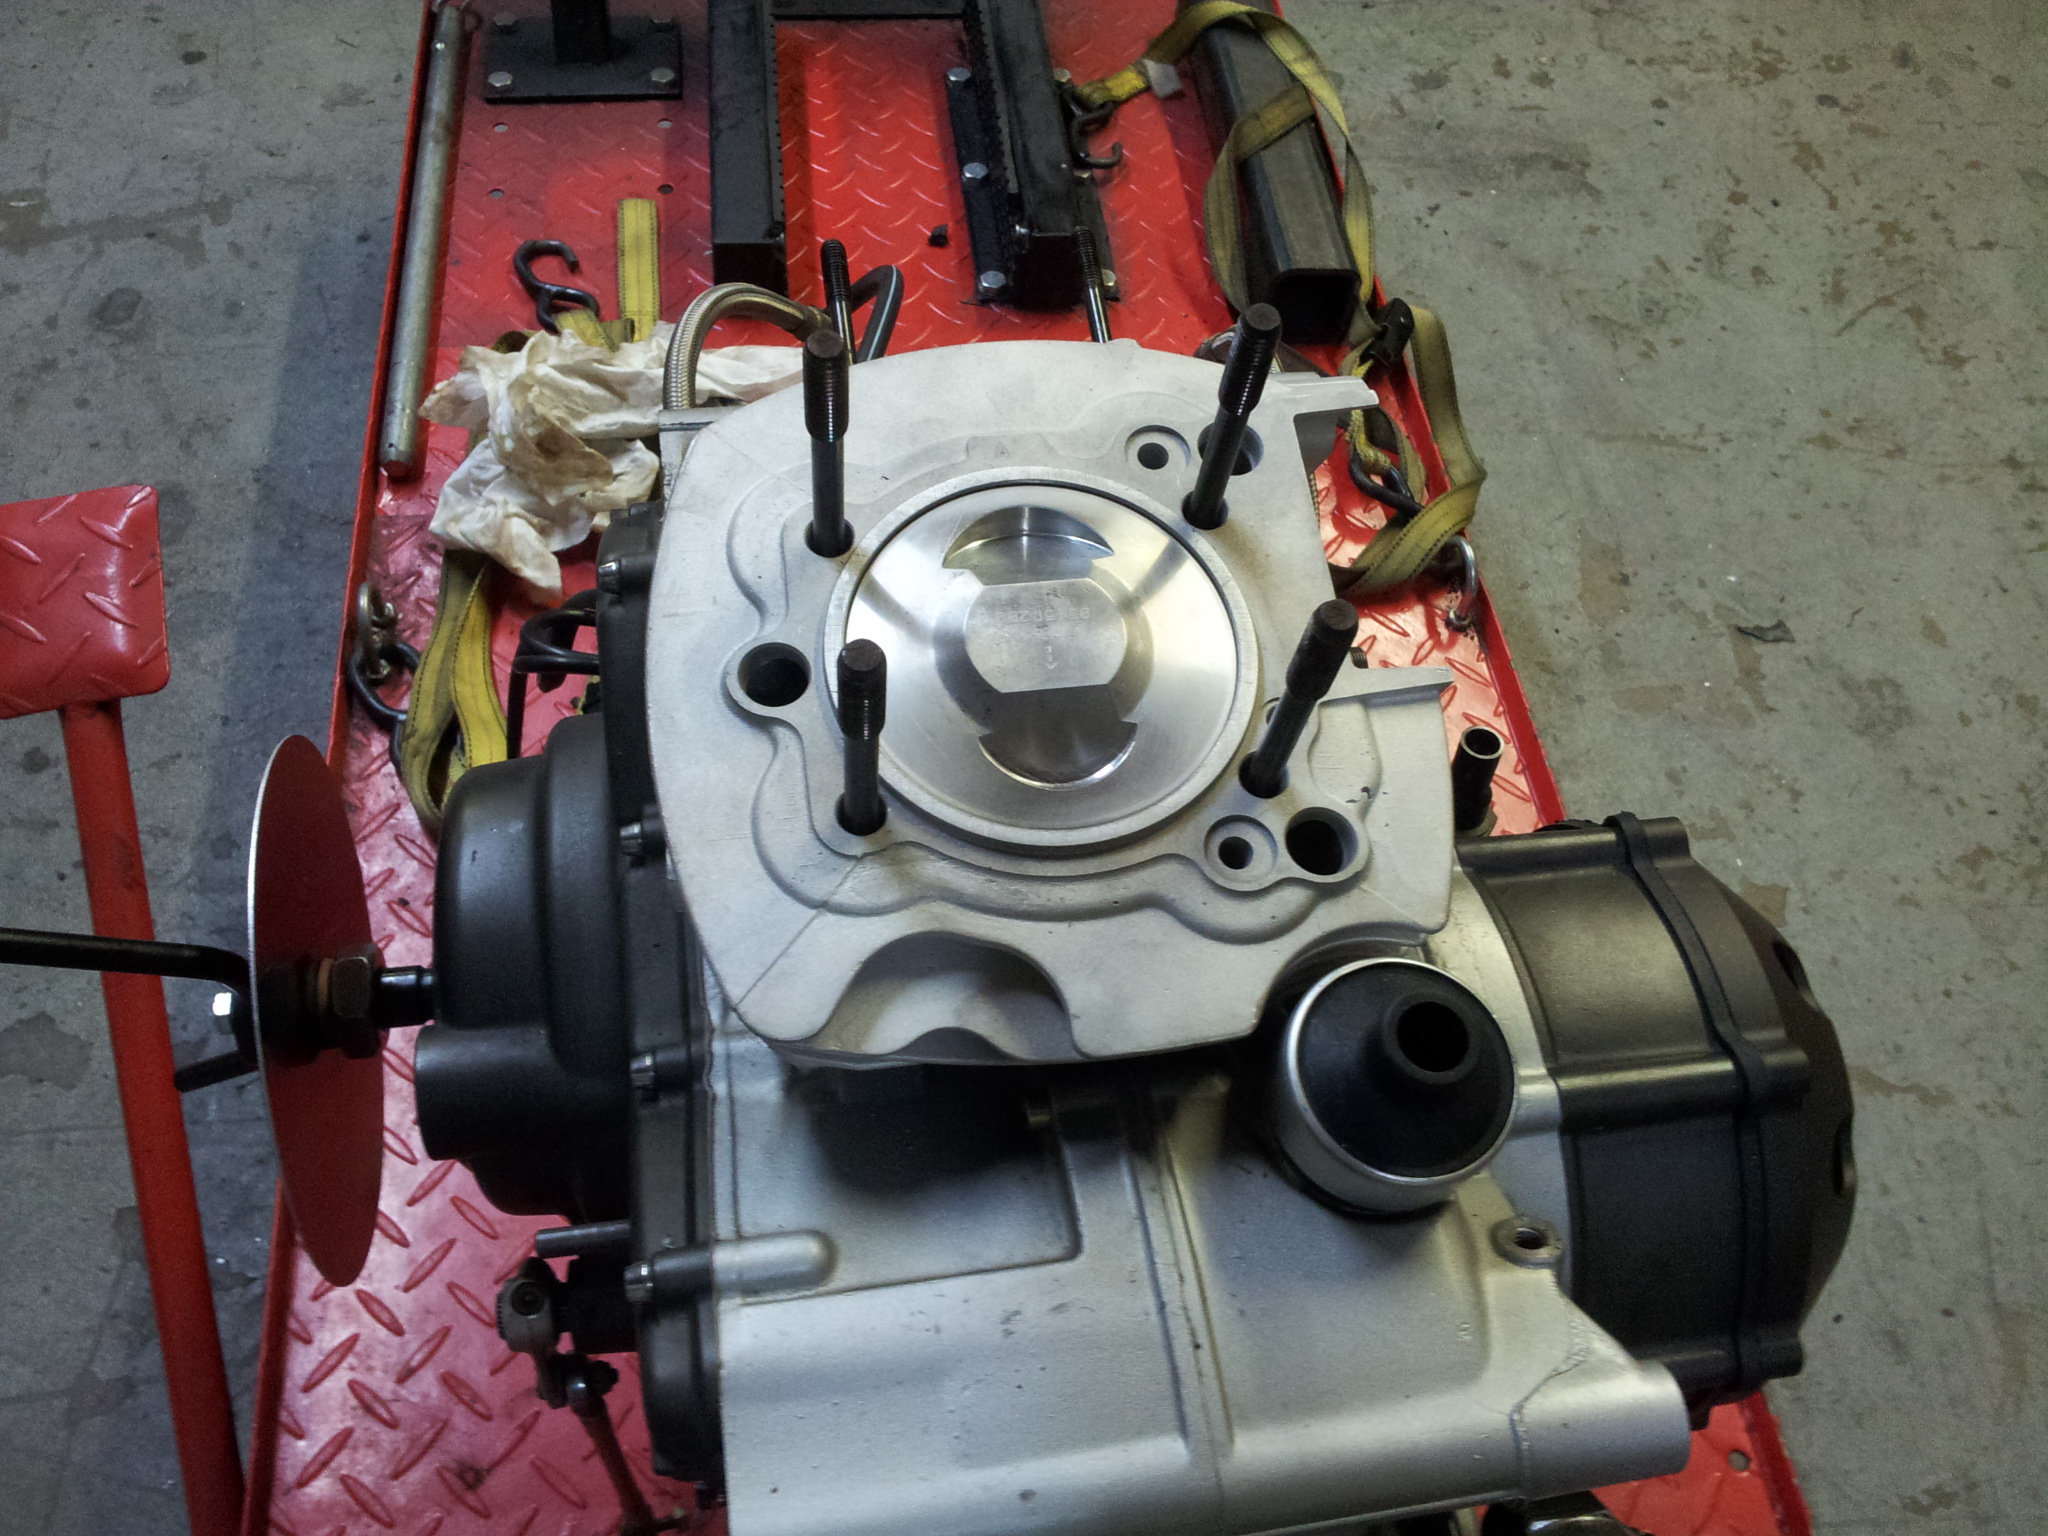
The fun really started now: I removed the case covers, the freshly installed slipper clutch, the flywheel, starter clutch, and oil pump, etc. until the engine case was ready to split.
I removed the connecting rods to check the bearings and they all looked great. Ducati recommends replacing the rod bolts if they are removed, and wanting to avoid a costly mistake I replaced them .

Ducati 900SS Engine Side Disassembled
Now to the transmission installation: I did everything by the book (it helps to have the factory manual); set the shaft end float, trial shifted the gears (I had the cases apart a few times) and used the factory gear selector tool to finish the set-up.
Finally, I applied the sacred Ducati goo on the case half and put the cases together for the (fingers crossed) last time. After that was done, I wouldn't know if it worked properly until I rode it for the first time.
As they say, assembly is the reverse of disassembly. The gears, oil pump, covers, etc. went back on. Also the clutch was reassembled for the 2nd time. The engine looked a lot cleaner than before so I was beginning to feel better about it.
The pistons were test fitted to the connecting rods and the cylinders were installed with the old base gaskets to check the deck height. The squish clearance was at 0.050" which is about right. The contour on the Wossner piston top matched the head nicely. You can see in the photo that the 94mm piston had a slightly different compression height which optimized the piston-to-head clearance. The valve reliefs were also deeper. I did a trial set-up with the belts installed to check the squish and valve-to-piston clearance and all was good.
Ducati 900SS Checking Deck Height
With the test fitting done, the new piston rings were installed (I had previously checked the gaps) and the pistons slipped into the bottom of the cylinders. I guided the cylinder assembly over the studs until the piston pin lined-up with the rod small end, and the clips were installed. With everything pushed down tight, the next step was the head installation.
The head installation was easy; 4 nuts on each head, torqued to spec and it’s done, and the cam drive/belt system was installed and timed.
I set cam timing initially to the factory settings, and next used a degree wheel and a dial indicator to fine-tune the timing. I decided on an intake lobe center of 106° as I wanted maximum torque at the possible expense of a few ponies on the top end. This coincided with my decision to use two long air horns in the air box. These changes were based on my engine simulation work.

Ducati 900SS Checking Cam Timing
The project was gathering momentum; the engine was buttoned up so it was time to put it in the frame. With 2 people, hoisting the frame up and over the engine and installing the mounting bolts was relatively easy. We had to block up the engine so it wouldn't move around, but that was about it.
Next the electricals, hydraulics, fuel system and mechanical bits were installed. I think the most difficult part was installing the throttle bodies, which ended up being a wrestling match. All in all it went together without any huge drama.
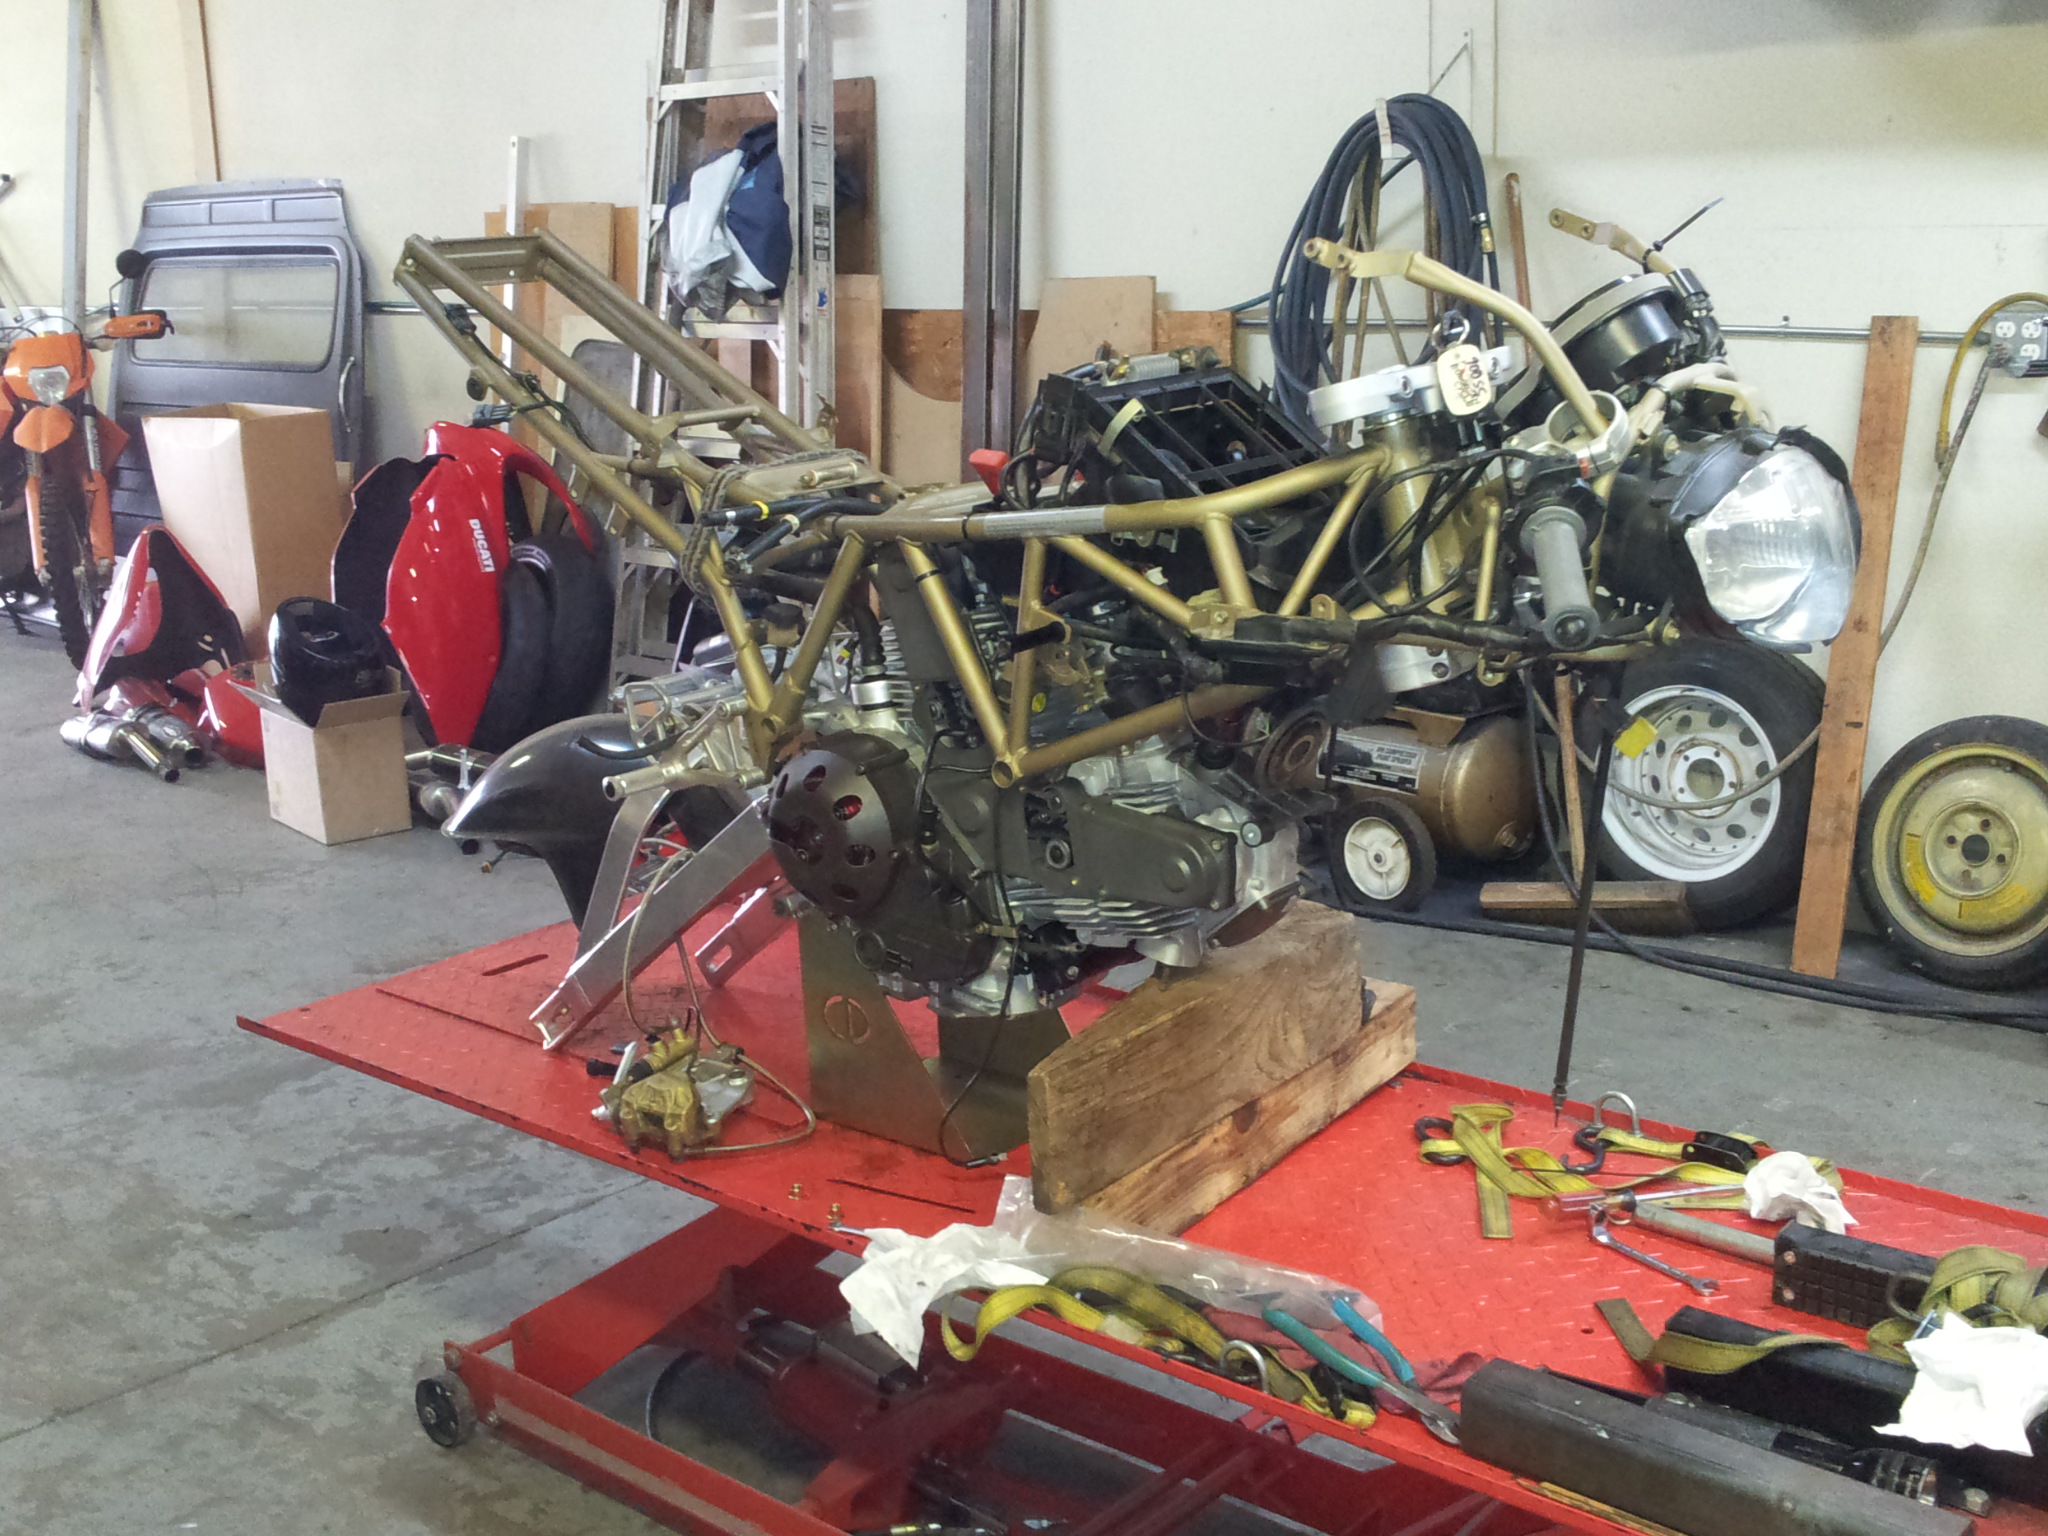
Attaching Engine to Frame Ducati 900SS
Suspension, wheels and brakes were the next items on the reassembly list.

Ducati 900SS Before Fairings Are Installed
After the chassis was mostly assembled, I turned my attention to the bodywork. I had removed the lightweight Sharkskinz fairing from the donor 750SS. Now, I had to make it fit the 900SS and install the air-cooling ductwork.
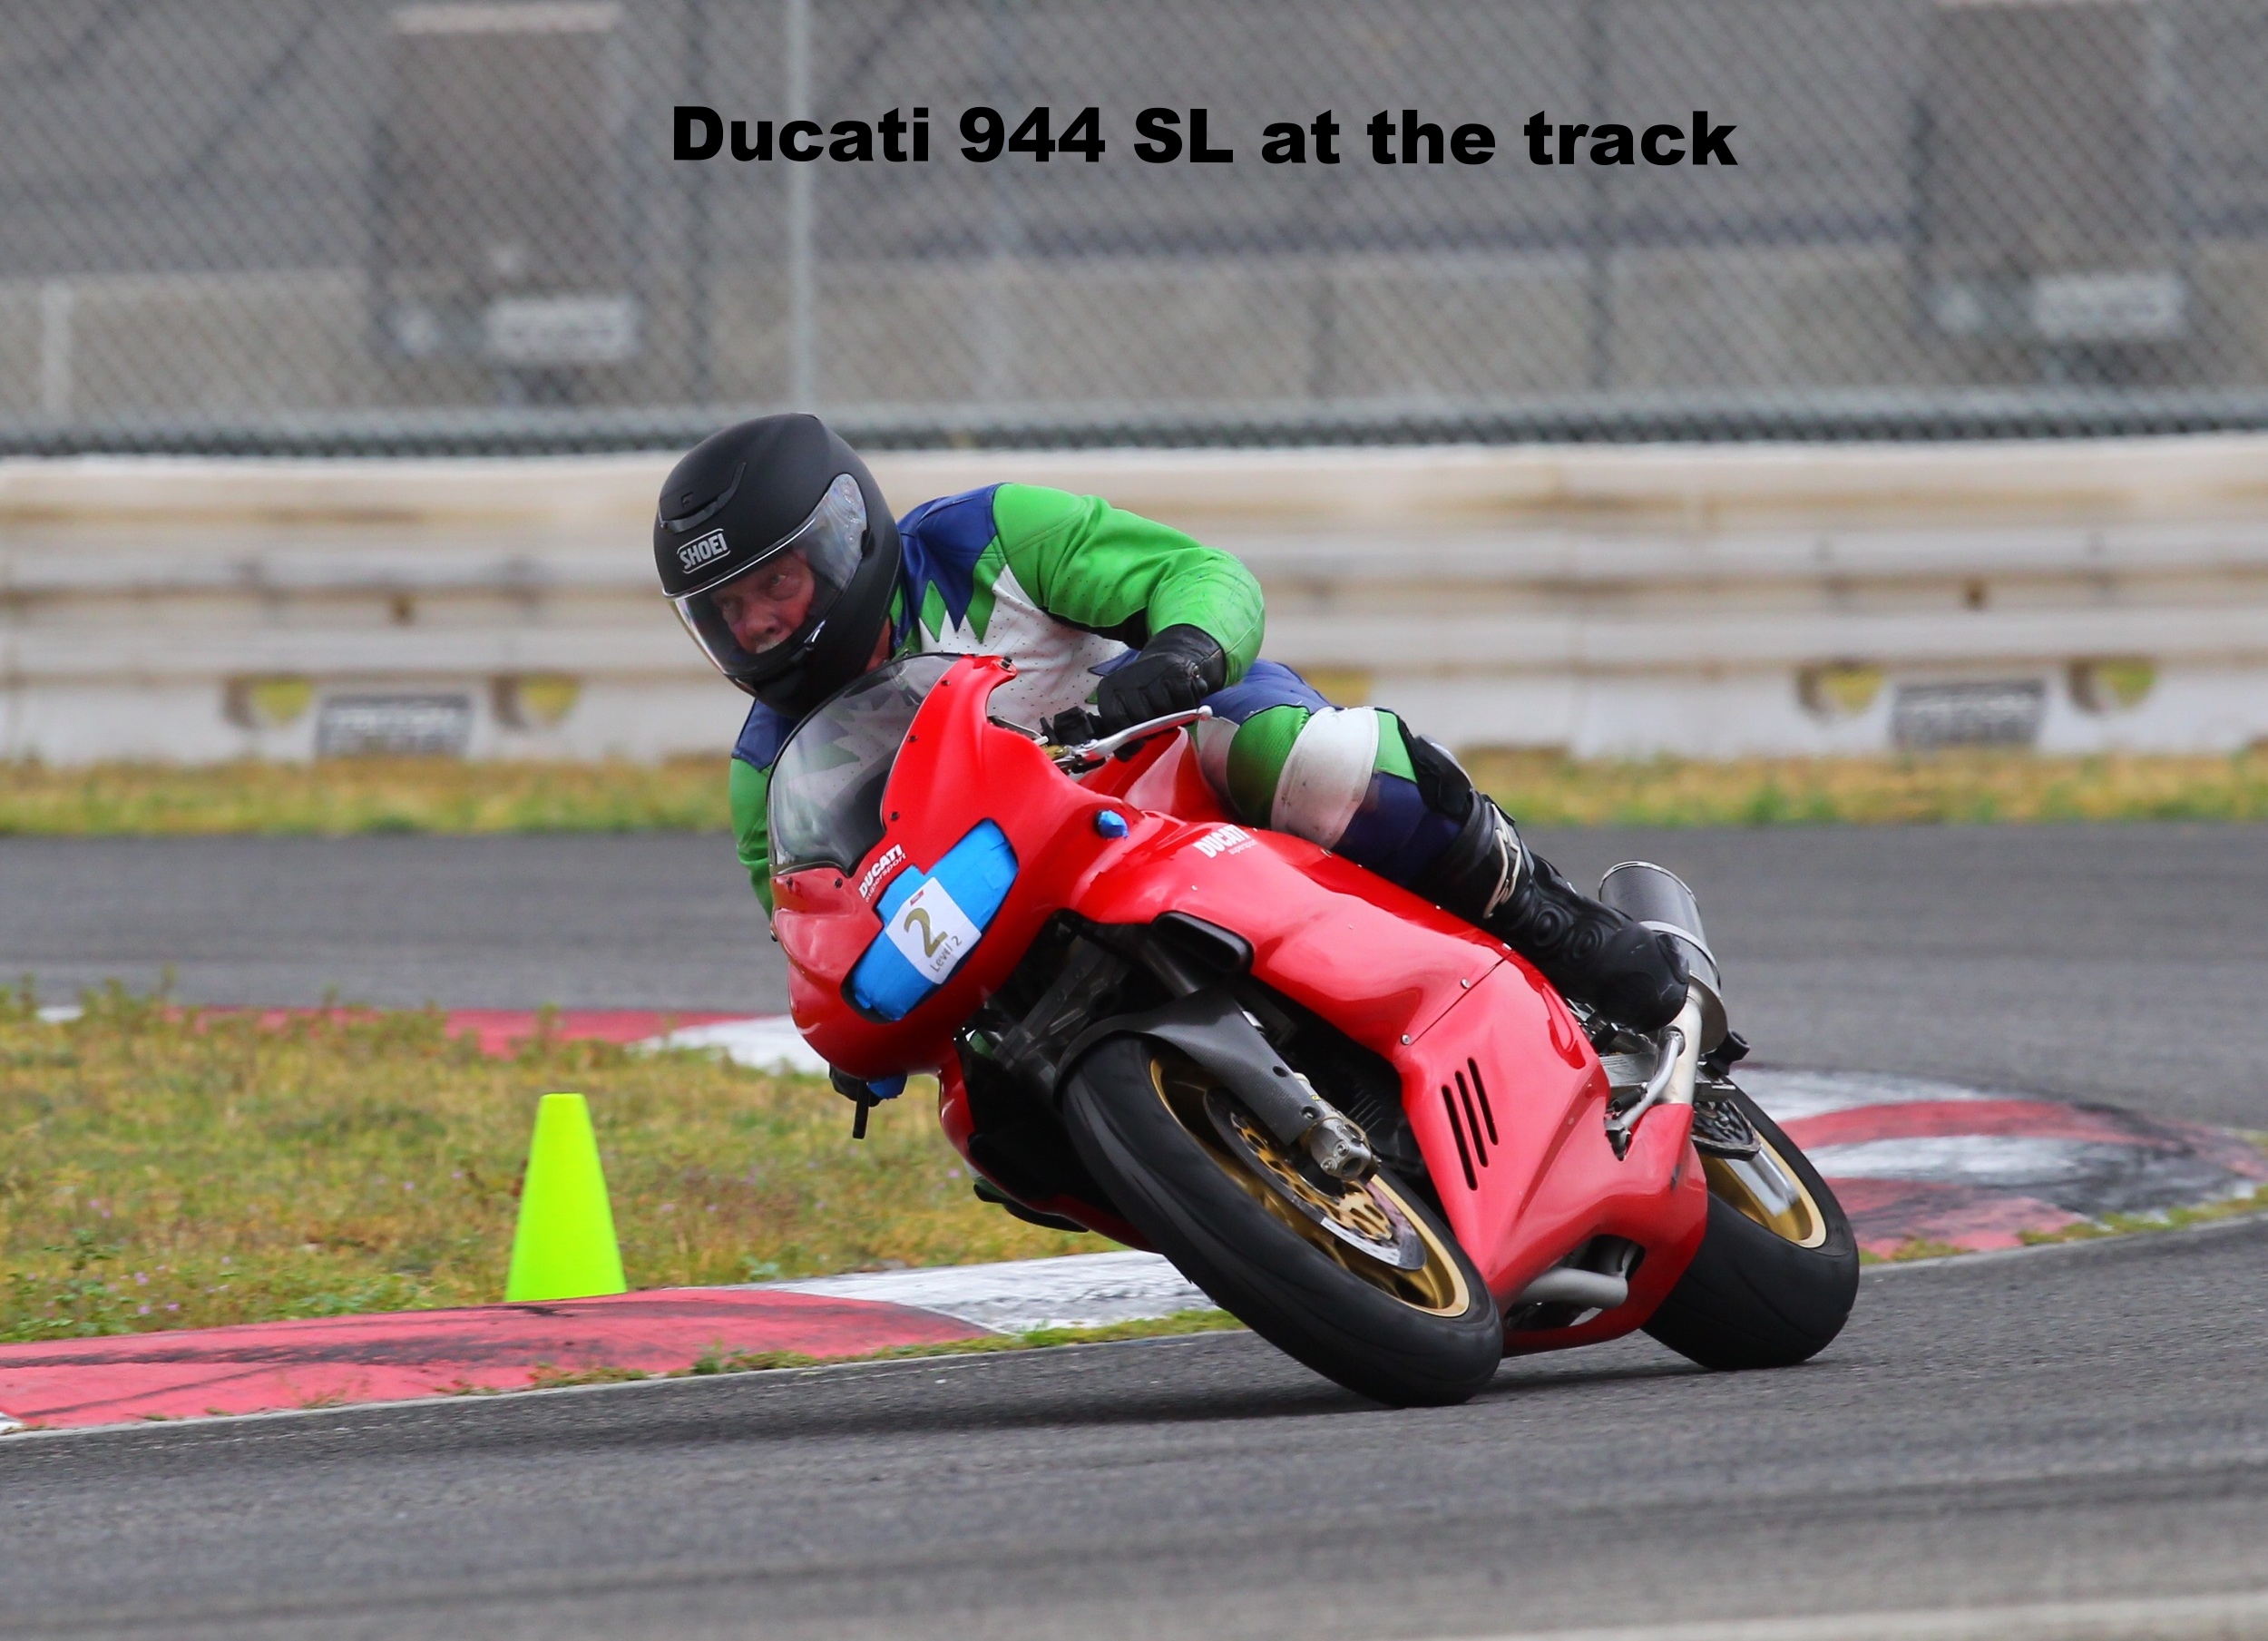
Some would ask, "why bother with the air ducts"? The previous owner of the 750SS must have thought that as they weren't installed. I figured that, just maybe, the Ducati engineers know a thing or two about air-cooling on their V-twins. I have read that the air ducts are worth 70°F of cooling on the rear cylinder. If it was worth the R&D for them, it was good enough for me. To keep the lightweight theme going, I ordered a fiberglass pair of front ducts from AirTech and used the rear air deflectors from the original fairings. I intended to do track days in Southern California and might need the extra cooling.

Installing Air Ducts to Fairing Ducati 900SS
The other issue to deal with was the fuel tank. The donor 750SS had an ETI-Fuelcel Kevlar tank that was seeping gas on the rear edge. The previous owner said he had sent it back to the company for repairs before I bought it. When I took the 750SS apart, I sent it to ETI (actually I delivered it as they are local) for further repair and the tank was repaired and sealed.
The tank I have is the "Sprint" version, which is smaller (lower) than the original tank and doesn't have the "hump" on the rear of the tank. I like it because it saves 9.5 lbs. over the stock fuel tank and it is more comfortable to ride as it fits my body better.

ETI Fuel Tank for Ducati 900SS
With the bodywork done, the bike was taking shape. But, before the final mounting of the bodywork, I wanted to start the engine and test ride it without the fairing so any needed mechanical work could be done without removing the fairing again – the Sharkskinz fairing isn't easy to remove as the upper and mid parts are one piece.

Ready for a Test Drive Ducati 900SS
The engine started right up and sounded great. The carbon cans weren't doing a lot of muffling so the pure Ducati sound came through. The added compression to the engine sure made it sound better; it had really strong throttle response.
After a quick around the building test, I was off for the first ride. The Duc looked very odd without the fairing and with the mirrors bolted to stays. That didn't dampen my enthusiasm during the test ride. This bike rocks! the chassis felt really tight and solid while the close ratio gearbox kept the engine in the meat of the power curve. Of course, I was trying to break the engine in so I didn't use all of the power available.
The handling was almost telepathic and the brakes – Wow! The combination of the Brembo radial M/C, full-floating iron rotors and soft pads gave a huge amount of stopping power and feedback. Definitely the best brakes I have experienced.
After the test, the body work went on. After some break-in miles (about 100 miles) to seat the new rings, it was off to the dyno.

Dyno Test for Ducati 900SS
I was definitely nervous to see what the dyno would say about the power. My simulation predicted about 90 HP, but engine simulation programs are for seeing if changes to the engine components make an improvement and not for hitting the peak power numbers perfectly.
The 900SS was tied down to the dyno with an air-fuel probe stuffed up the right muffler. Richard, the dyno operator, started the engine (it sounded great) and proceeded to warm things up before the first pull. On the first pull, I thought the engine would explode from the volume of noise coming out of the pipes; it was really loud (maybe I needed to do some repacking!).
After 3 pulls, Richard shut down the engine and I approached him to see what the result was. “You are going to disappointed” he said, “it only made 89.14 HP”. Not the 90 HP I had hoped for, but pretty darn close. See attached dyno graph. The torque was good too, approaching 70 lb-ft.
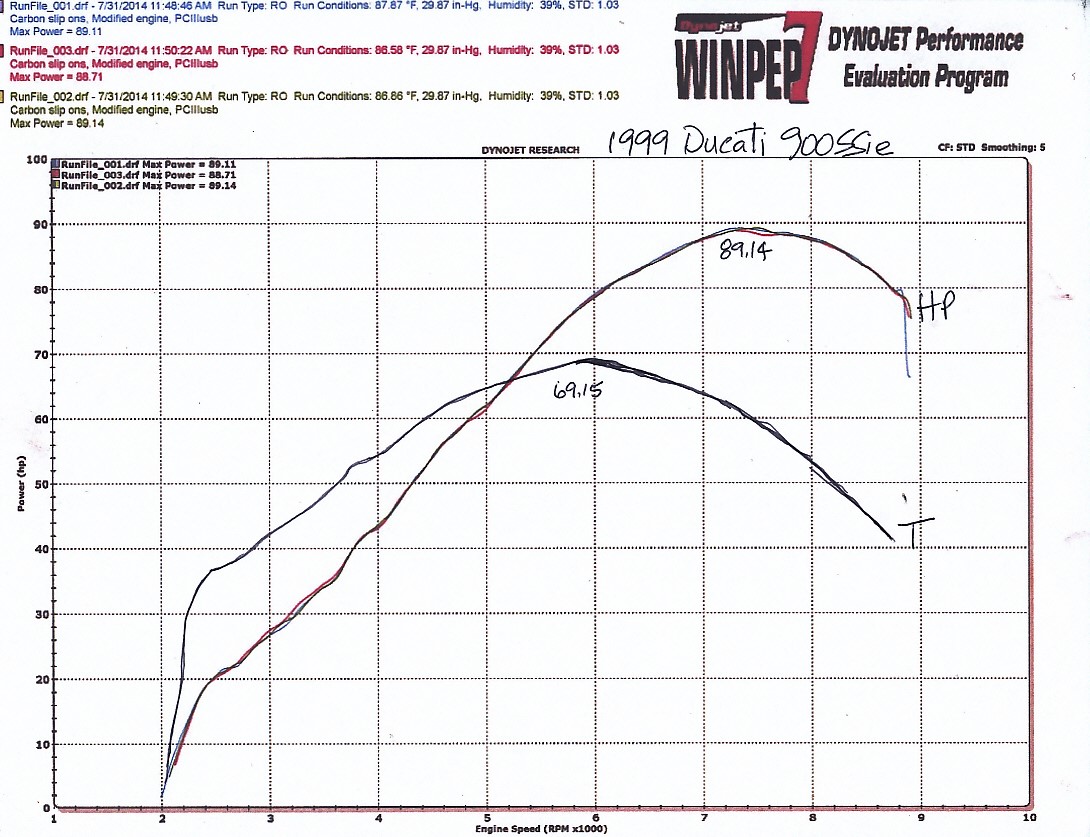
Dyno Results for Ducati 900SS
With the dyno test over, I also got an air/fuel ratio graph that showed some pronounced leaness below peak power. I had previously installed a Power Commander III unit and loaded an engine control map from the Dynojet website. I modified the values of the map due to the increased air flow in the engine. While I wasn't very far off, it needed some tweaking.
After re-mapping the lean portion of the curve, I test rode the bike and it felt great; better in the low speed range and the classic Ducati snachiness was much reduced. While I probably need to get the bike back on the dyno to double check the mixture, it feels so good that I haven't had much motivation to do it. A couple of other guys who have ridden the bike have said "it's perfect, don't mess with it".
On the chassis side, the springs were about right and the sag numbers were good, and I reduced the compression valves on both ends which gives a decent ride and good handling.
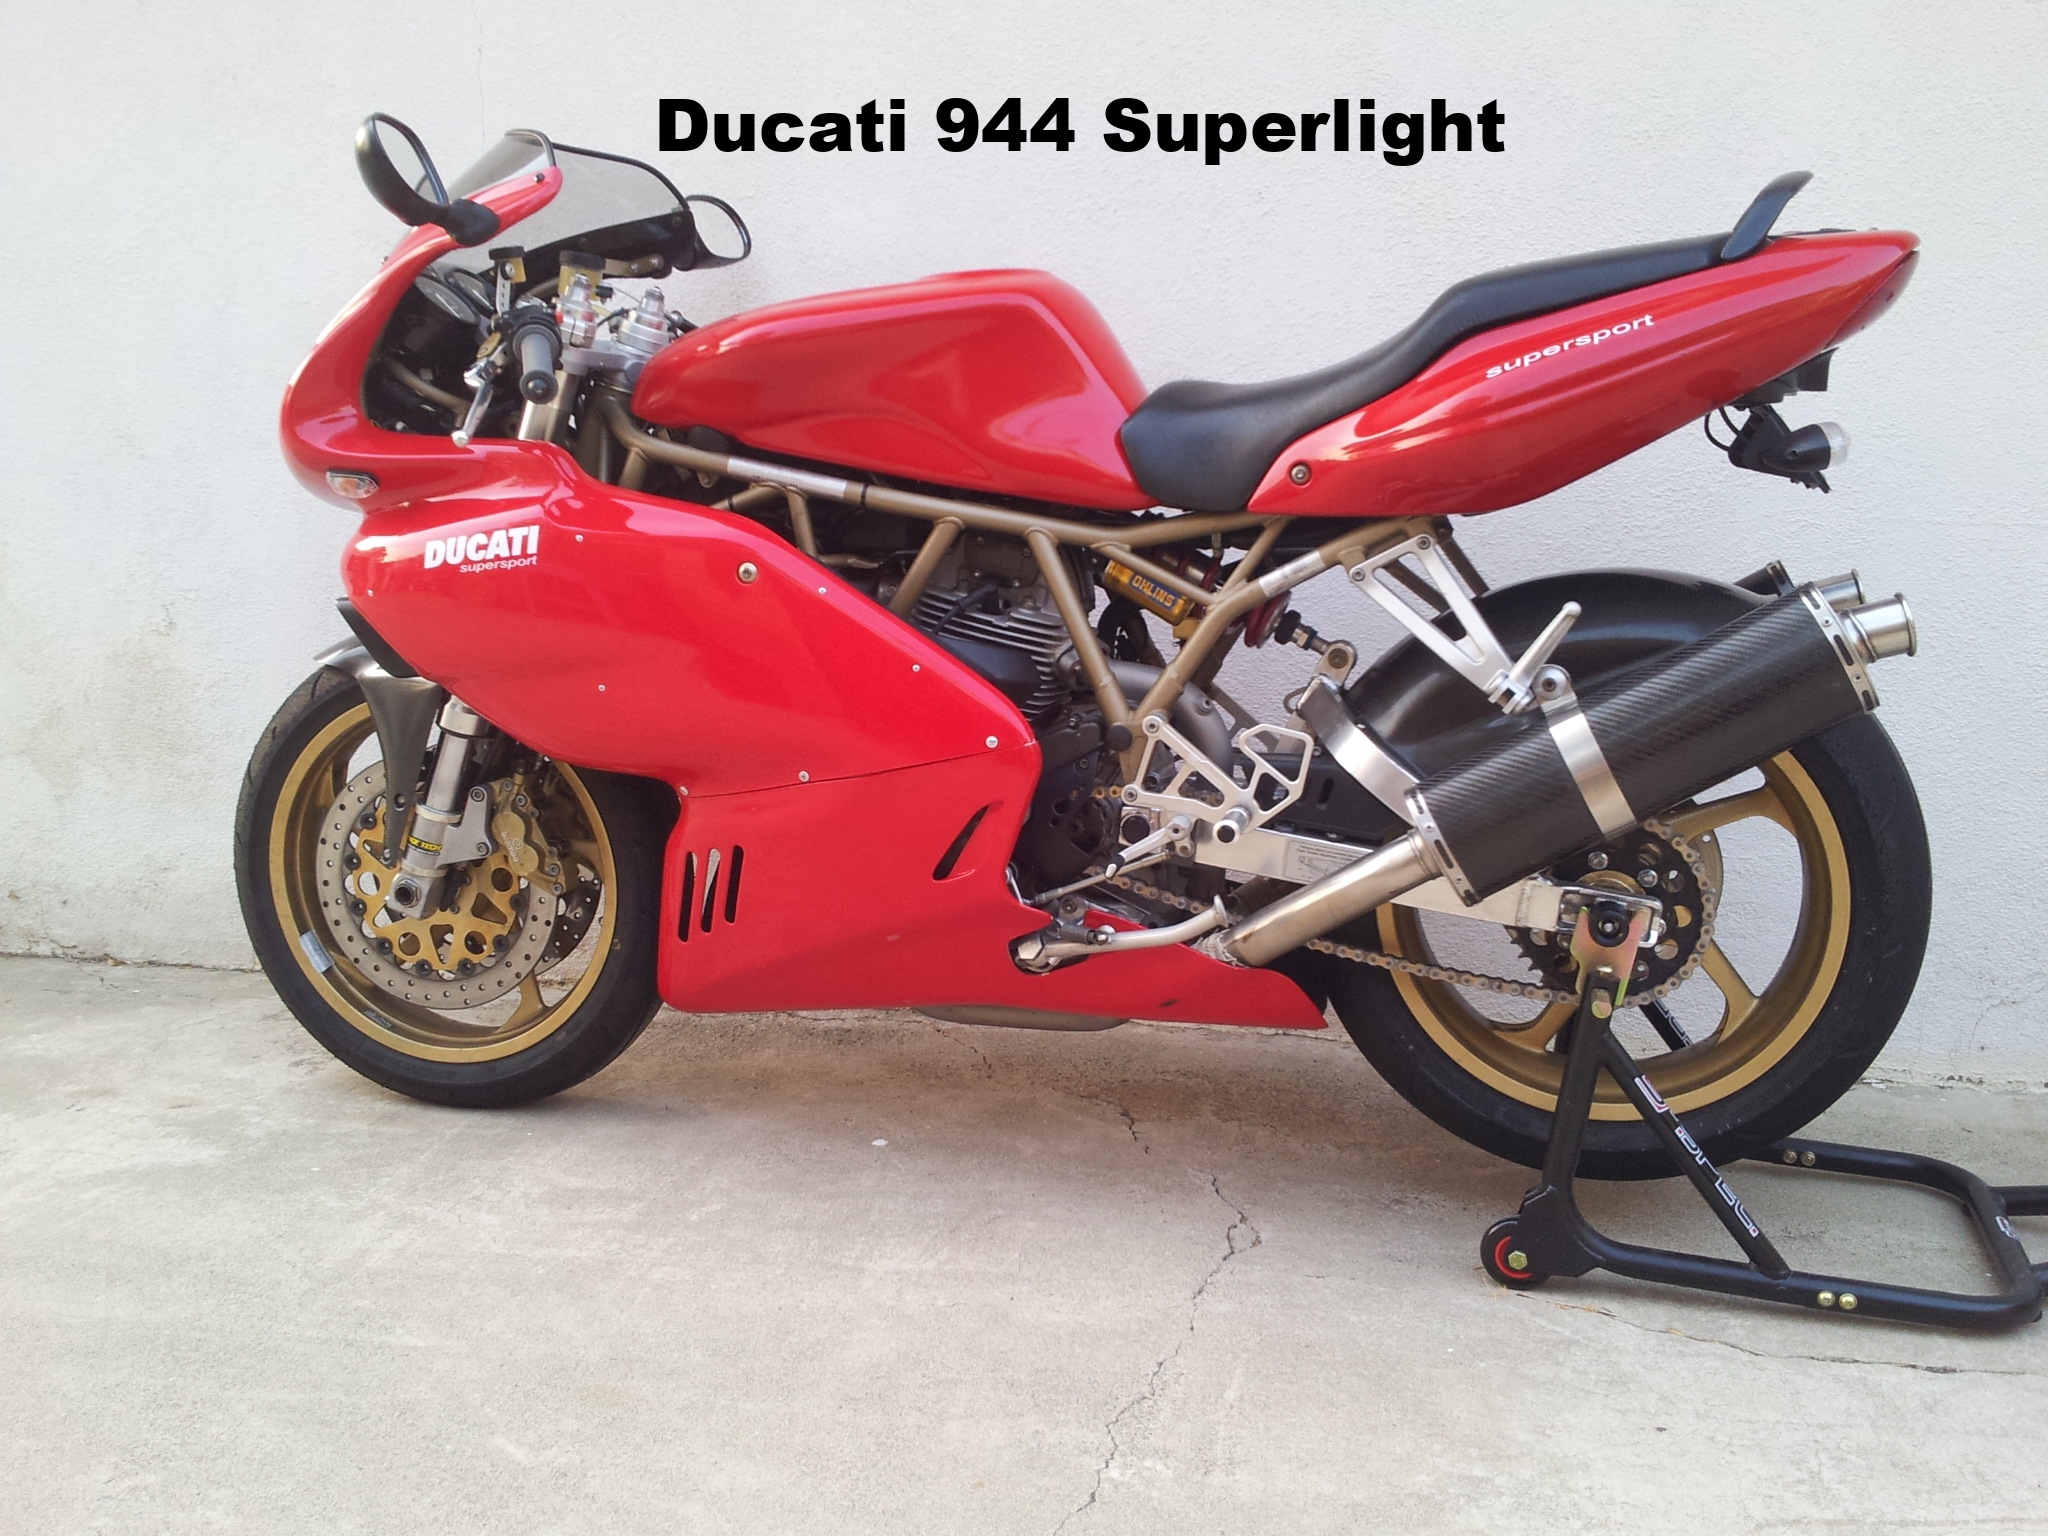
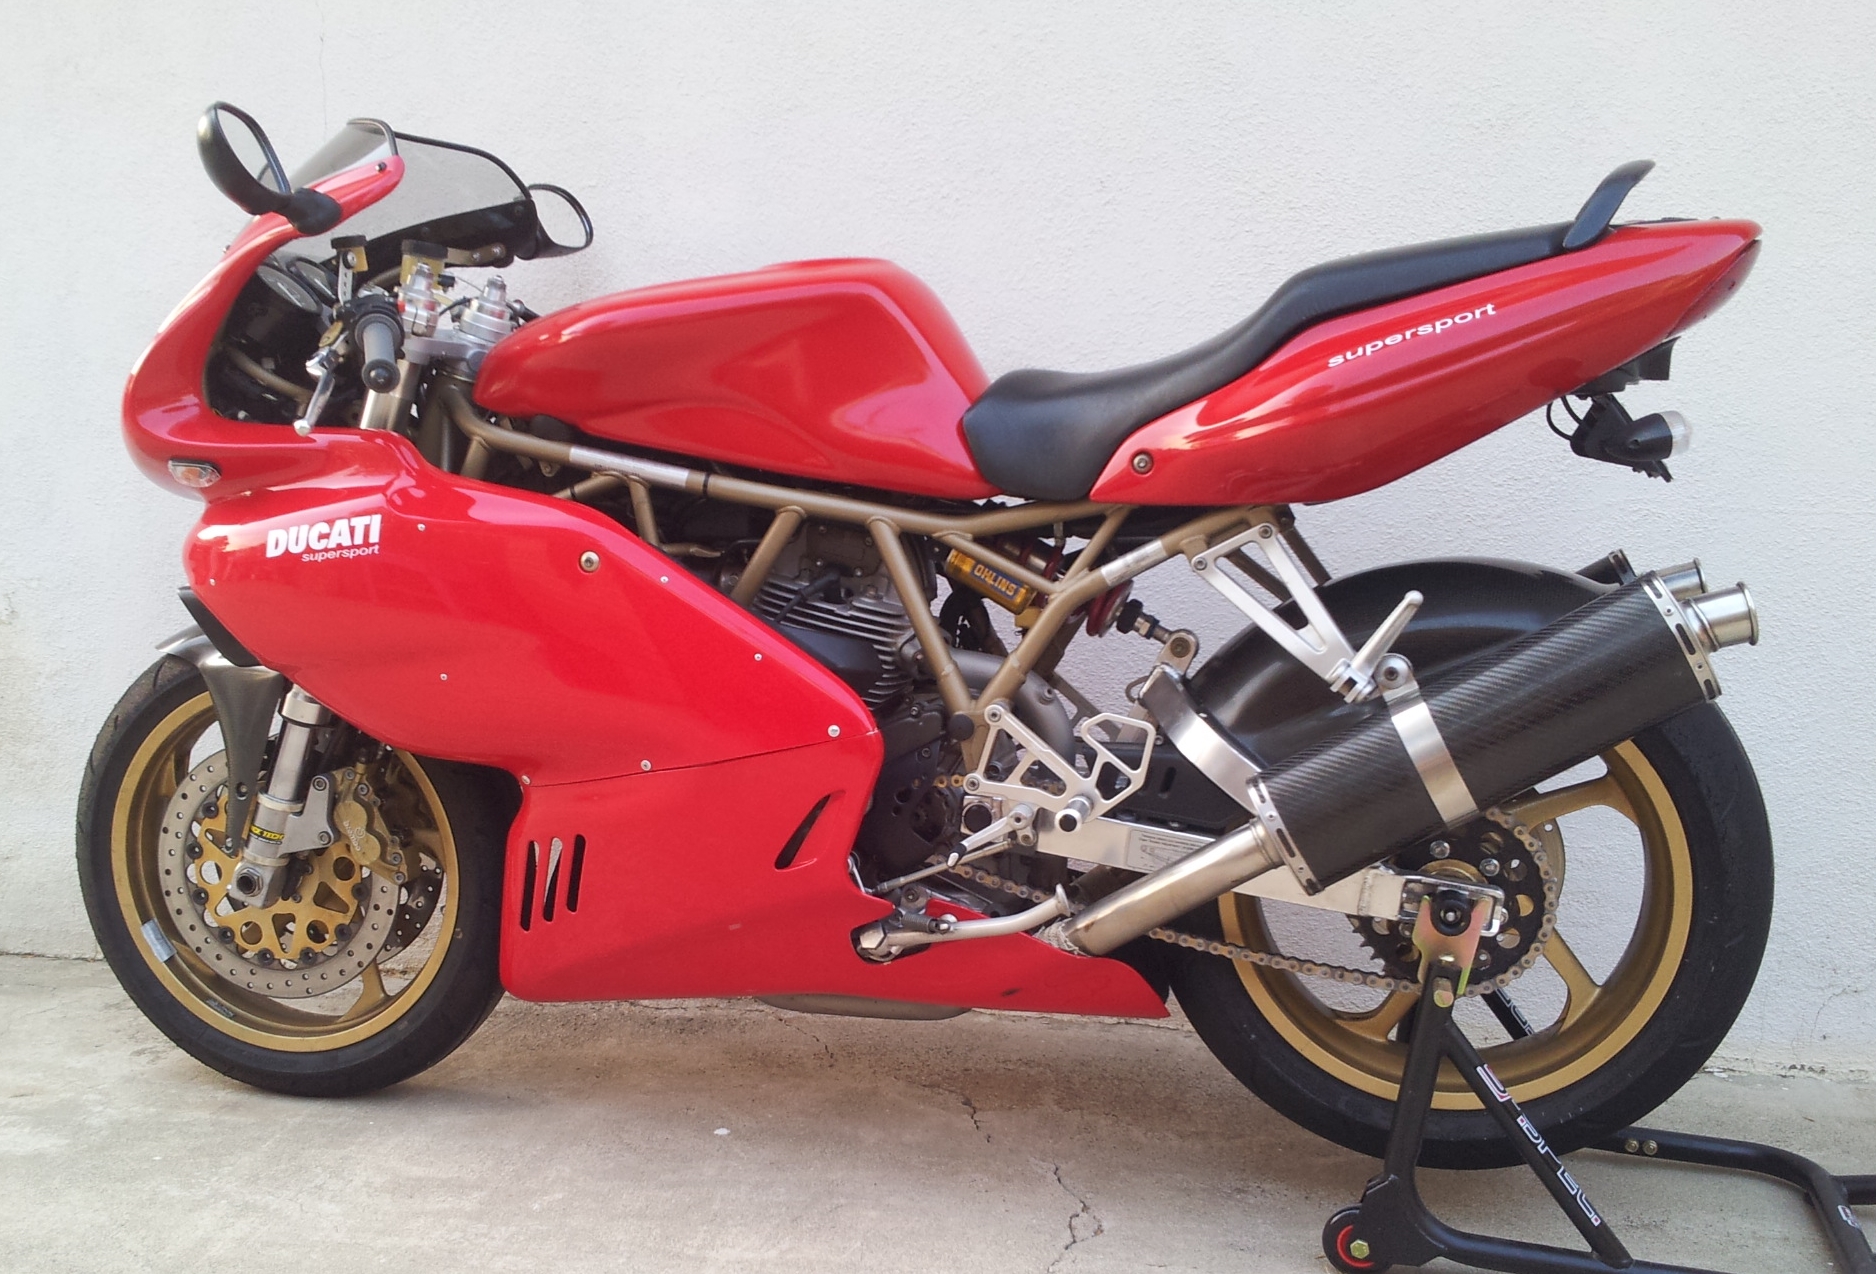
All things considered, the project was a success in producing a balanced, higher performance version of the 900SSie.
After I rode the bike I decided to add a ¼-turn throttle so that I could get to full throttle without having to grab the throttle twice. This happened numerous times after I realized that the throttle wasn't WFO. A company named Electraeon makes a replacement throttle cable cam that bolts onto the throttle body instead of the twist grip. When I test rode the bike again it was apparent that the throttle was quicker (about 30%), but the around town riding wasn't much affected (a good thing). Actually, I wouldn't have minded an even quicker throttle, but that’s just me. This modification is recommended for occasional/full-time track bikes.

Quick Throttle Installed on Ducati 900SS
That wraps-up this project.