

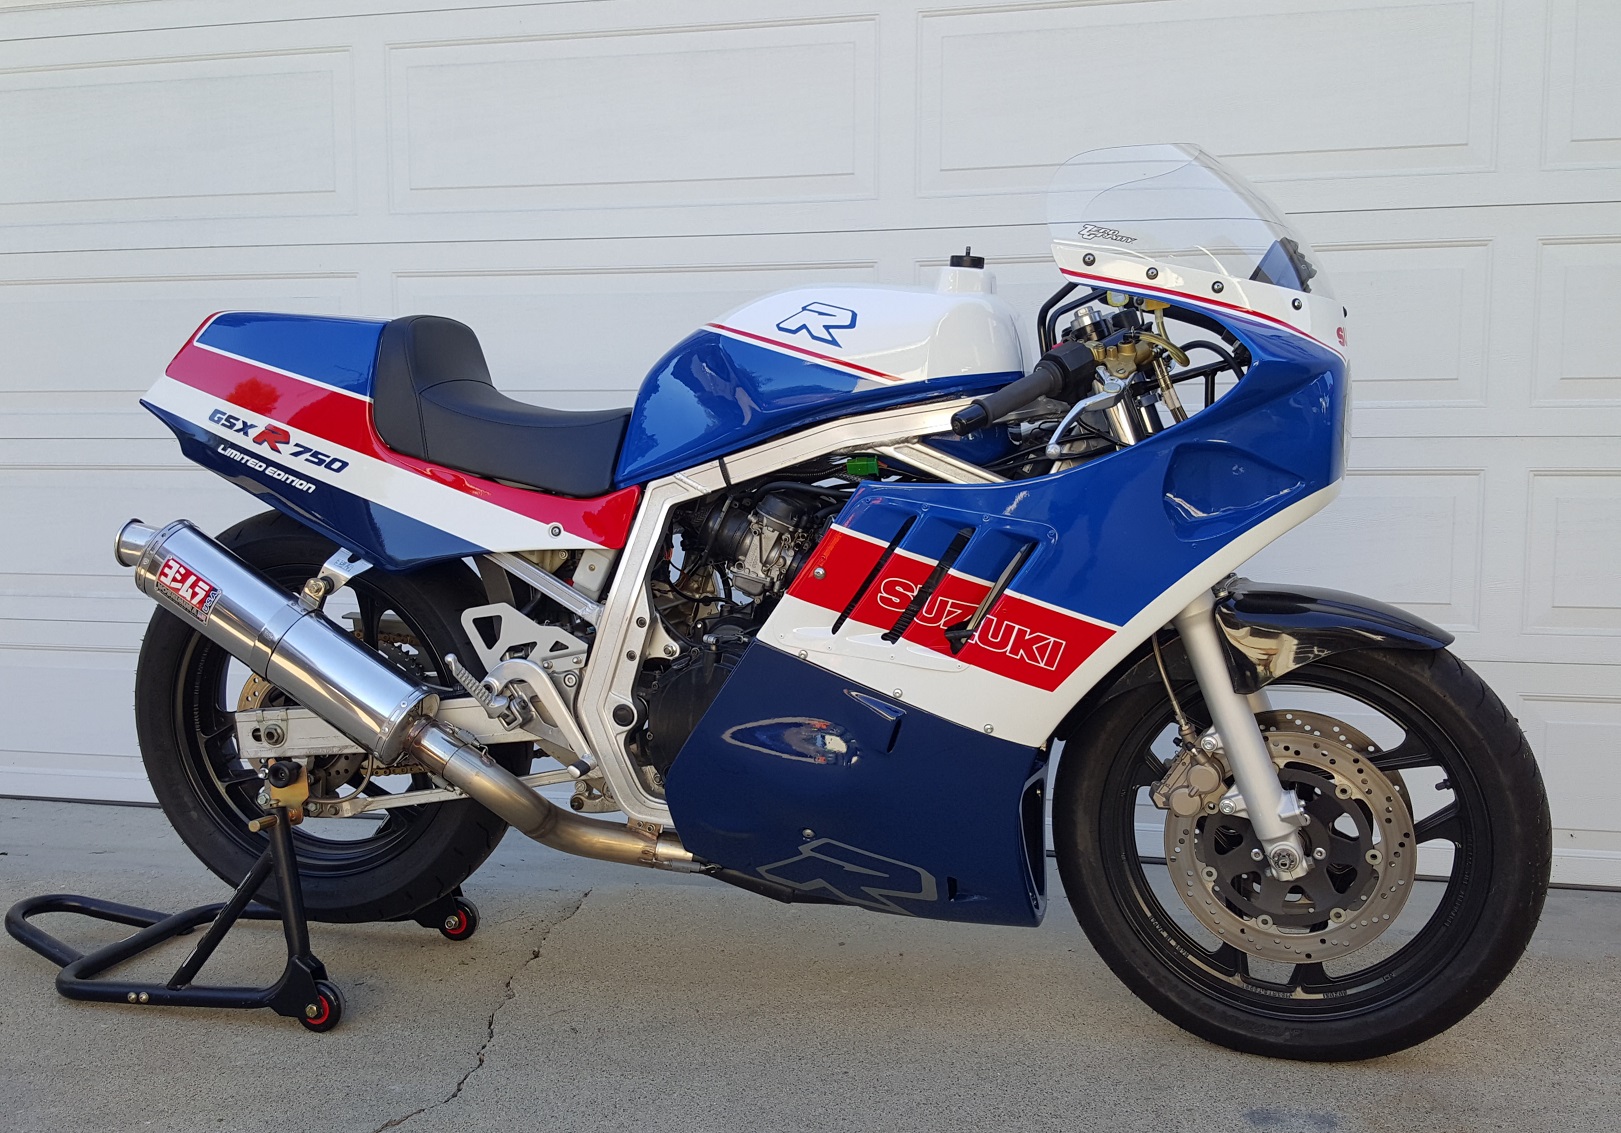
Suzuki GSX-R750, Side View
1986 Suzuki GSX-R750 Project
Initially, this project started out as an inexpensive way to put together a classic-period track bike. The bike was purchased as a semi-complete, non-running example of an early first generation GSX-R750 with the intent of stripping down and rebuilding it to run at the track.
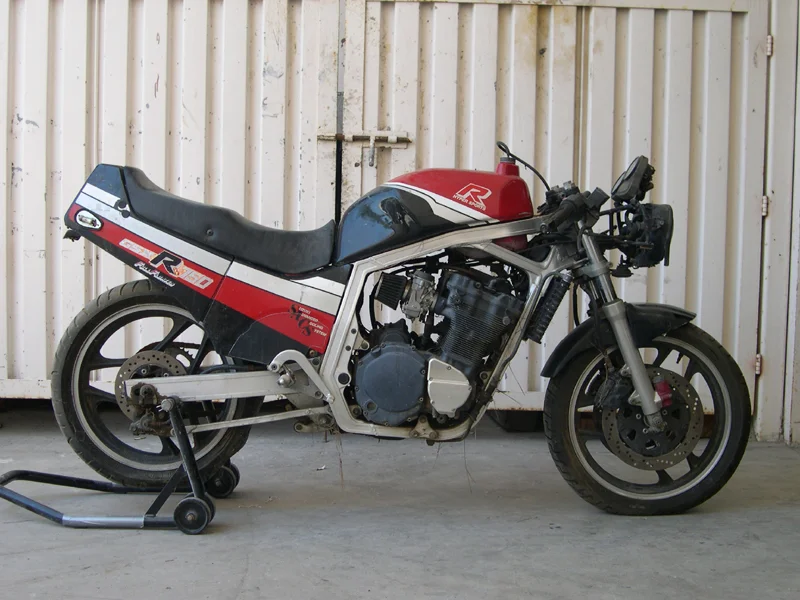
Original Suzuki Project Bike Before Rebuild
This project changed direction almost immediately when it was decided that adding more power would be fun. A second engine from a 1989 2nd generation GSX-R750 was purchased. From doing the research, it was found that the short-stroke Slingshot engine had more power in standard tune than the old small-valve, long-stroke engine. This was due to a much better cylinder head with bigger valves/ports, bigger carbs and more aggressive camshafts.
Part of the reason for buying the second engine was a secret desire to replicate the 1986 Limited Edition (LTD) version of the GSX-R. The Slingshot engine would allow for a cable operated clutch, which is what the LTD has, and would eliminate the clutch hydraulic slave cylinder on the counter shaft sprocket cover.
So, the goal of the project had shifted to making a fun classic track bike that mimicked the appearance of the LTD version. Another goal was to replicate, as closely as possible, the riding experience of a semi-professional Superbike from the 1986-‘87 racing era. Also, in the same spirit, to use as many original Suzuki/Yoshimura parts as was practical.
Part of this goal would entail keeping the original 18” wheels. Many self-proclaimed experts on the various internet forums decried this as antiquated and predicted poor results. We will see. My thought was that the 18” wheels were an integral part of the chassis/suspension design and the traditional appearance of the bike. Follow along as the details and results of the build are revealed.
Frame and Bodywork Modifications
The frame started life as a standard 1986 GSX-R750 unit. Part of the plan was keep the frame stock with only minor modifications as needed for a track bike. This included the swing arm; although many builders have gone down the braced swing arm route, an early decision was made to keep it in standard form.
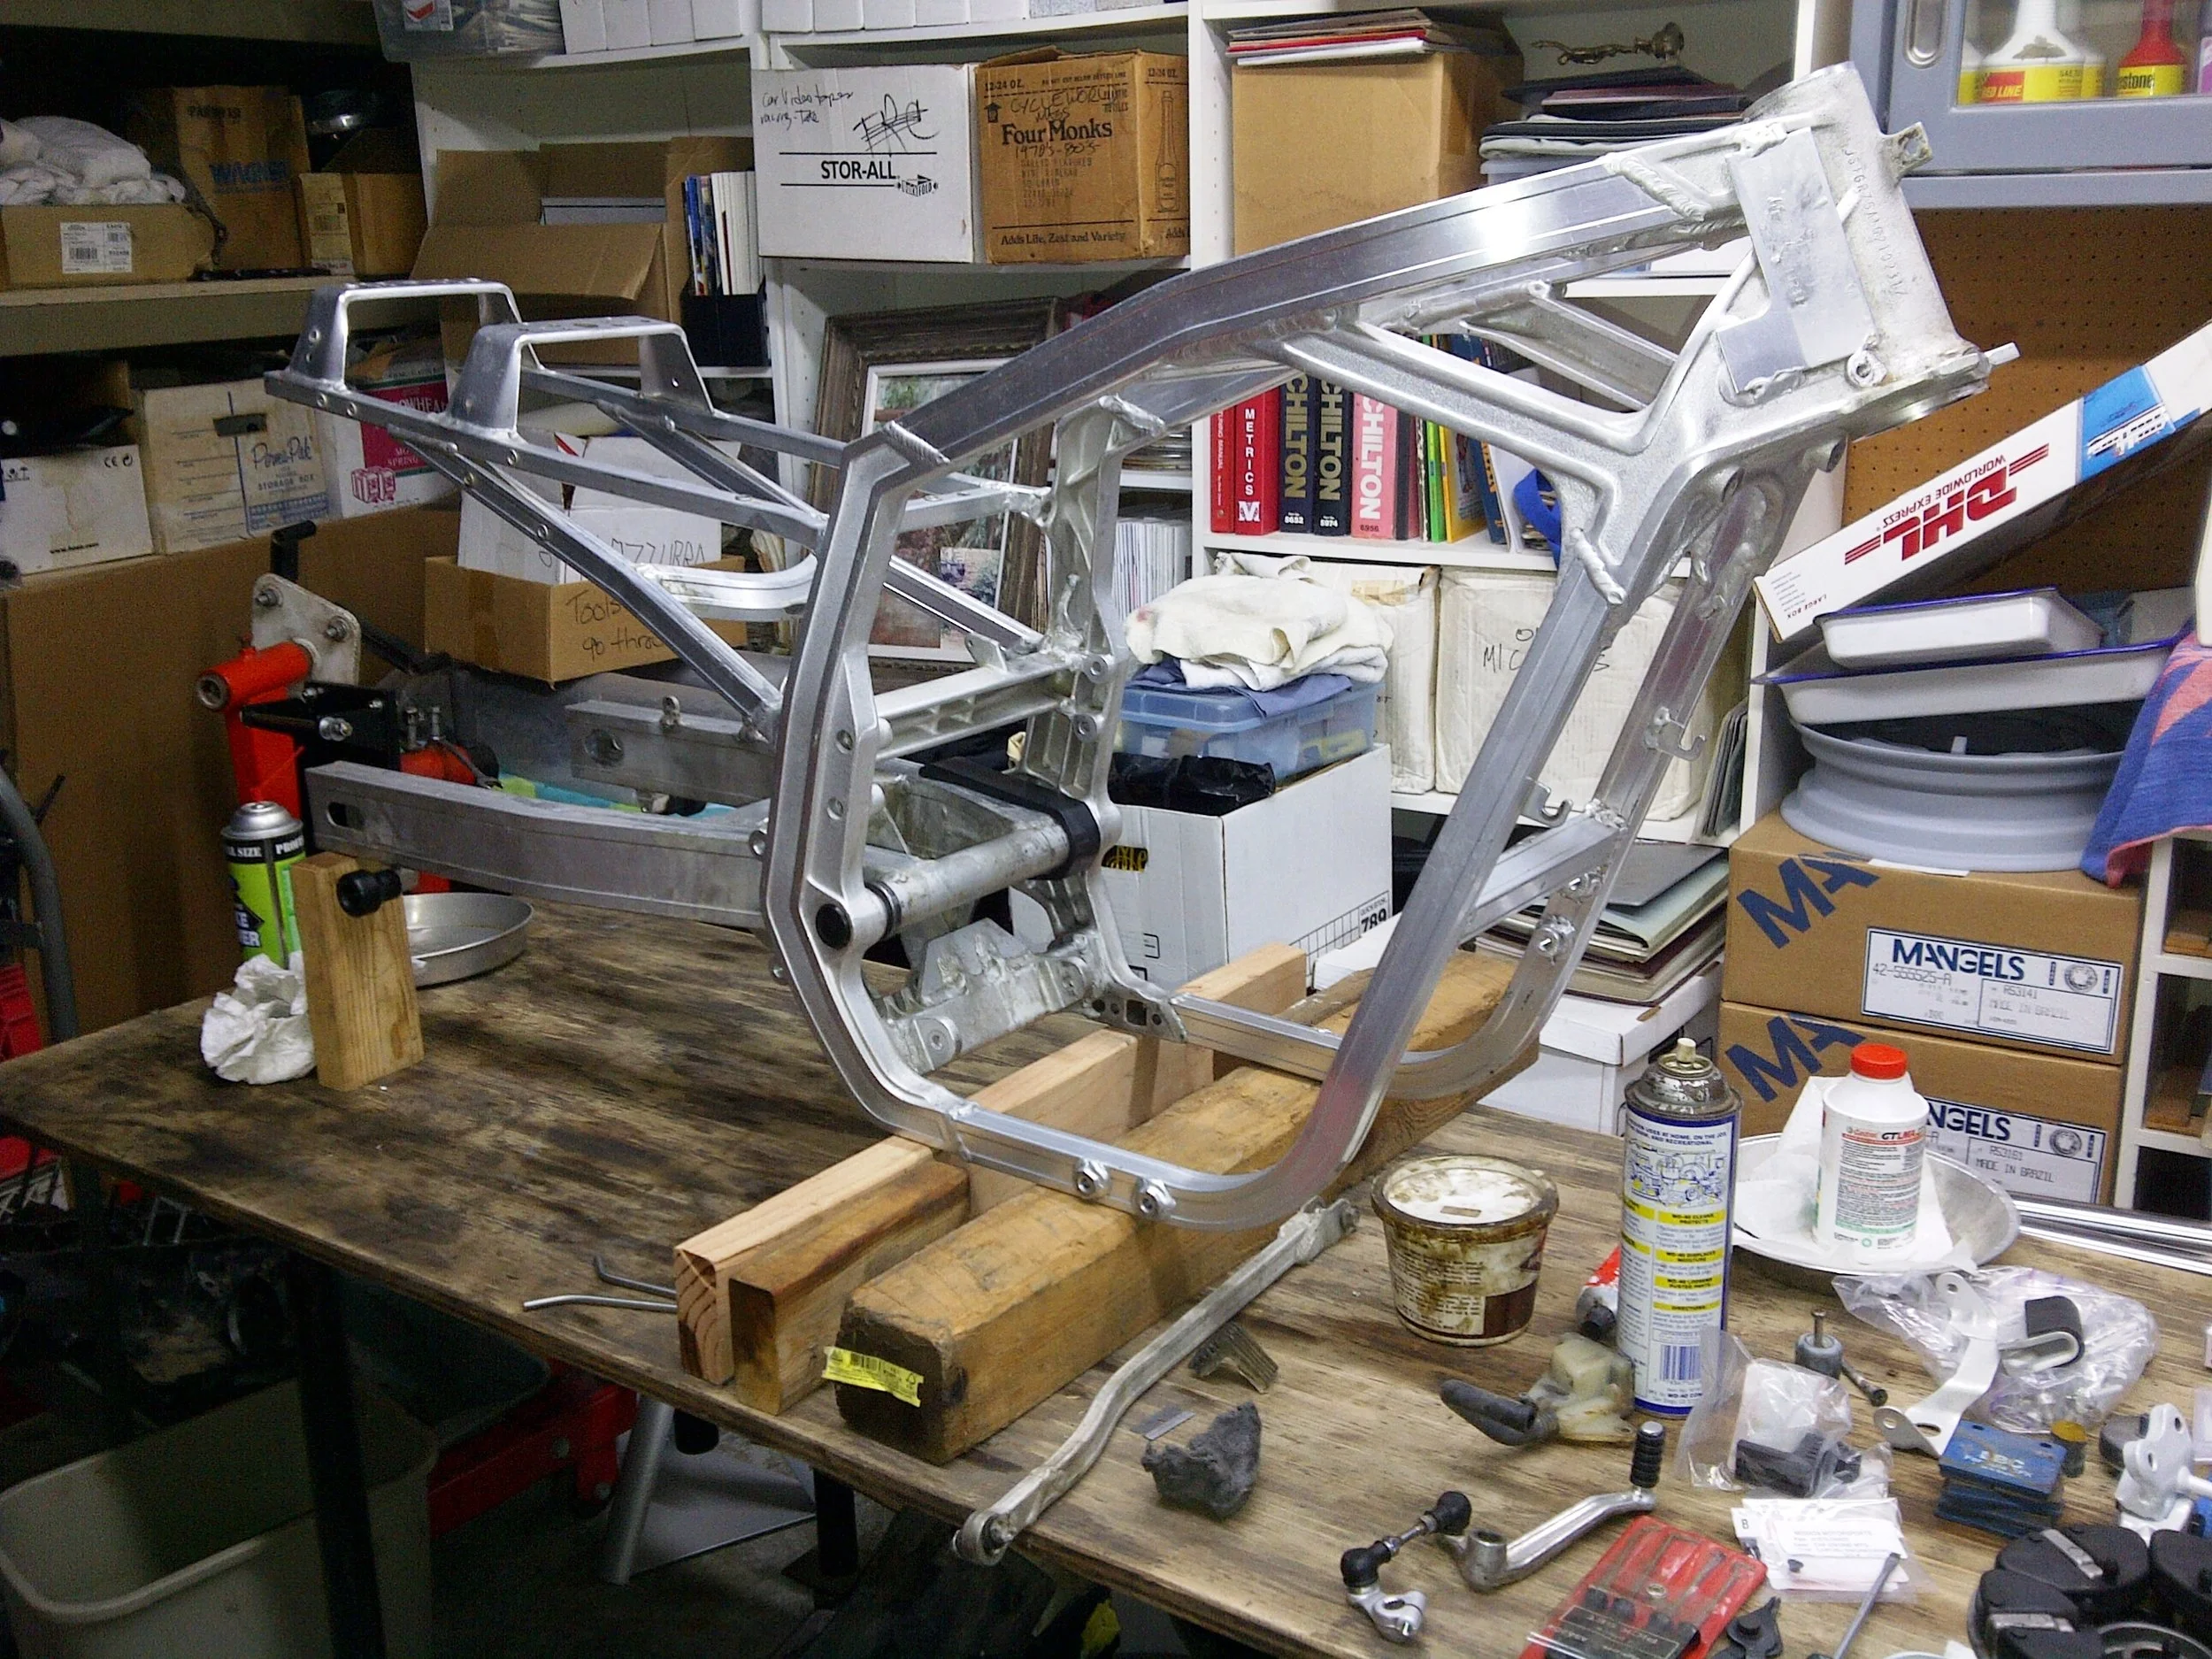
Suzuki GSX-R750 Bare Frame
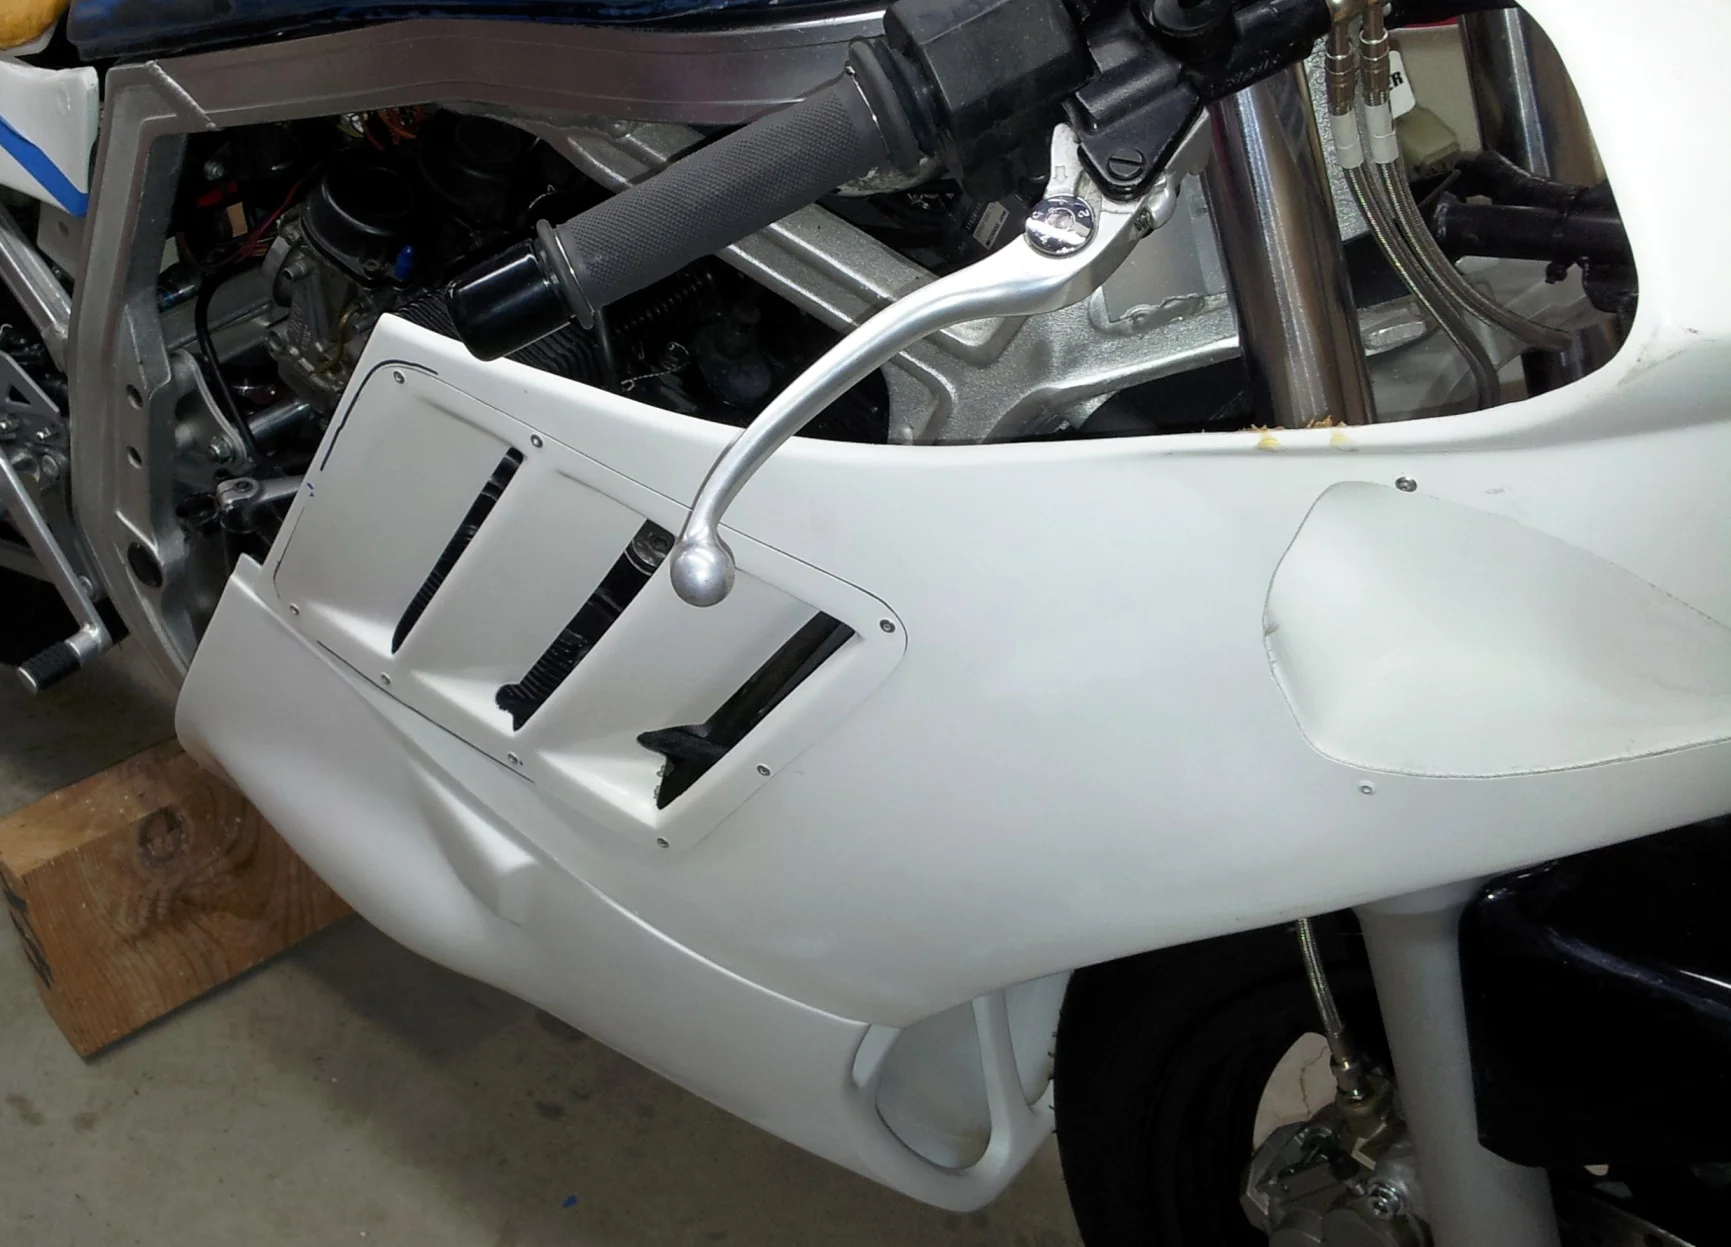
Obviously, the bodywork would be different from original as the lights were removed and the LTD tail section was part of the deal. The concept was to make the fairings similar to what Yoshimura used during the 1986-87 Superbike season, but with the LTD theme paint work.
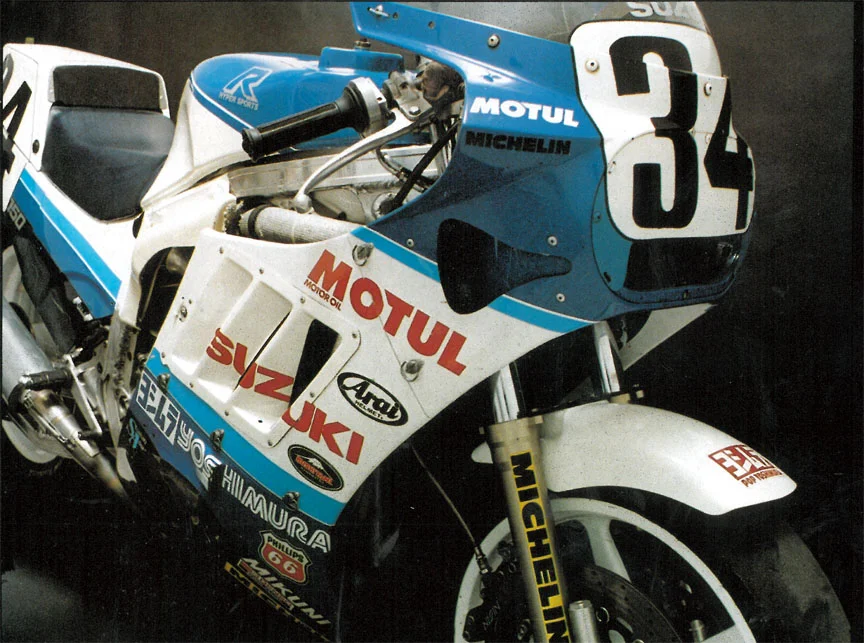
Yoshimura Superbike Replica
All the bodywork was purchased from Air Tech as they were the original suppliers to Yoshimura in the day. They had the correct type vents and scoops to go along with the racing fairings and LTD tail. Additionally, I was able to buy an original LTD seat from Sander “Dutch” Knook (former production manager at Air Tech).
The frame/swing arm were cleaned, but kept with the original finish intact. Some parts of the swing arm had some wear, but I wanted to keep the original patina. Rear stand mounts were welded on to the swing arm for spools.
One of the steering stops was damaged and had to be repaired. When the steering damper was installed, a Slingshot style frame mount was placed on the left-side by drilling 2 holes in the upper rail.
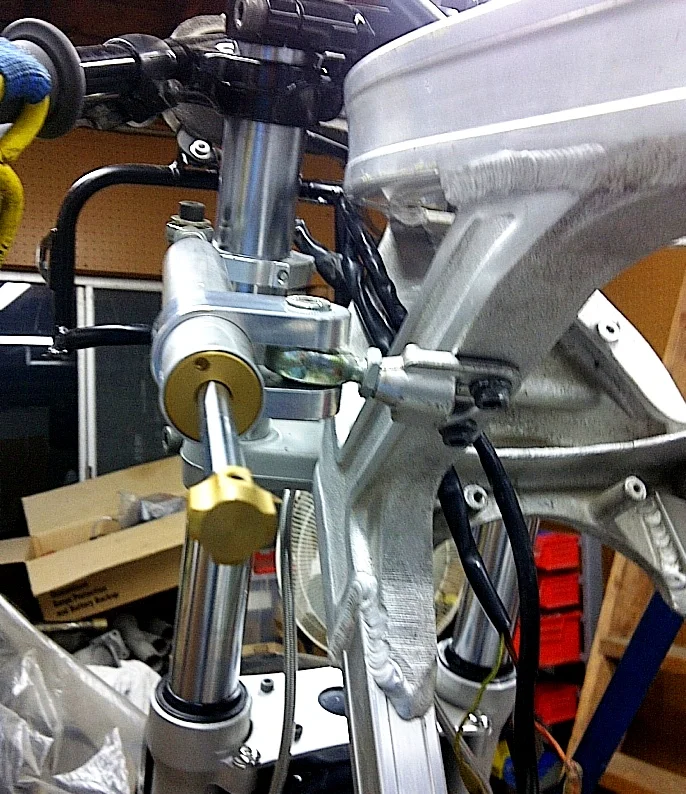
Steering Damper Mount
The battery box was modified to clear the new rear shock. Since a smaller lithium battery was used, raising the floor of the battery box frame wasn’t a problem. This allowed all the side mounts to stay intact which preserved the location of the various electrical parts (fuse box, relays and ignition control unit). This was important because some of the parts are visible with the LTD tail section on.
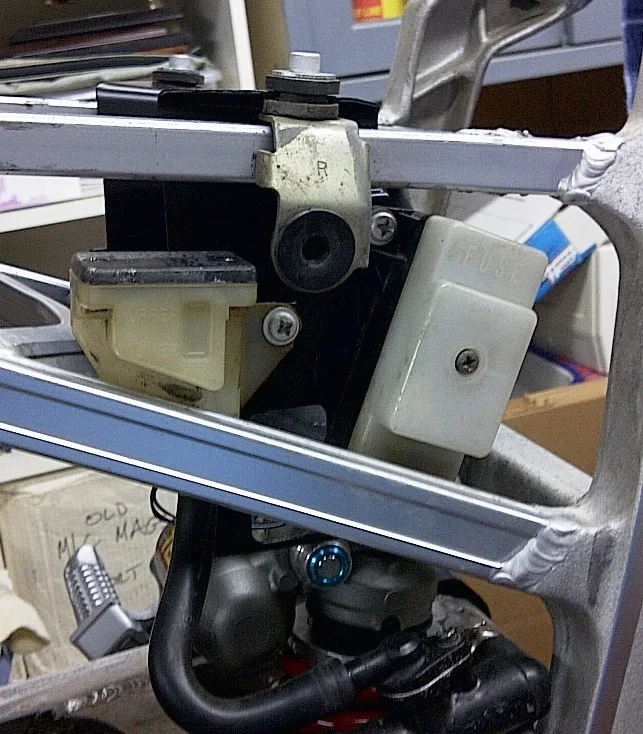
Suzuki Battery Box
One big issue when trying to emulate the Limited Edition look was the heel/chain guards. Basically, they are not available new and good used ones are very hard to find and expensive when you do find them. My solution was to make new ones. This was a big project as the heel guards required more than just water jet cutting from aluminum plate; there was welding and pressing the correct shape into the guards too. While it was all possible, special tooling was required to accomplish this. The finished parts looked authentic and had a tumbled surface with a clear ceramic coat finish.
For those wanting to buy heel guards, the tooling was sold long ago to a guy in the UK so they are not available from me.
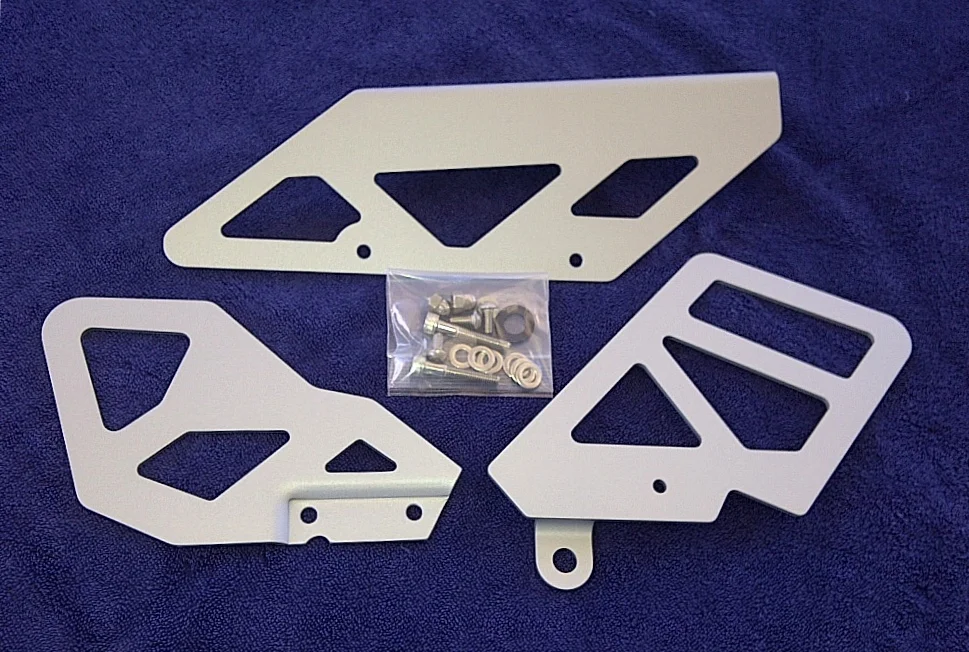
Heel Guard Kit
The rear fender was bobbed to fit with the LTD tail section. The rear fender was retained to protect the rear shock and electrics from road debris thrown off from the rear tire . Also, a round, period style oil catch can was fitted to the rear of the sub-frame with the dump hose exiting to the rear of the tail section.
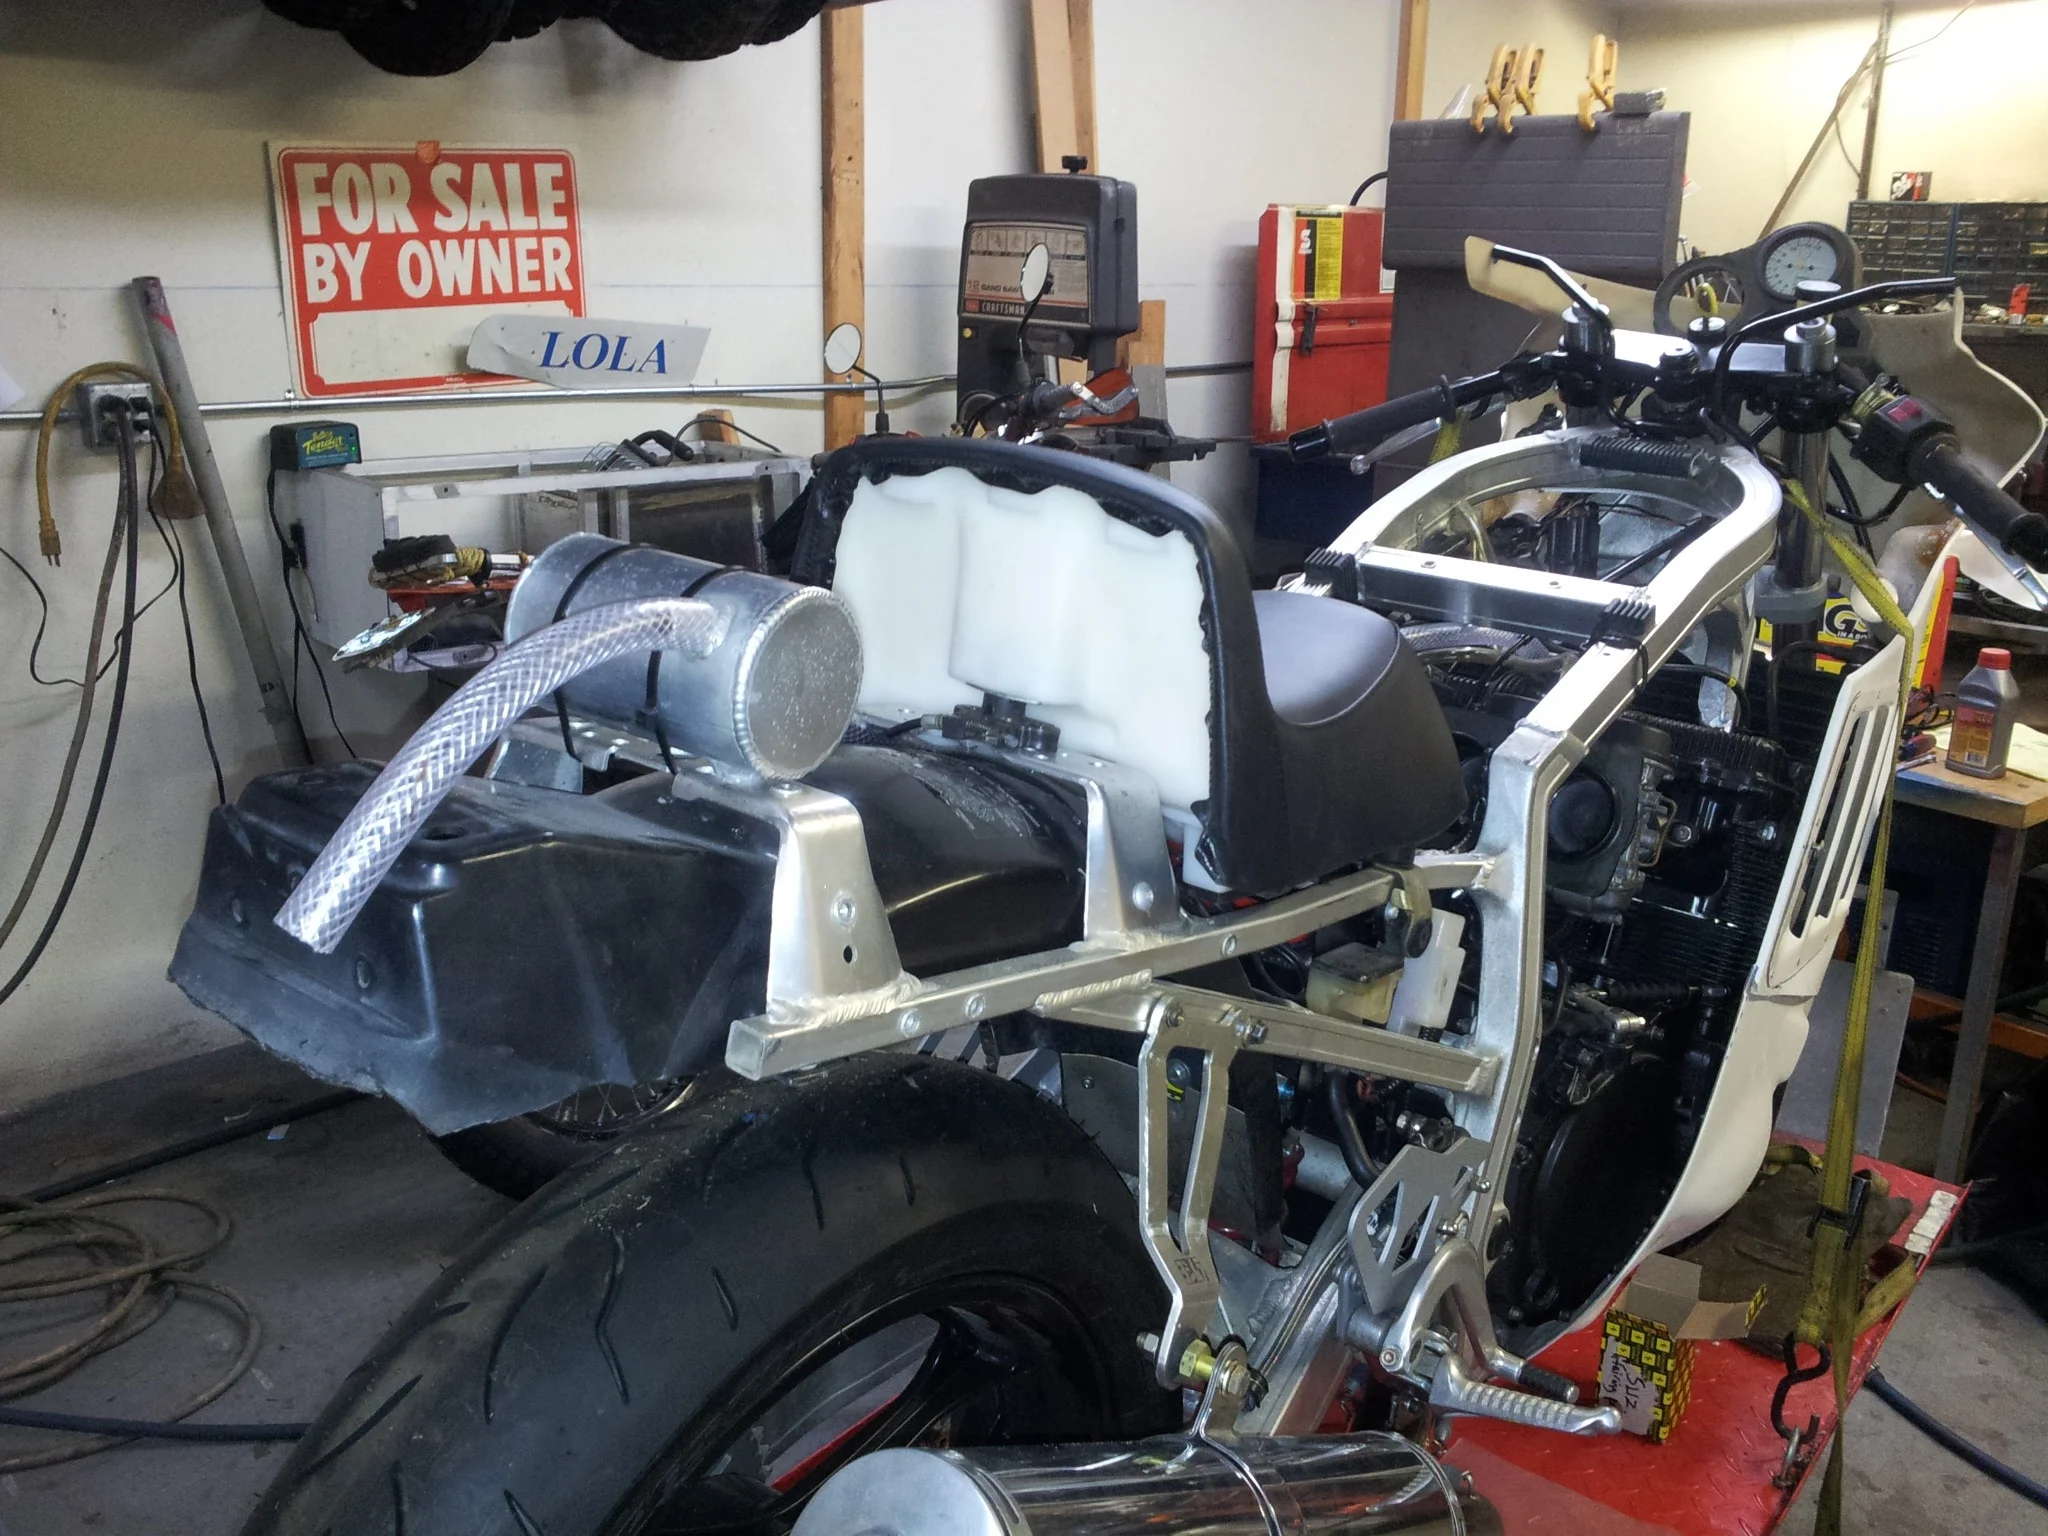
Oil Catch Can
The gas tank retained the standard fuel filler and vent hose arrangement, and I chose a dual feed Pingle petcock to supply enough fuel for the higher engine output demands of 110+ HP.
The first step in the process of fitting the fairings was to do a mock assembly. During this step, the front fairing support was trimmed of unnecessary parts like the turn signal mounts. Also, it was found that the rear mount on the nose fairing was bent and was replaced a new part.
After the first fairing test fit, the new side vents and front scoops were installed. This necessitated making cardboard templates to ensure accurate cutouts on the fairings. After a lot of drilling, sawing and grinding, the new vents and scoops were ready to be riveted and glassed-in. My limited fiberglass skill showed as I struggled to keep it looking neat on the insides of the fairings. At least they weren’t going to fall out!
Fairing Mock-up
More test fitting showed that the new vents needed clearance around parts of the cylinder head and clutch cable. Additional work was done to fit the fairing lower with new Dzus fasteners added to the side fairings.
The tail section was test fitted and found that some cutting and grinding was needed to get it to sit correctly on the frame rails and to attach it in front. The tail section was held in place by 2 screws at the front and the seat in the back. The original seat latch was used along with the release cable. The cable hung down just next to the tail piece on the inside and could be actuated by pulling on the cable to release the seat.
Next was all the prep work to get the fairings ready for paint. At this point, the decals had been purchased from another GSX-R owner who was building an LTD race bike and had an extra set on hand. They were placed on the bodywork to get an idea of how the paint would be masked.
After an aborted attempt at painting the bodywork in my shop, the parts were sent out for professional painting – the result was very nice considering this is a track bike and not a concourse queen. The paint job emulated the standard Suzuki GSX-R750 LTD scheme on race fairings. One fun addition was the front and rear lights in decal form. The headlight feature was needed to complete the front end styling and provide an end-point for the paint job and the rear light provided some color for the blank white space on the tail.
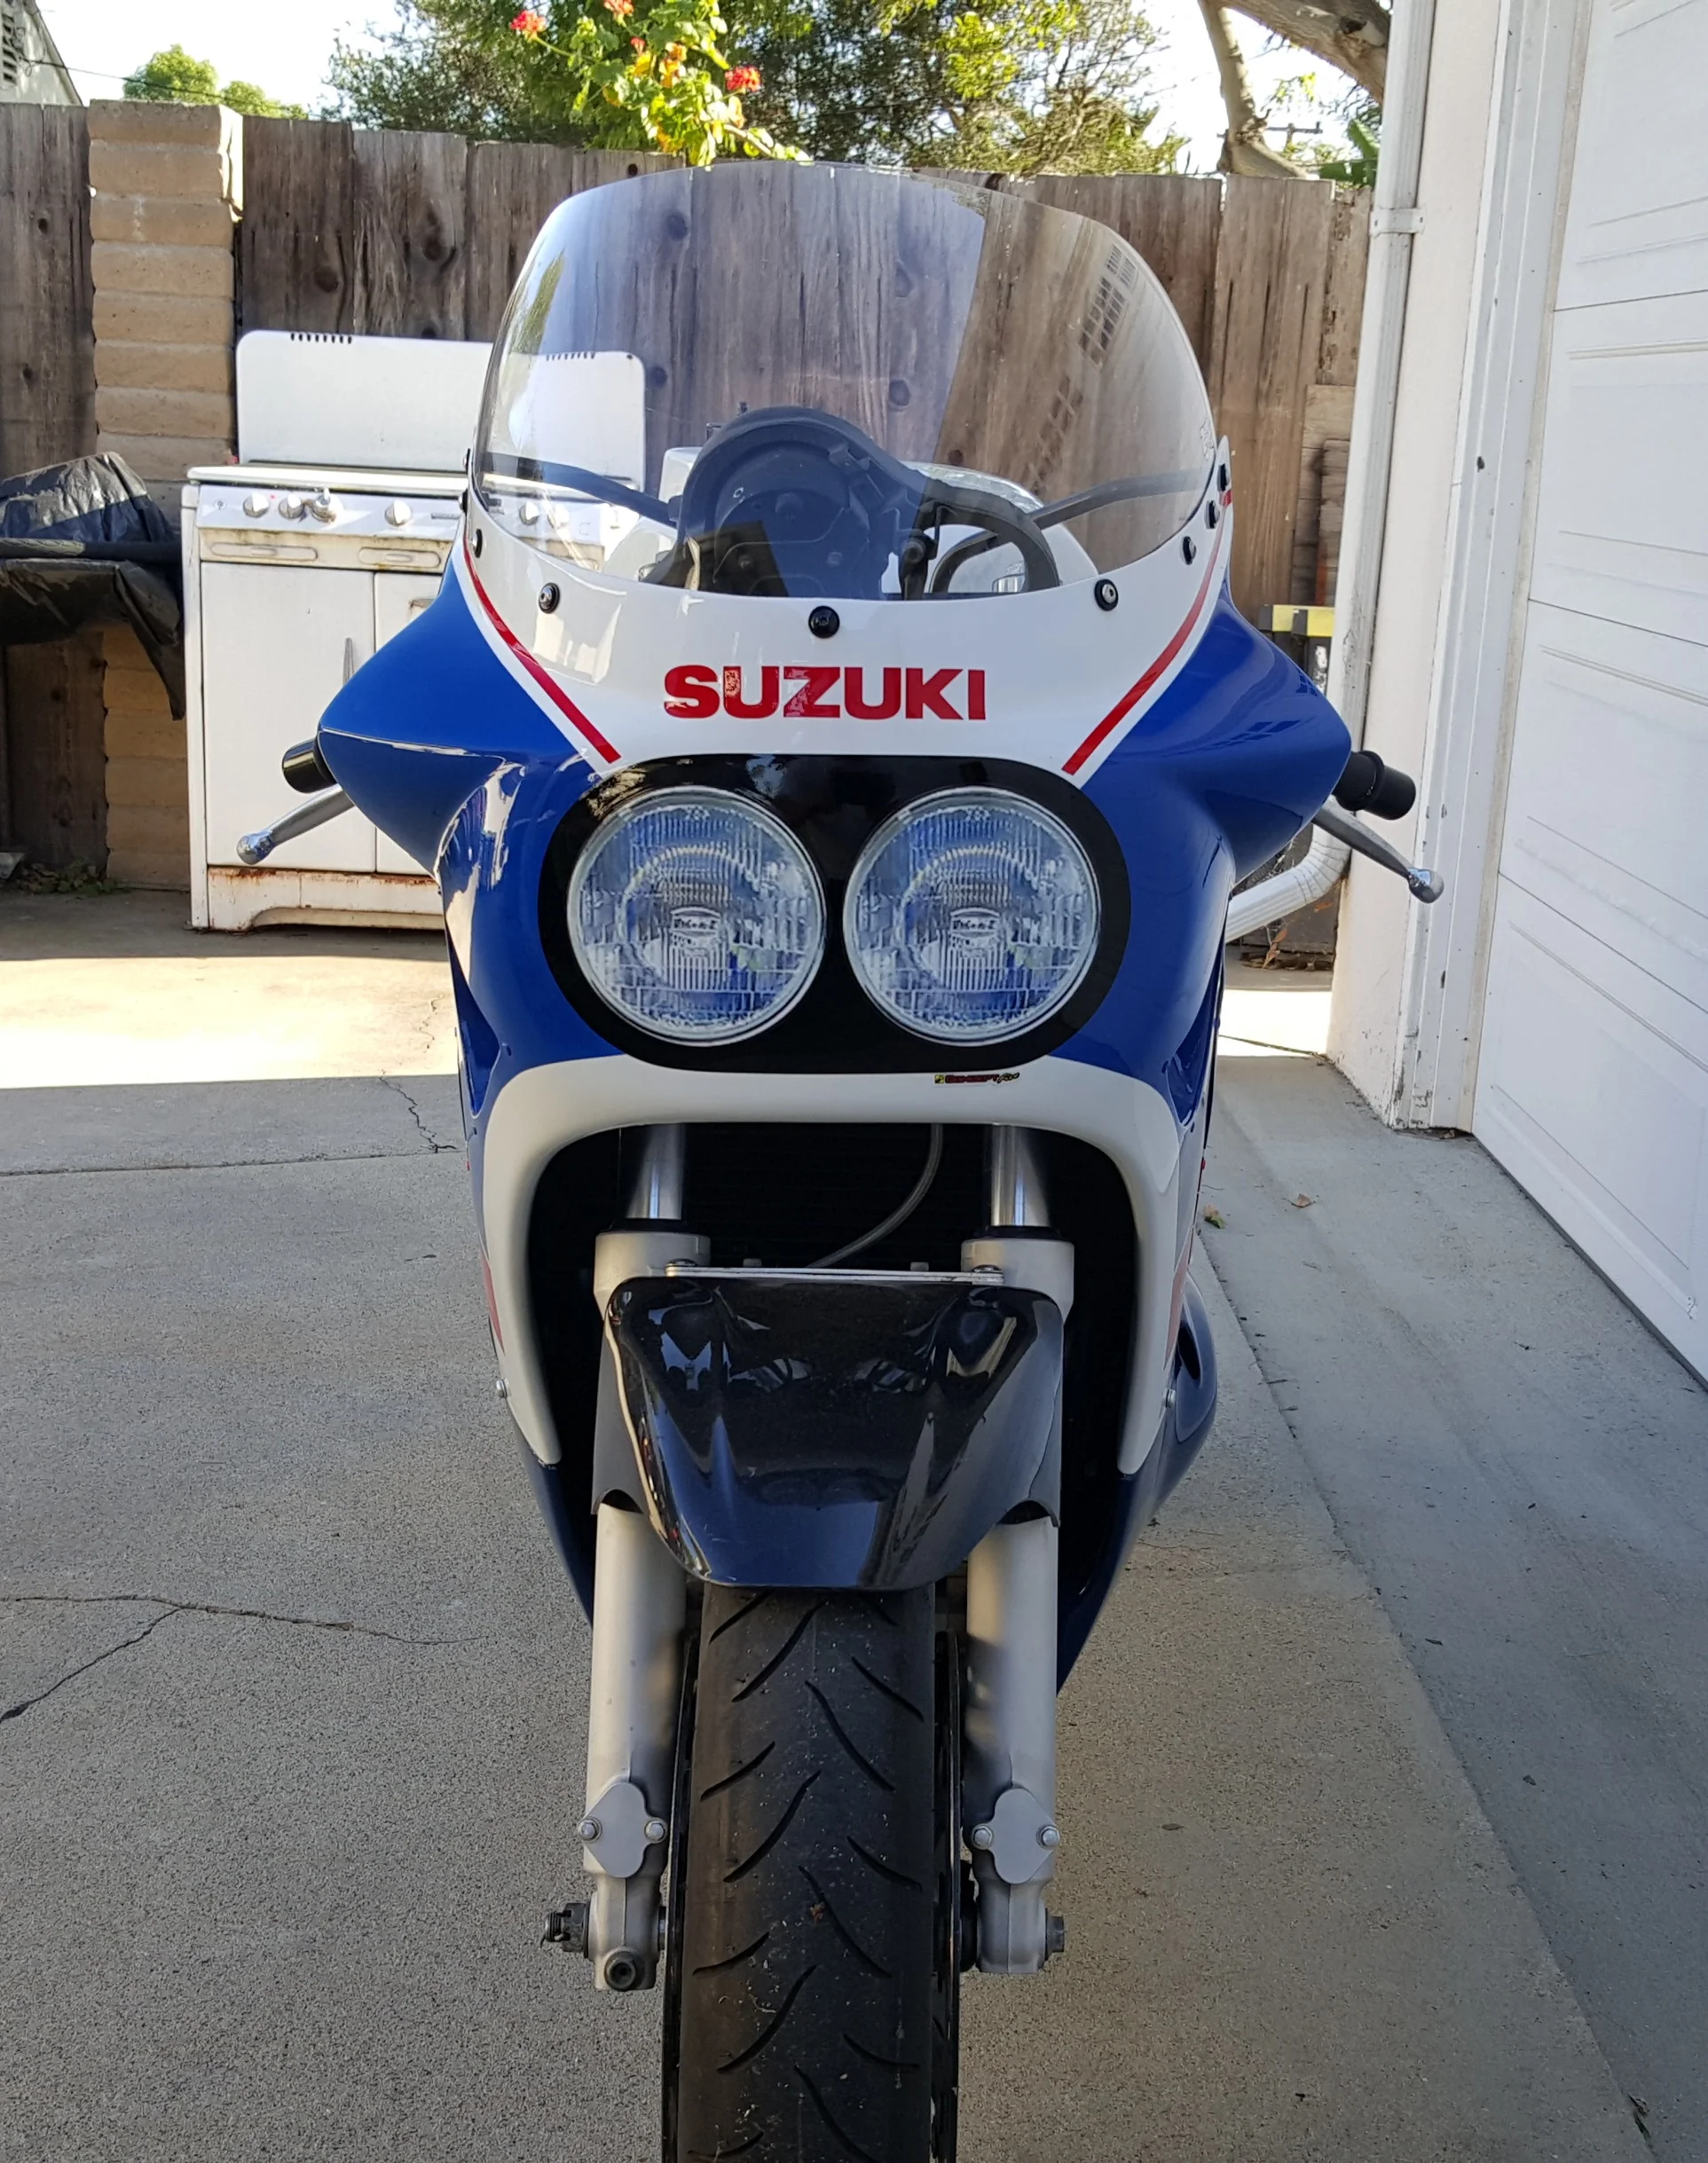
Suzuki Headlight Decal
The fairing work was topped off with a new Zero Gravity clear windscreen. The instrument panel was set up to hold the original white-faced 1986 tachometer. The standard ignition lock was retained as well as the right-side switch module containing the kill switch and starter button (the starter was retained along with the side stand for convenience).
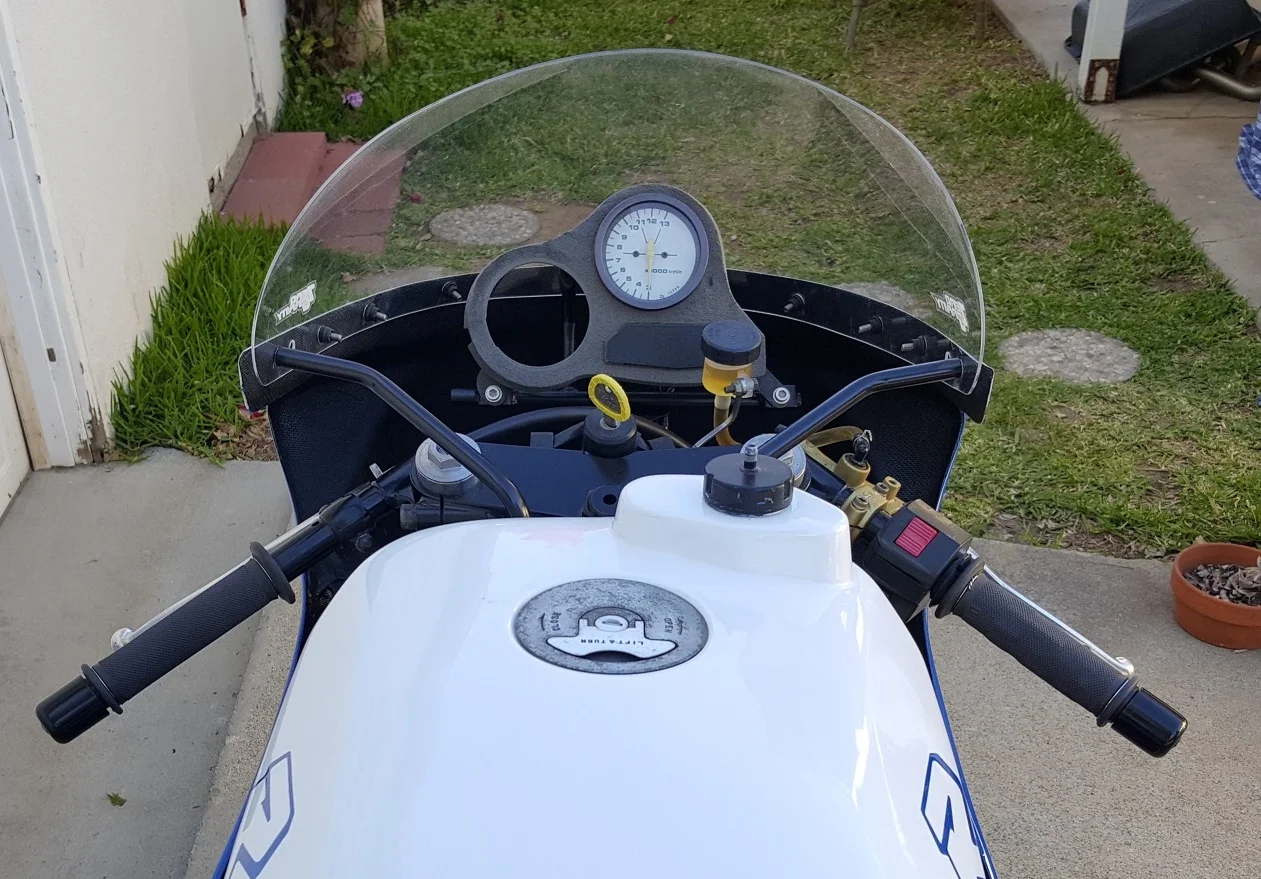
Suzuki Cockpit
For an accurate period look and feel, the standard clip-on handle bars were used and lighter weight, black aluminum bar-ends topped off the effect. The bars attached to standard GSX-R750 triple clamps. The view from the cockpit was close to period correct. Maintaining the original feel of the bike was an important point for me. In the same vein, the original style foot pegs and shifter/brake pedals completed the picture.
Suspension and Brake Modifications
The plan with the suspension and brakes was to keep as much of the parts period Suzuki as possible. The use of 1986 GSX-R1100 front forks, wheels and brakes was a given. Because the rear shock was hidden, more latitude was possible for using a more modern part. Using 18” wheels instead of the more common 17” wheel conversion was another non-negotiable feature. The 18” wheels are a major part of the period visual.

Suzuki Front Forks
The 1100 forks are longer than the 750 forks so that helps with adjusting the frame geometry. As the 1100 rear 18” wheel is 4” in width and uses a 150/70-18 tire size, the rear of the bike would be taller than when using the original 140/70-18 tire size. The longer forks allowed some compensation to be made in leveling out the bike.
The forks were sent to Race Tech for a complete rebuild (new bushings and seals) and a set of their cartridge emulators installed along with 1.0 kg/mm springs. While they were apart, the aluminum sliders were bead-blasted and then clear ceramic coated. This gives a very durable matte aluminum look finish. NEAS block-off plates were fabricated and installed (NEAS is not needed with the cartridge emulators and removes 2 lbs. of weight).
When the forks were installed on the bike, the fork brace/fender mount aluminum plate was doubled-up to give more stiffness to the forks. Also, a Storz adjustable steering damper was mounted to the left-side of the frame and the front fork leg.
Using the GSX-R1100 brakes helped give the bike more of the LTD look. The rotors are 310mm in diameter and are a “floating” style. The calipers needed a total rebuild including new pistons, seals, bolts, O-rings and bleeders. While the calipers were apart, they received a titanium-colored ceramic coating and new HH compound brake pads slotted into the new-looking calipers. The rear caliper was rebuilt to match, but new OE Suzuki brake pads were used.
A Brembo 16mm front brake master cylinder was installed with a small, clutch-type reservoir. The original Suzuki rear brake master cylinder was rebuilt using an OE kit. Braided stainless steel brake lines from Spiegler were used front and rear.
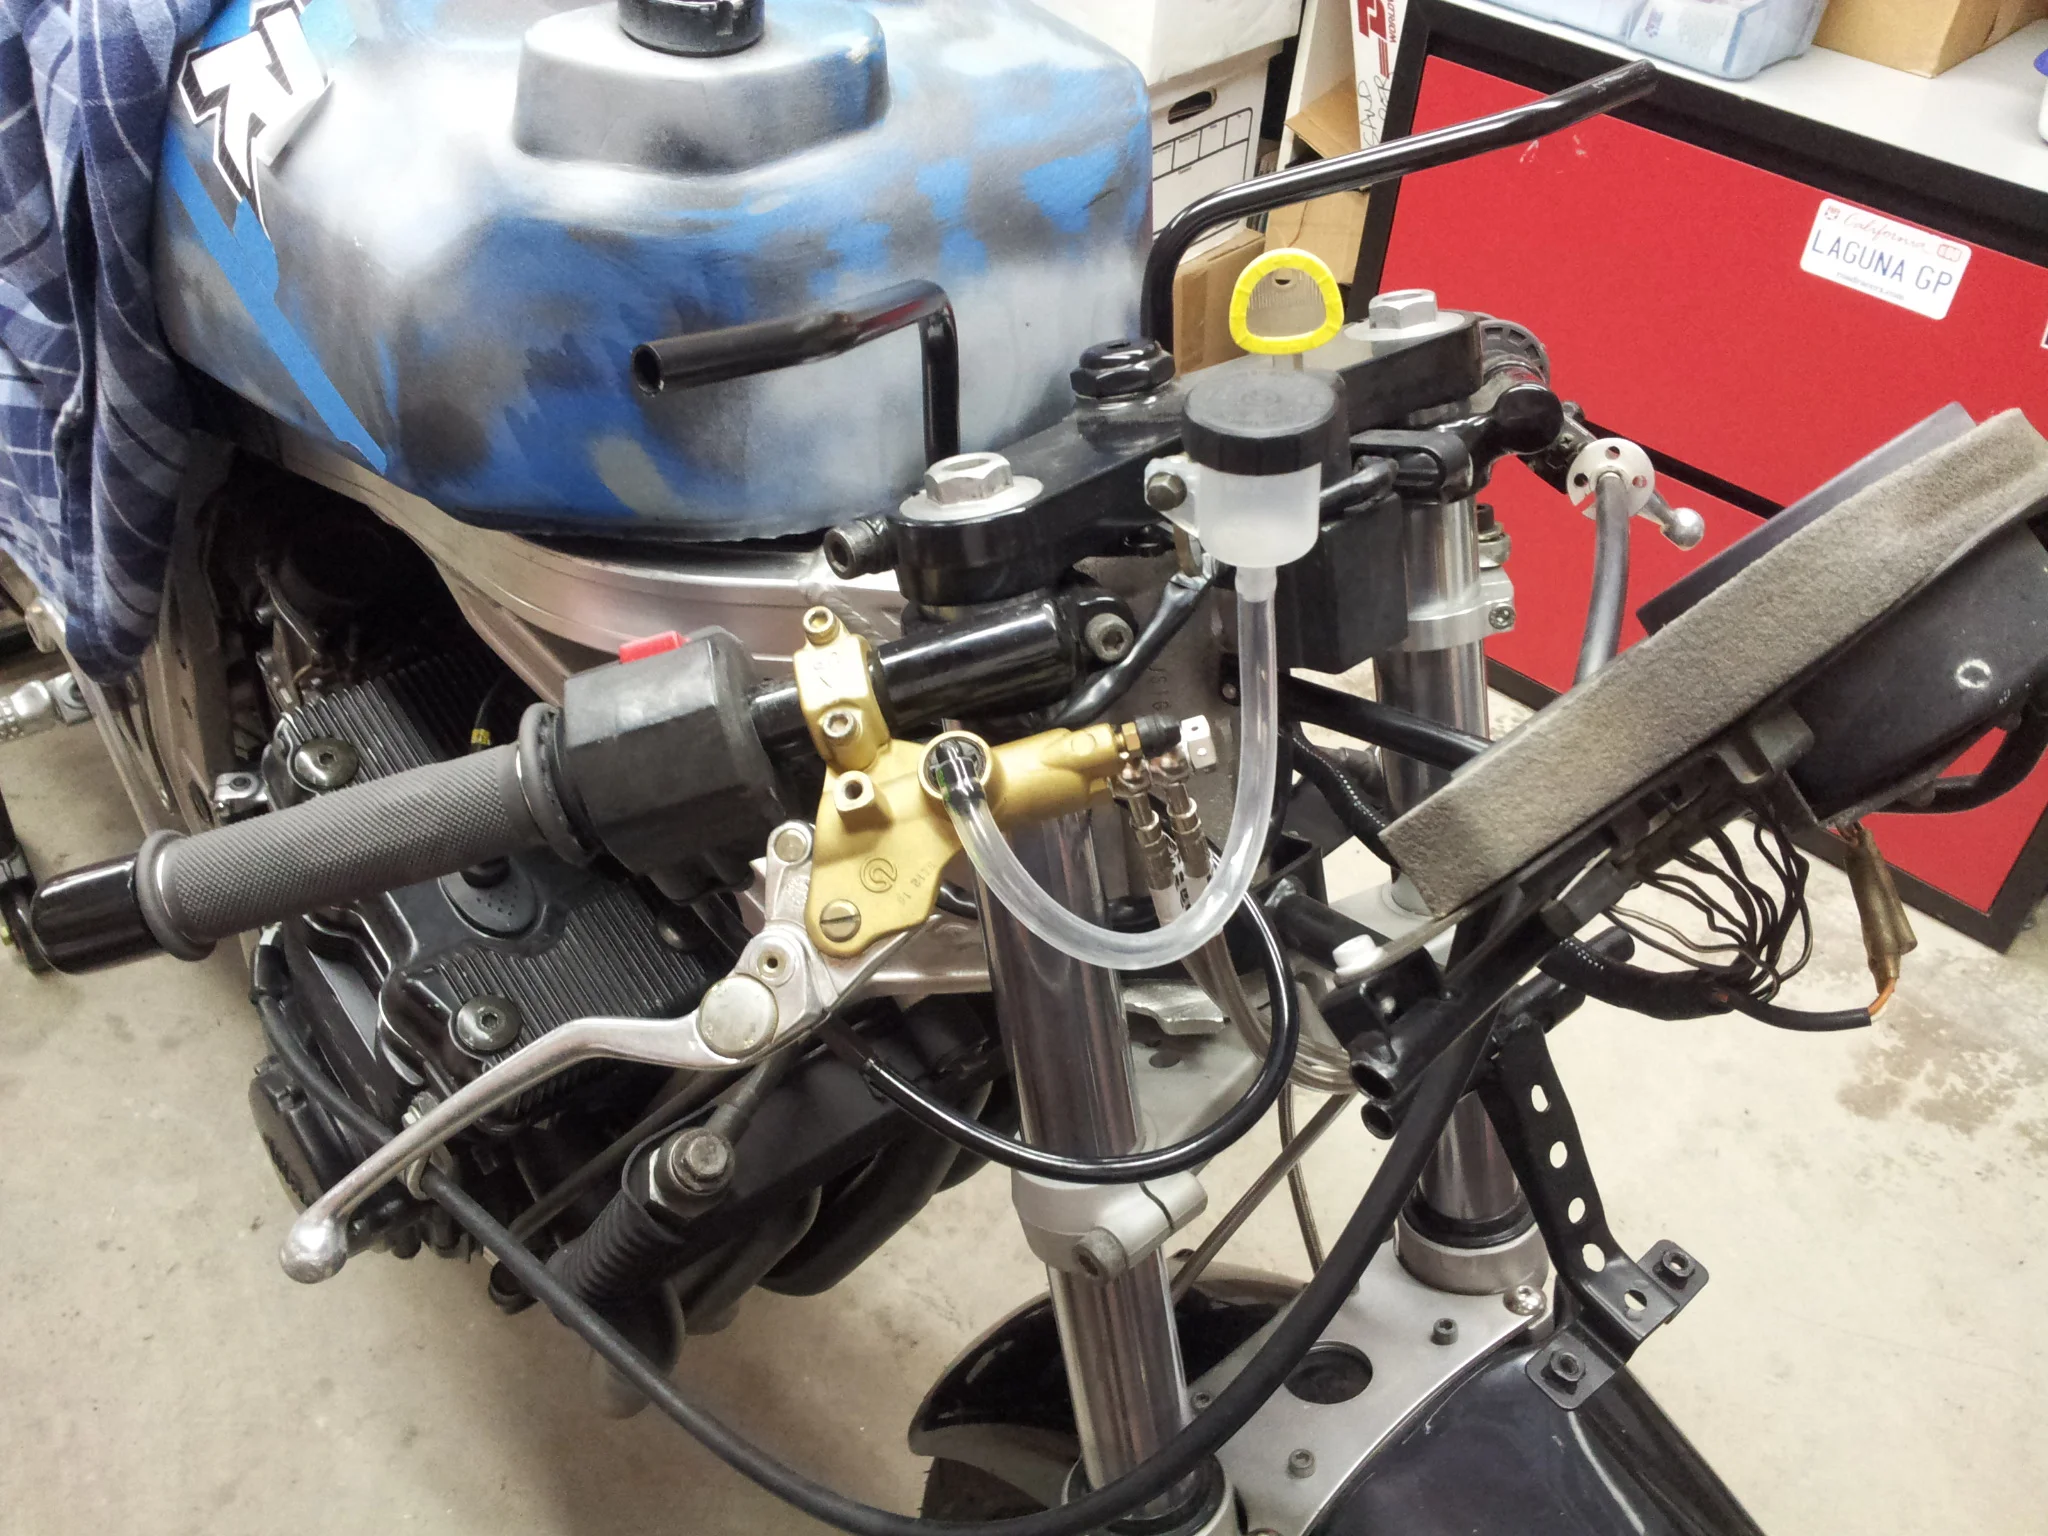
Brembo Master Cylinder
The wheels were sent off for a semi-gloss black powder coat finish. Then new bearings/seals went in. On the rear wheel, new cush-drive rubbers went in. Finally, new Bridgestone BT-016 tires in the stock 1100 sizes were mounted and balanced.
The rear shock was a puzzle at first; after some research a suitable replacement was found. A 2005 Yamaha R1 shock was very close in length to the original and the ends are the correct type. The body is aluminum (verses steel on the original Suzuki part) so it is light-weight and has a built in reservoir. It comes with compression and rebound adjusters (the original only had a 4-position rebound adjuster).
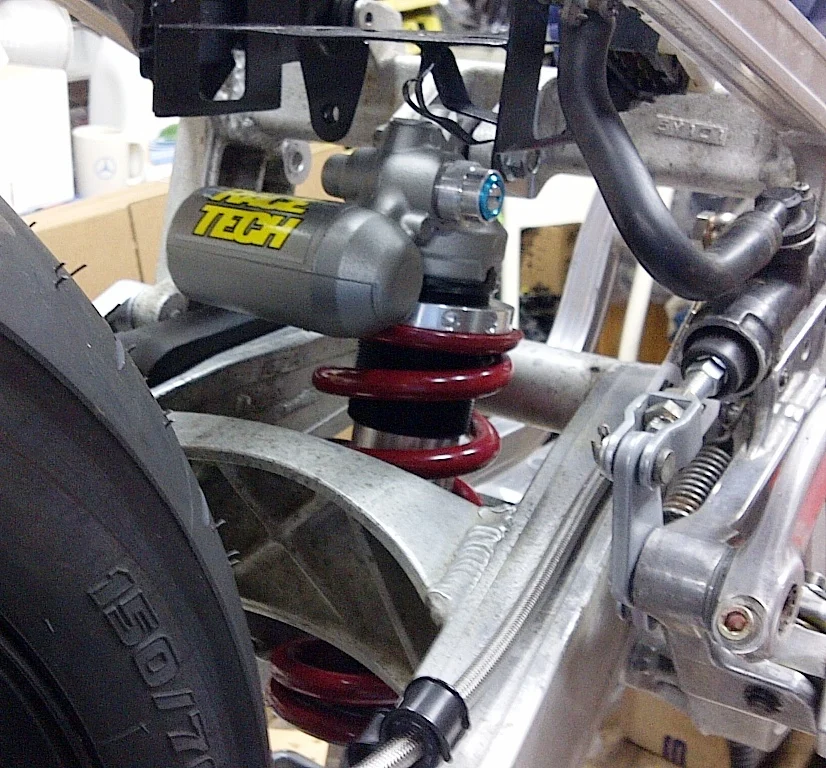
Shock Installed
The new shock was sent to Race Tech for a complete rebuild and modification. They offer a Gold Valve kit, threaded spring adjuster (instead of a ramp type) and a damping curve to match the Suzuki linkage ratio. An Eibach 650 lbs./in. rear spring was installed.
The final result of these modifications was very positive. Both test riders and myself found the suspension very good for track day work with minimal changes. The brakes worked very well while requiring a bit more pressure than modern brakes to stop hard. The Bridgestone tires are good enough for a casual track day. The newer Continental CR tires might be slightly better.
Tate Casey on the Suzuki GSX-R750 at Auto Club Speedway in CA
Engine Rebuild and Modifications
Originally, I had expected to just rebuild the stock 705 series, long stroke 749cc engine. I wasn’t going to make many modifications to it, but plans changed when the choice was made to reproduce the LTD look.
The LTD engine has a dry clutch with cable actuation on the right-hand side as opposed to the standard first generation engine which has a hydraulic slave cylinder hanging off of the left-hand side counter shaft cover. This would be a big visual difference between a run of the mill 1986 GSX-R750 with LTD paint and my vision of a more accurate representation of the limited edition.
A good solution was a 708 series (748cc) short-stroke Suzuki GSX-R750 engine from the Slingshot generation. The 708 series has a cable actuated right-side clutch and produces more power from a better cylinder head, higher compression, bigger carburetors and more aggressive camshafts.
Using the 708 engine means less money would be spent on modifying the engine for increased horsepower. A new countershaft cover needed to be made that incorporated the shift shaft pivot with the smooth look (no slave cylinder) of the LTD version as original LTD magnesium covers are difficult to find and expensive.
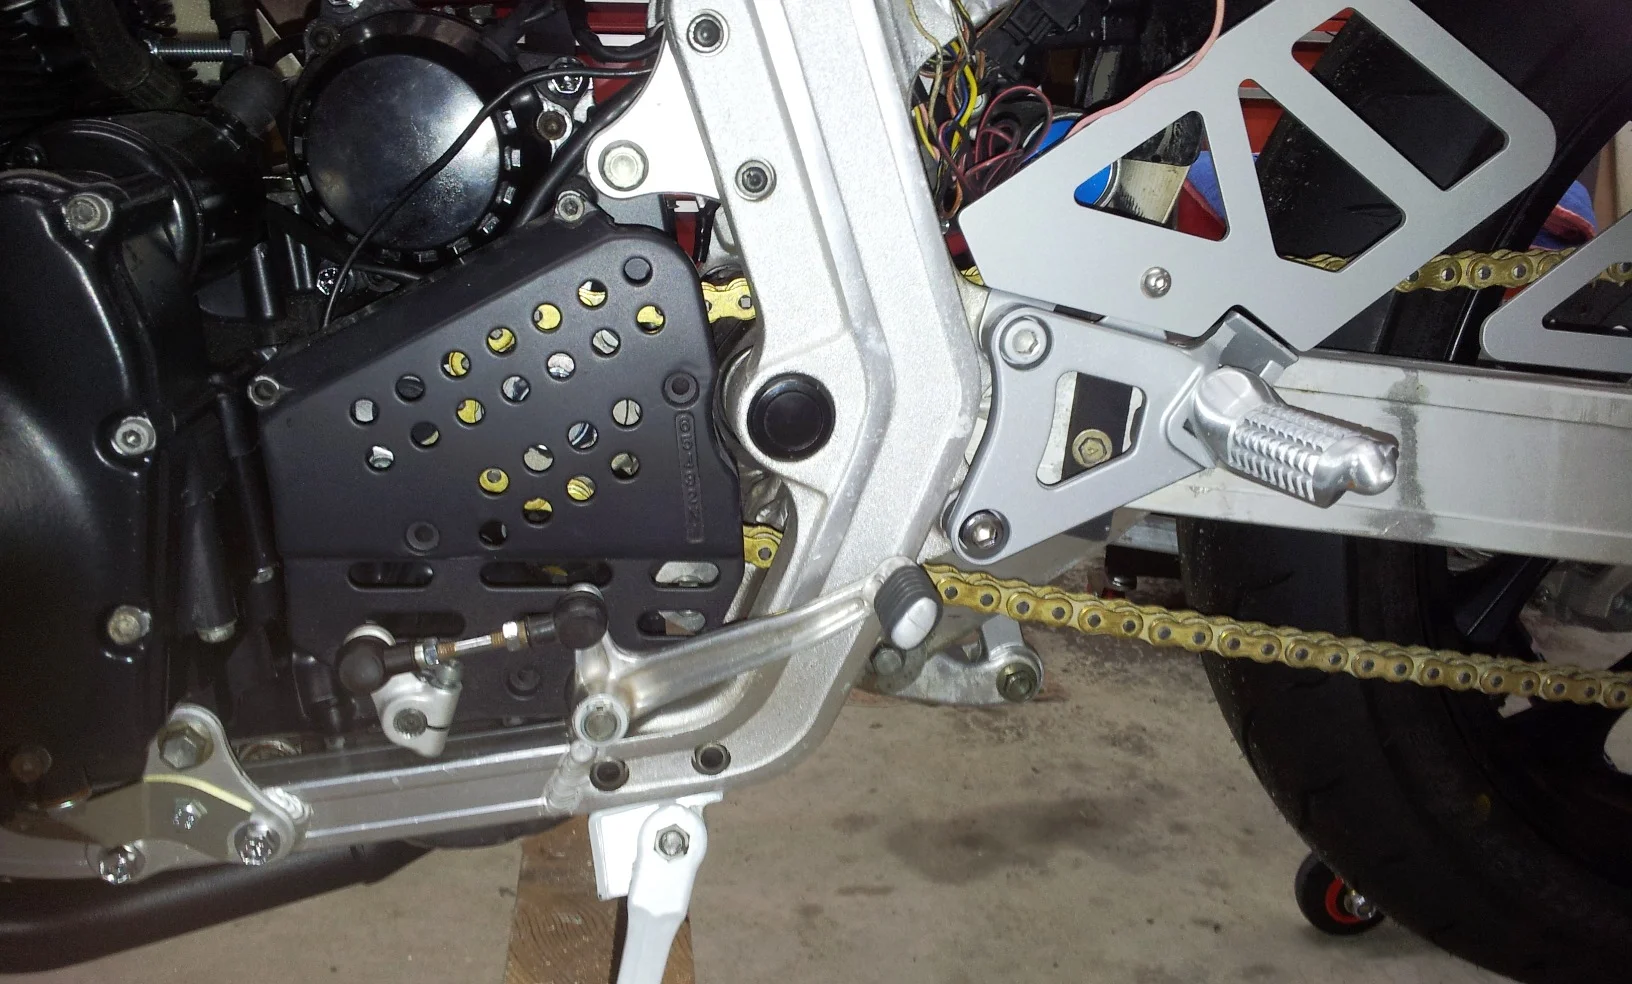
Counter Shaft Sprocket Cover
So, with the engine choice nailed down, a plan was formed to build a solid and mostly stock bottom end. The connecting rods are a weak point of early GSX-R750 engines so later Suzuki rods or better needed to be found and custom pistons made. The core 708 engine block already had a 2mm overbore which necessitated new 76mm forged custom pistons (+1mm more). This brought the engine displacement up to 811cc.
The plan included replacing worn transmission gears and all the bearings along with a re-shimming of the gear stacks. And, of course, the clutch would be renewed.
One additional exterior touch was using ceramic-coating to cover the entire outside surface in a heat radiating black finish. The ceramic-coating is much easier to keep clean and is very thin (as opposed to paint) so heat radiates faster. I know, some nitpickers will say the original engine finish was a greyer color, etc., but this is a custom build so I get to do what I want.
One lucky find while searching for parts, was a new set of Carrillo/Yoshimura connecting rods in their original box. I was able to buy them on an enthusiast GSX-R website (Gixxer.com) for a very reasonable price. Apparently, the Suzuki cognoscenti think that the long-stroke engine is the only way to go and shun short-stroke hot rod parts. I just laugh at his myth and benefited from it.
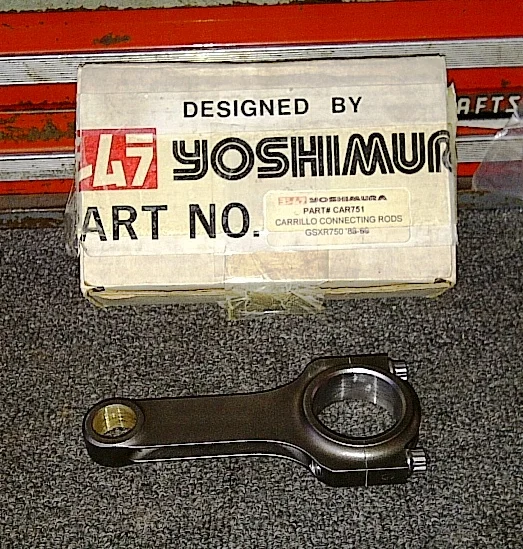
Yoshimura-Carillo Connecting Rod
Ok, now the lower end of the engine was set; stock, optimized parts plus Carrillo rods and a 3mm overbore filled with custom forged racing pistons. The outside ceramic-coated black and a special countershaft cover made. While this sounds simple enough, it involved a lot of effort, time and money to get things finished.
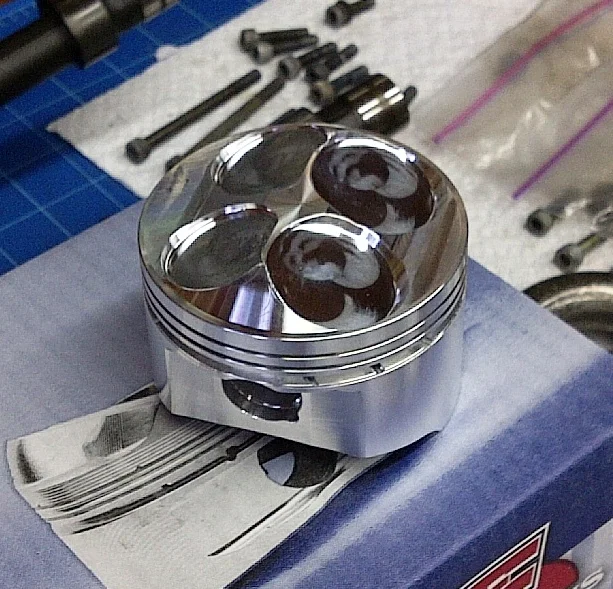
Suzuki JE Piston
Proceeding to the cylinder head, I didn’t want to change the valve sizes or hog out the ports. The stock “DOT” head already has big valves and good ports so some minor clean-up of the ports was all that was needed. The intake manifolds were replaced as they get hard from age and were subsequently port matched to the head.
On the exhaust side, new aluminum spigots had to be fabricated for the Yoshimura racing header as the originals were junk, and they were also port matched to the heads. The exhaust ports received a minor clean up too.
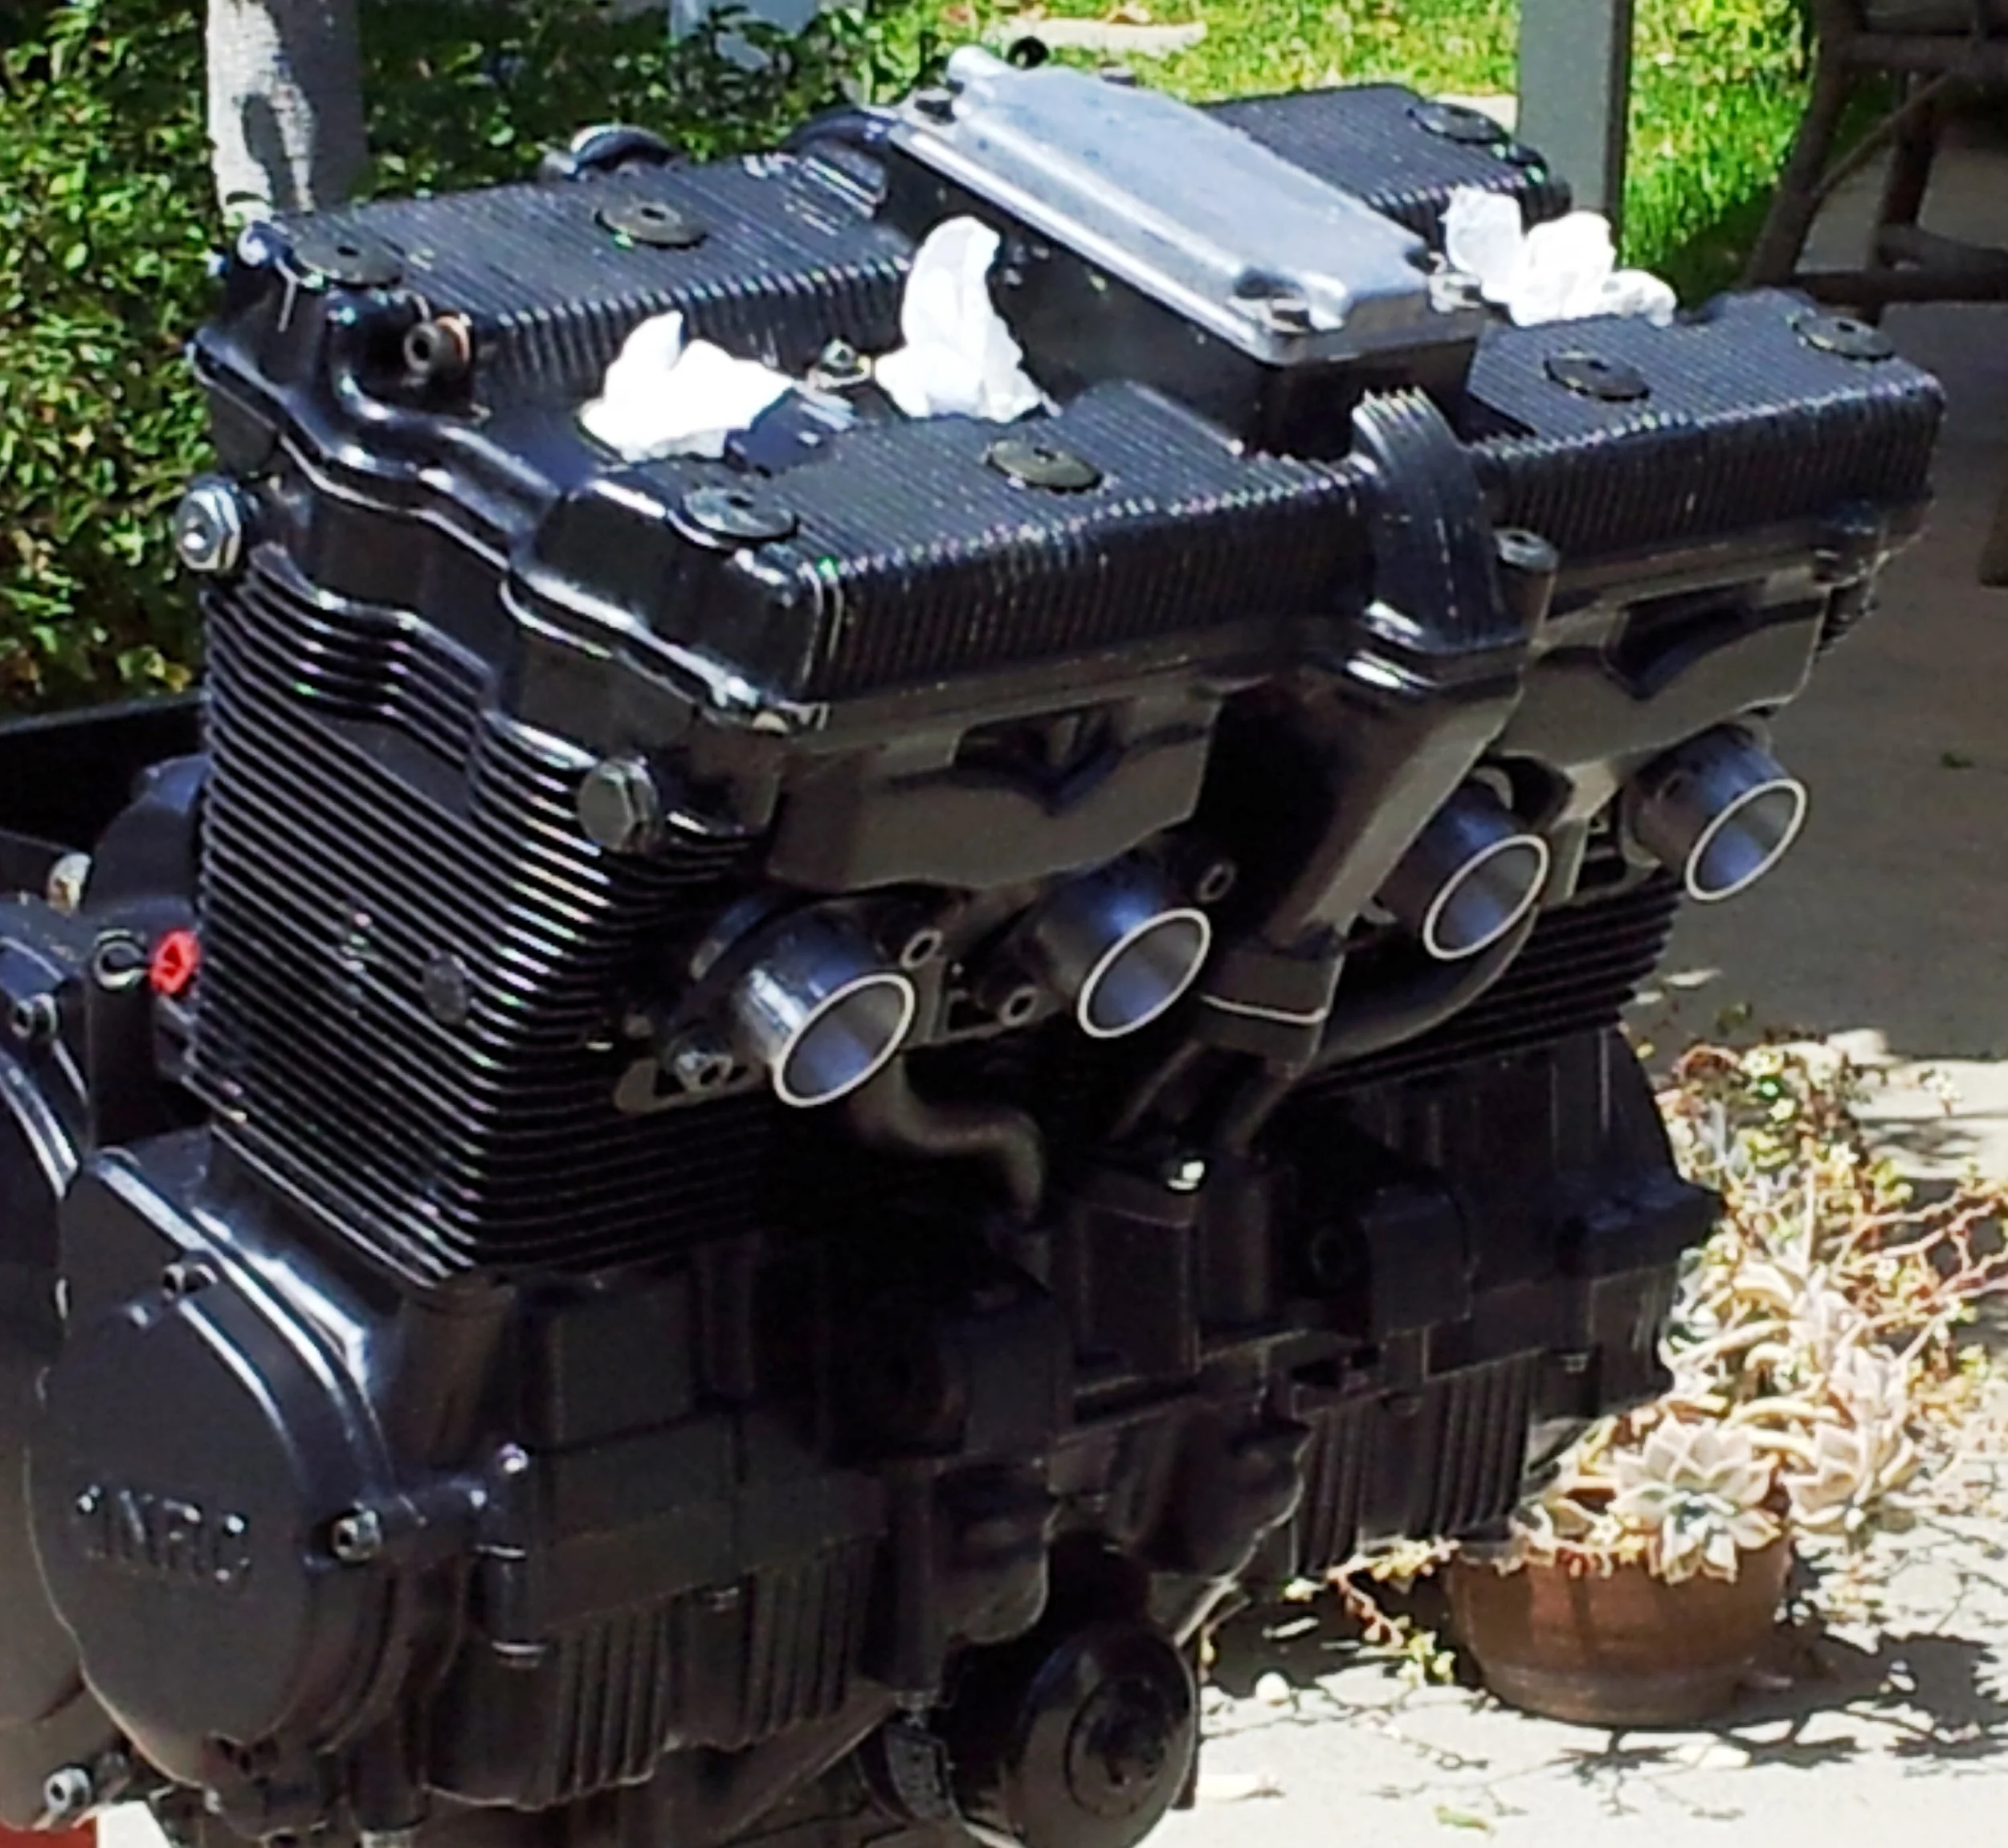
Suzuki 708 Engine, Ready to Install
The entire head was rebuilt with new valves, guides, valve springs, rocker arms and cams. These are wear-related items that take a huge beating in these high revving (for that time period) engines. As you can see, no big, trick items were used – mostly just fresh stock parts. I wanted optimization of the stock parts and not a re-engineering of what Suzuki originally did.
I was reminded of an old magazine article that had this cautionary bit of advice, “A hopped-up motorcycle, especially one that in stock form packs the performance of the GSX-R750, can be a strange creature. Many end up worse off than the original. Done correctly, a modified street bike is a pleasure to ride, but examples are rare.”
Some minor repair work was done on the head; a small amount of metal was skimmed from the head surface to clean it up and some of the valve cover hold-down bolt holes were Heli-coiled.
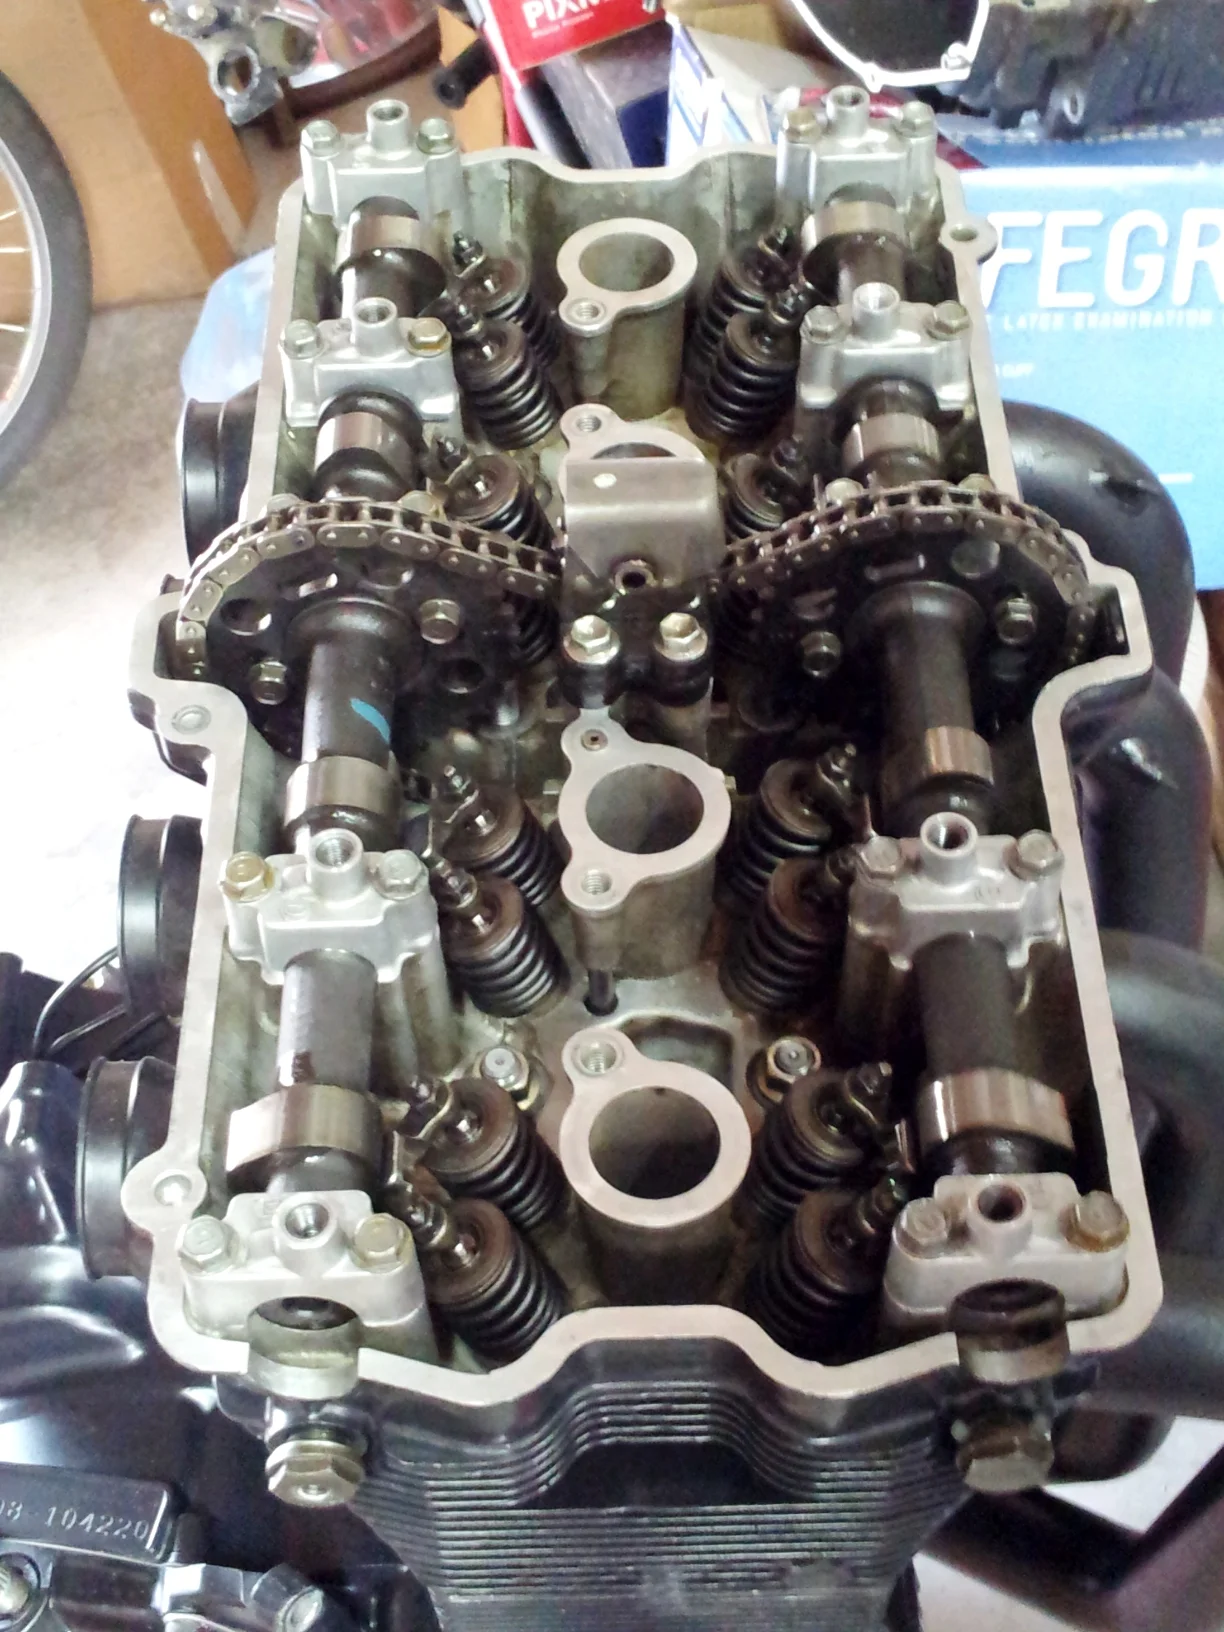
Cylinder Head without the Valve Cover
The carburetors were a stock set of 36mm Mikuni Slingshot carbs that were rebuilt. Later they were re-jetted on the dyno and the needle jets replaced. In the day (mid-eighties), race bikes ran open intakes and I elected to run the carbs open with the original bell mouths taken from a 1990 GSX-R750 air box.
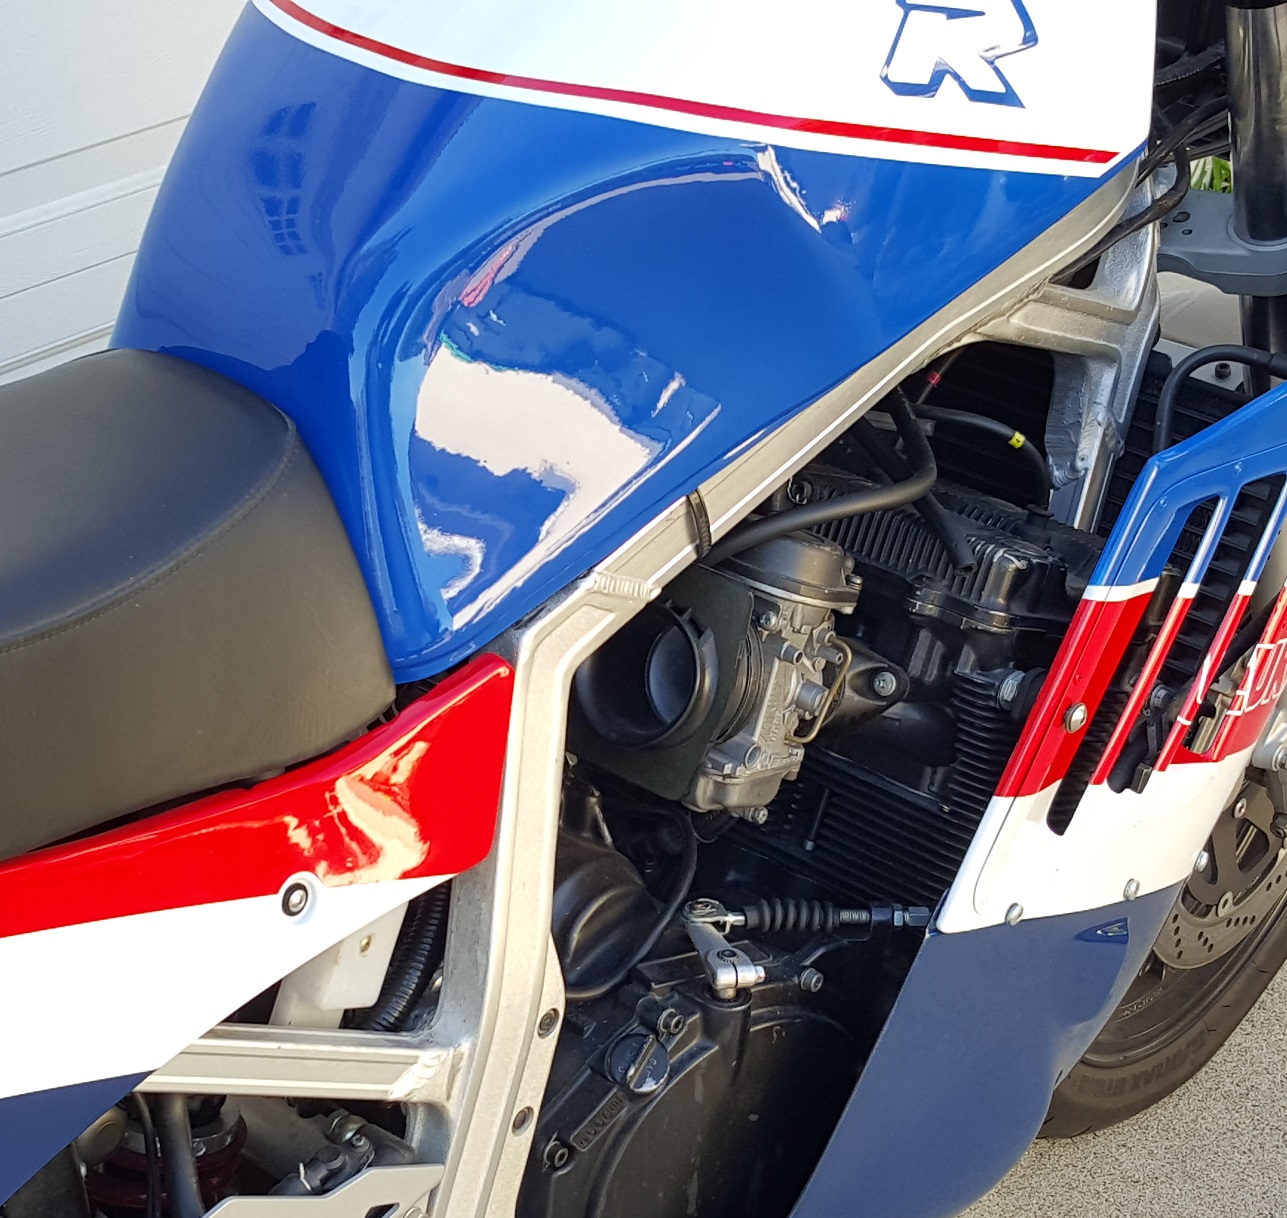
Mikuni Slingshot Carburetors
When the engine was going together, the cam timing was set slightly advanced compared to the Suzuki specs. This was done to increase the mid-range grunt and help keep the torque curve flat. Also, an APE mechanical cam chain tensioner was used for reliability.
Installing the 708 series engine in a frame designed for the 705 engine required some fiddling with the engine mount spacers on the rear of the engine cases. They seem to be slightly different in this area. Another area where an adjustment needed to be made was to the oil pan. The early model 705 oil pan was used so header clearance could be maintained.
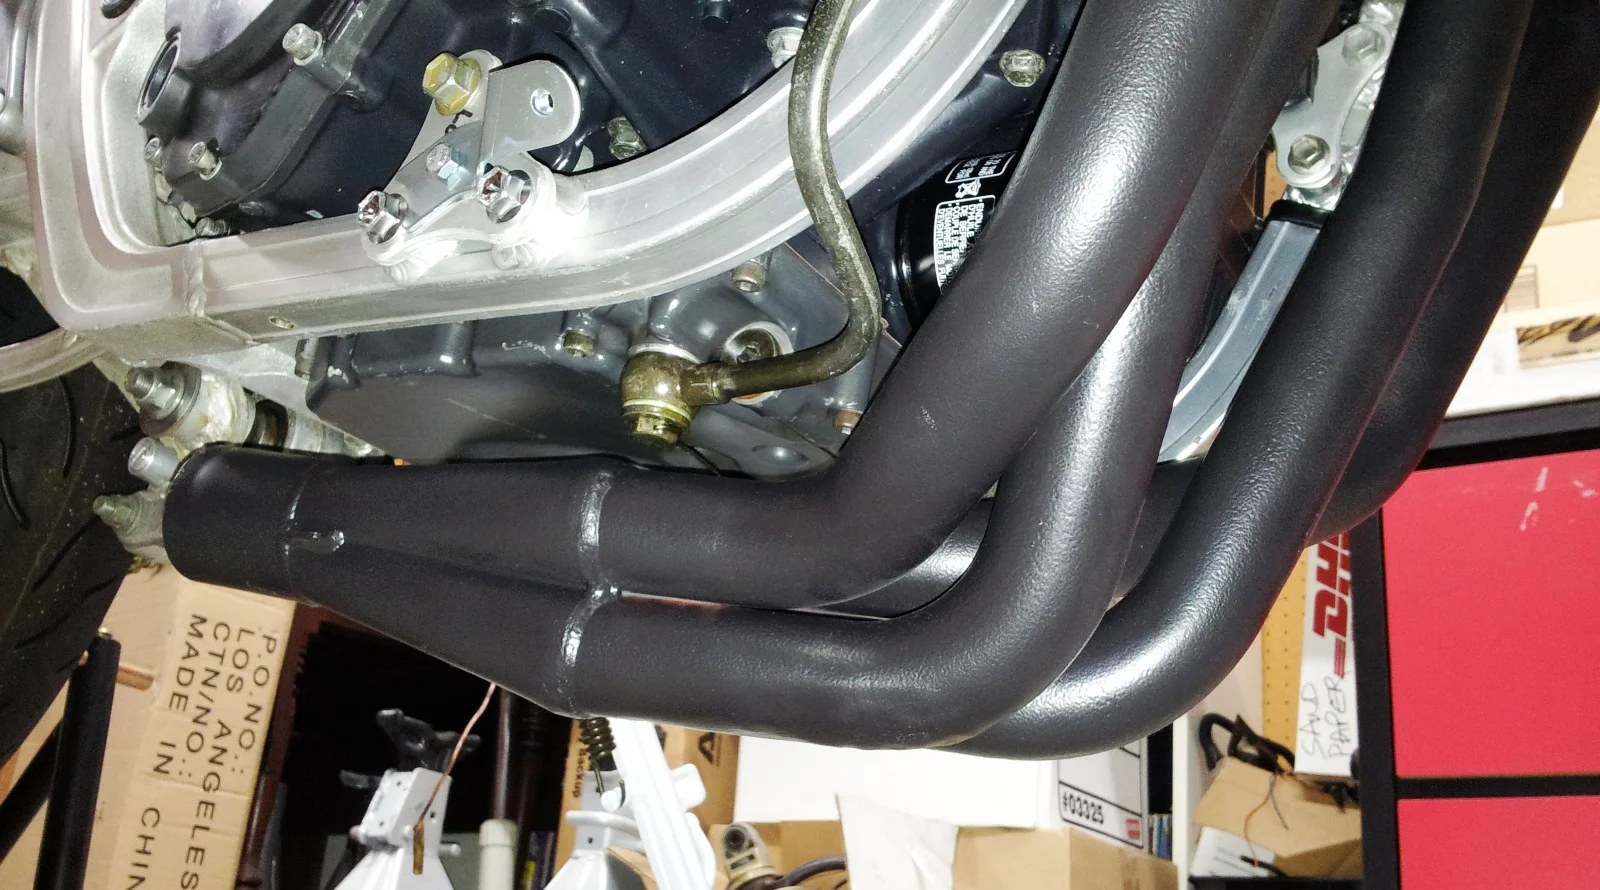
Yoshimura Header Test Fit
The exhaust headers were the before mentioned Yoshimura racing headers which came from a 1990 GSX-R750. They have a 4 into 1 design with a 2.25” collector exit size. The headers slip on to the aluminum spigots on the cylinder head and are attached with springs. Part of the quest for good torque output involved designing a special insert that slipped into the collector outlet. This insert reduced the outlet size of the collector to 1.75”. This was determined with help from Jack Burns (www.burnsstainless.com). Additionally, an O² sensor bung was installed in a custom fabricated mid-pipe for dyno tuning purposes.
Continuing in the exhaust theme, a Yoshimura RS3 muffler was used. A Yoshimura bracket from another Suzuki model was modified to fit. The exhaust can was completely rebuilt with new packing, sleeve and label. New Yoshimura springs held all of the joints together. The mid-pipe was also secured with a frame mount.
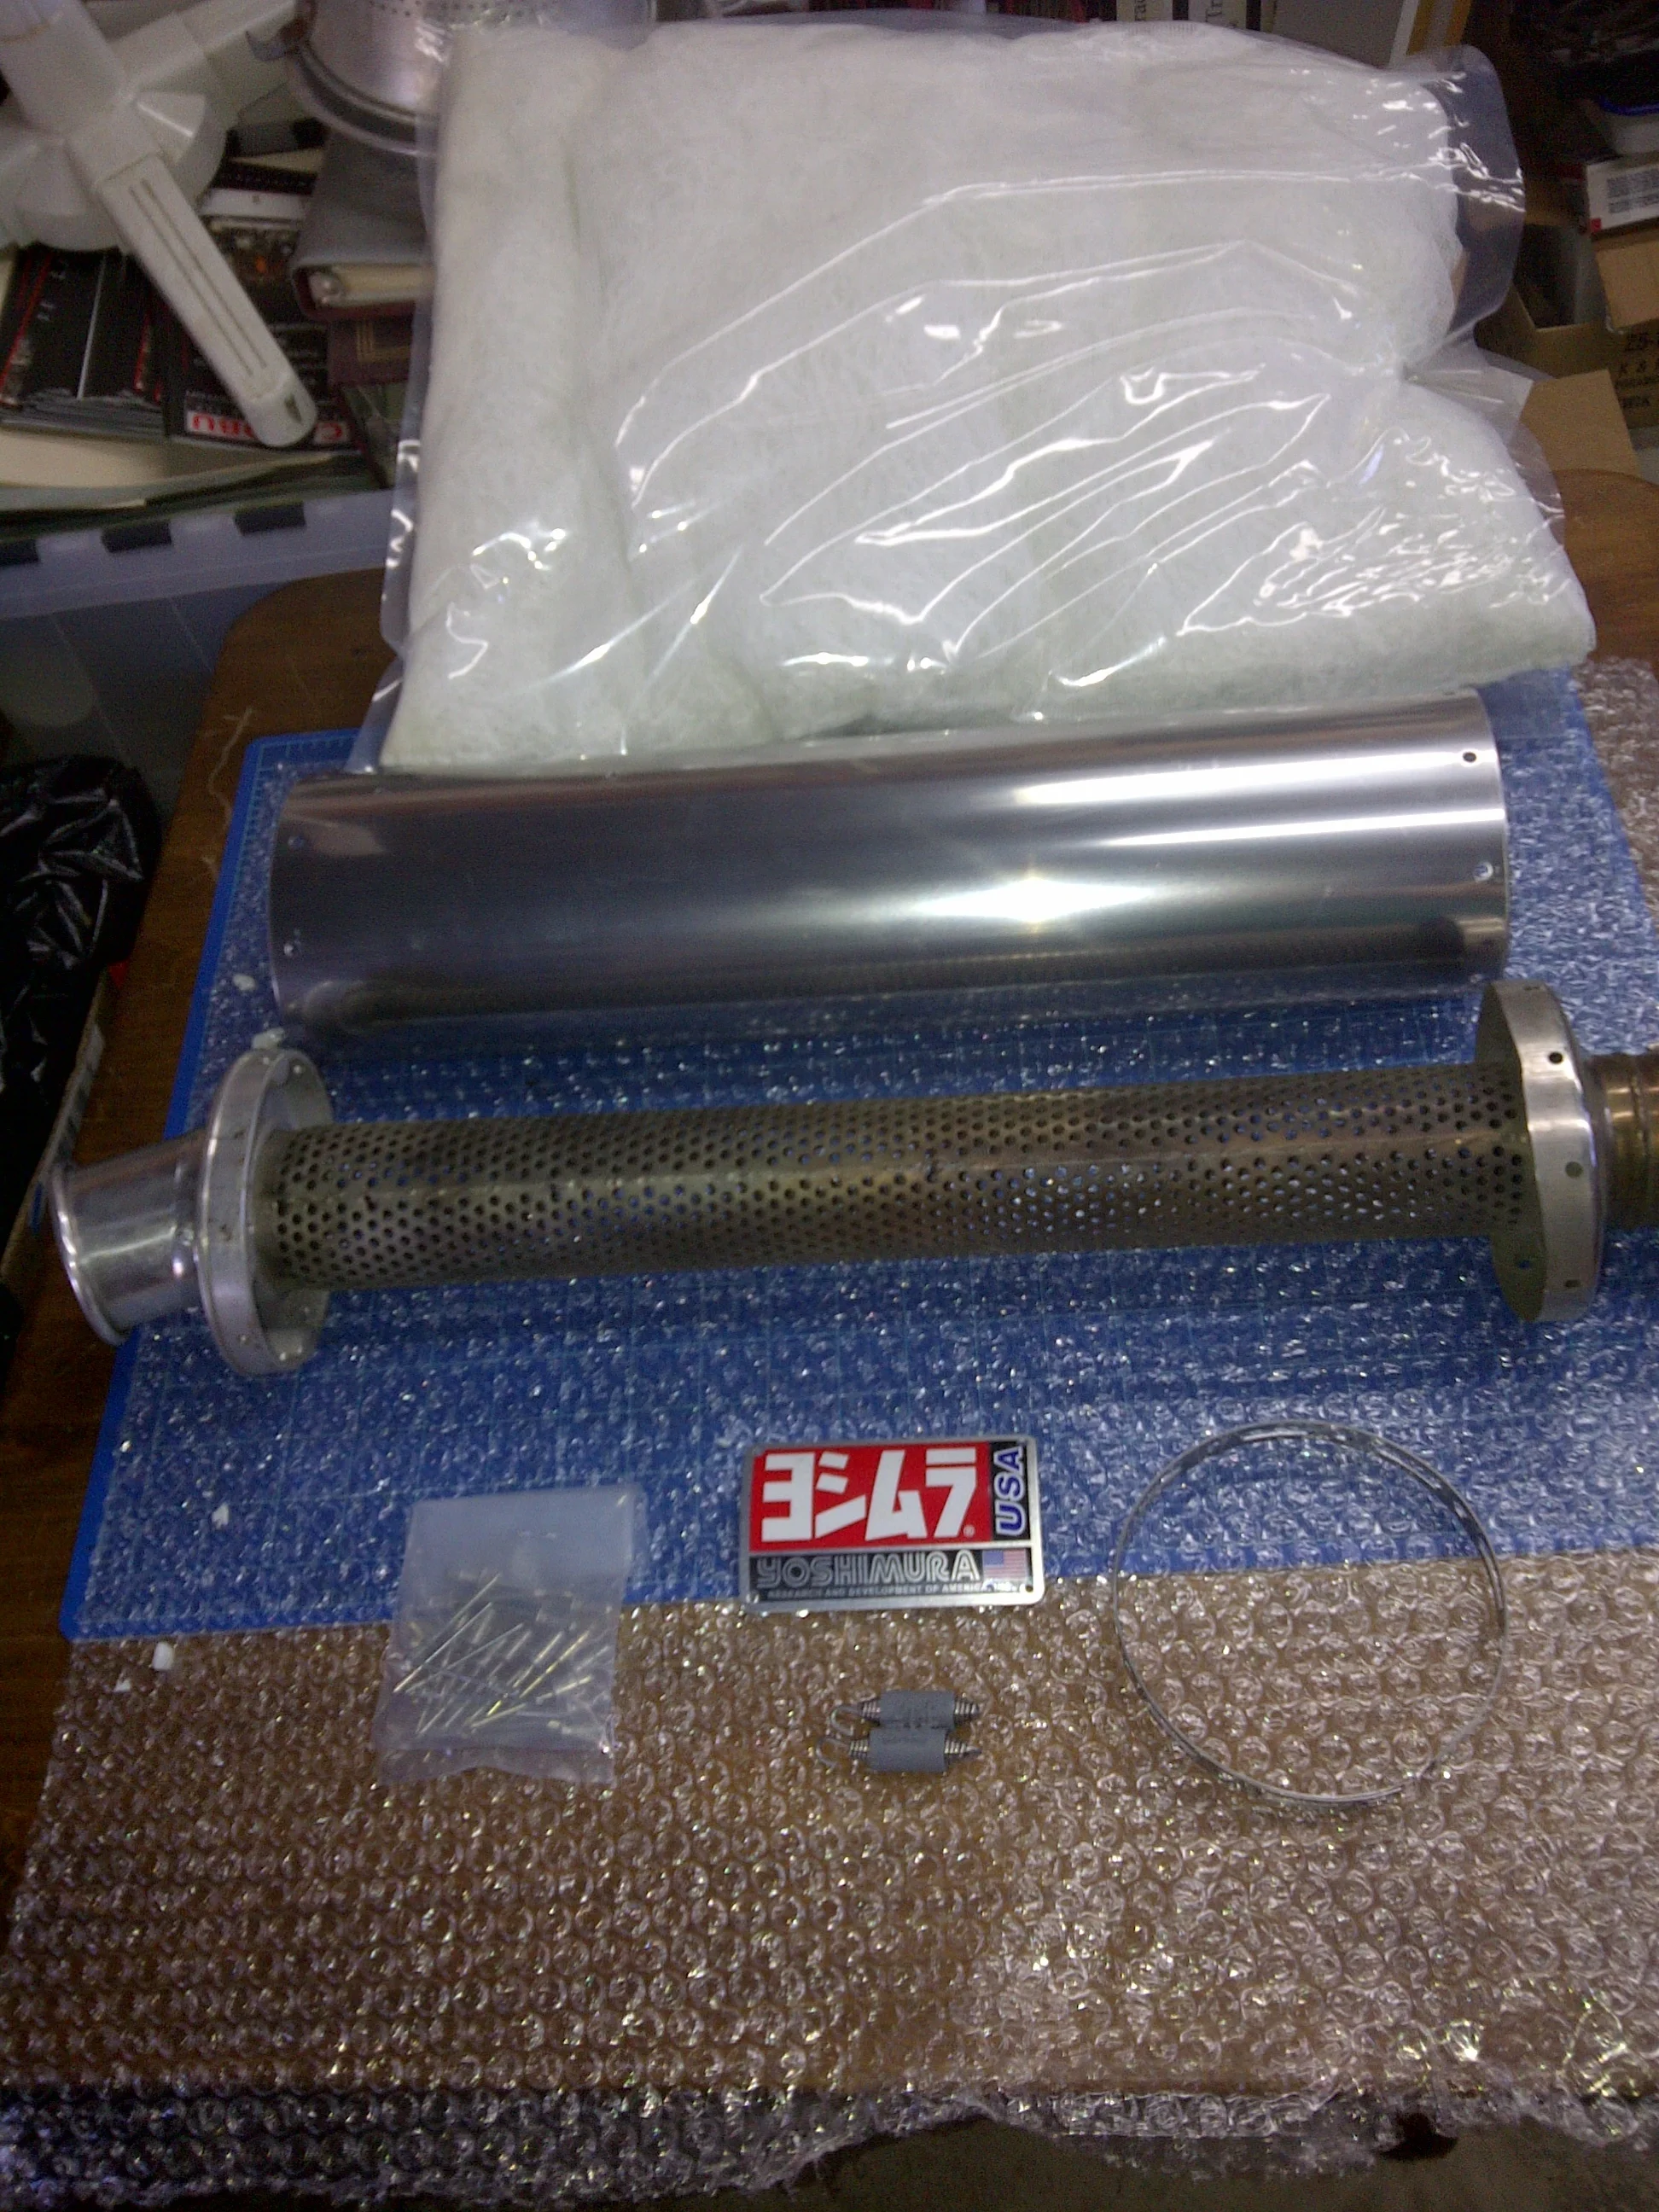
Yoshimura Muffler Rebuild Parts
On the electronic side, an ignition module from a Slingshot model ('88-'89) was wired in to run the ignition and the tachometer. The earlier white-faced tach was used for the sake of appearance. Both the starter and the alternator were rebuilt and tested. The alternator needed a new short harness as the old one was burned out. The wiring harness was modified to leave the right-side handle bar switch and the ignition key as stock.
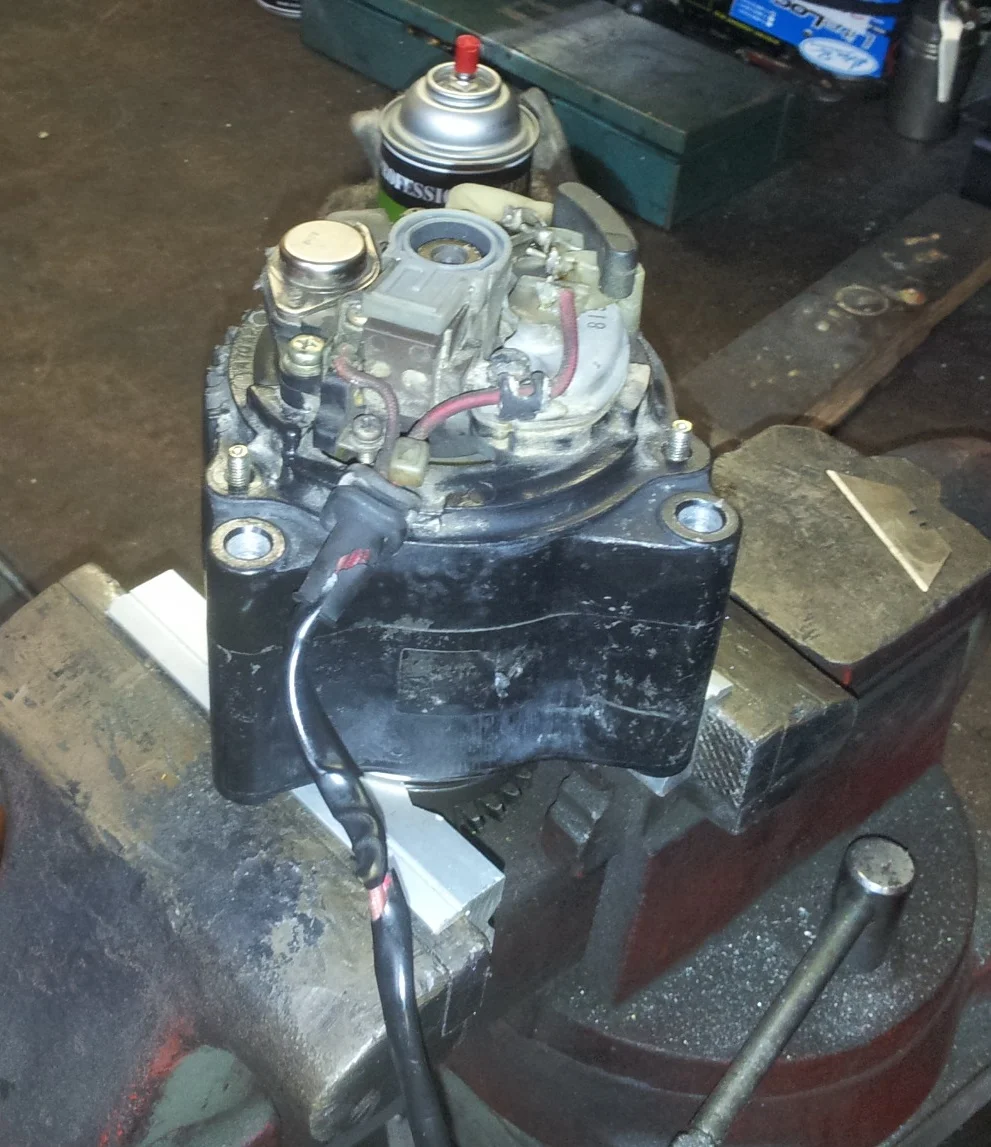
Suzuki Alternator
Dyno and Track Testing
The final part of this story describes the dyno tuning and riding the GSX-R at the race track. In many build stories that I have read, this is a missing part of the experience. References are made to “it makes a lot of power” or “it should run well with further sorting” and these are cop outs in a way; they have a fairy tale quality of “and they lived happily ever after”. Here, the engine was tuned and tested on the dyno. The bike was weighed on an electronic scale and pushed on the track to the limits – no fairy tales allowed.
For the dyno tuning, Mickey Cohen was chosen due to his ability to get the most from the Mikuni 36mm Slingshot CV carbs. Carb tuning is becoming a lost art so this was an important issue.
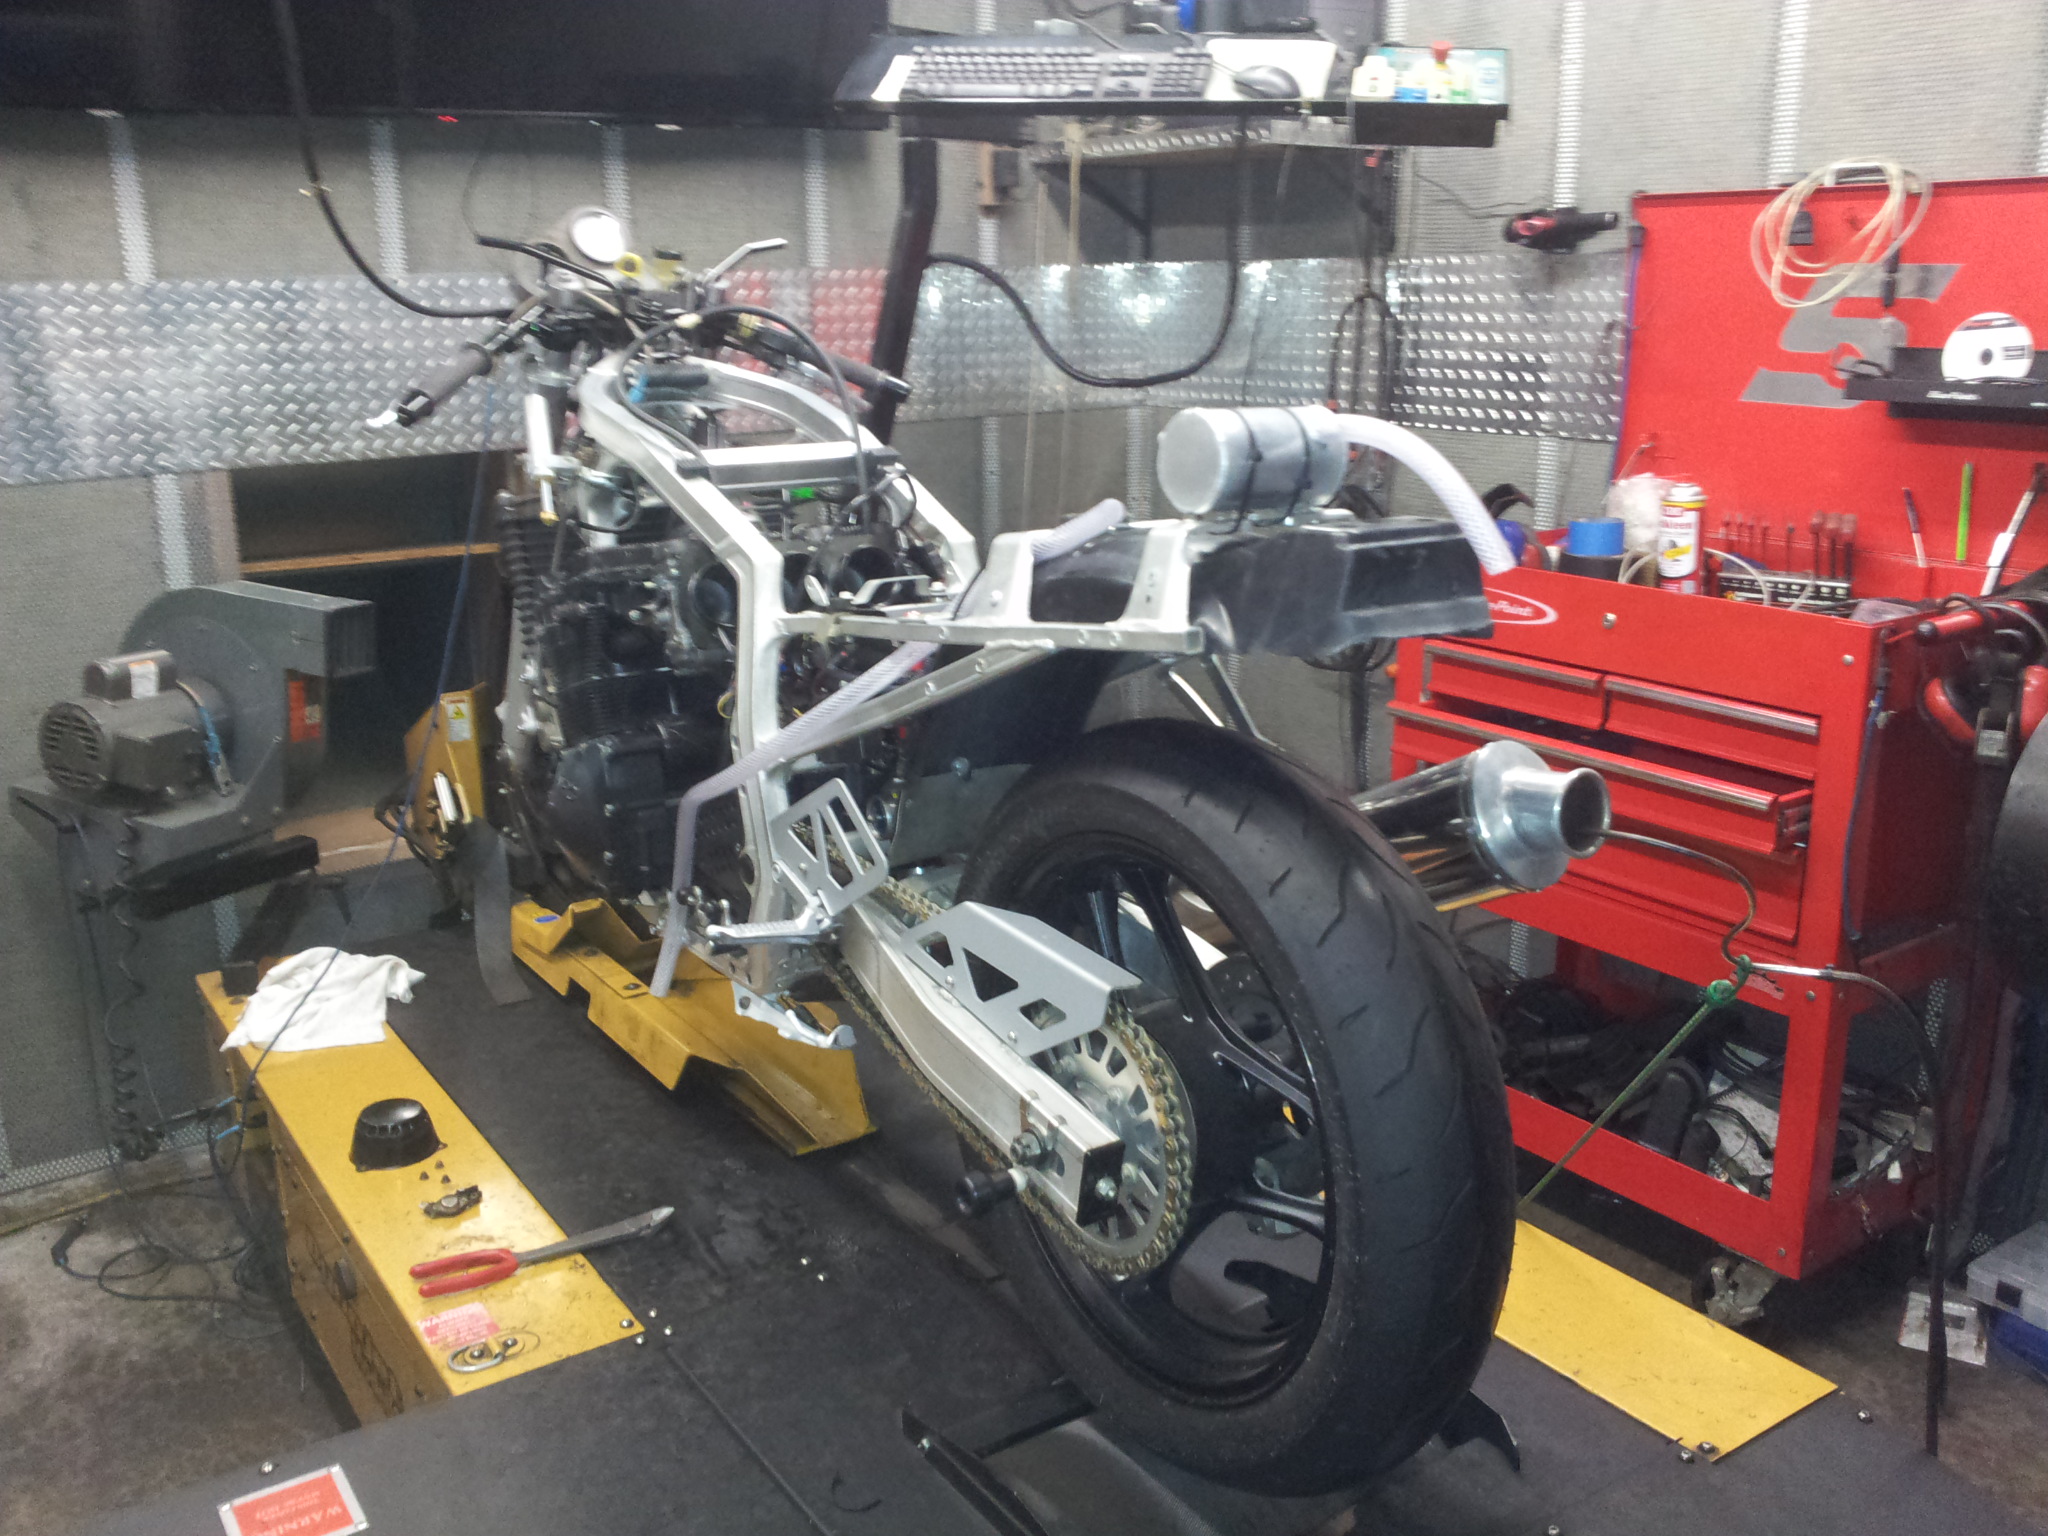
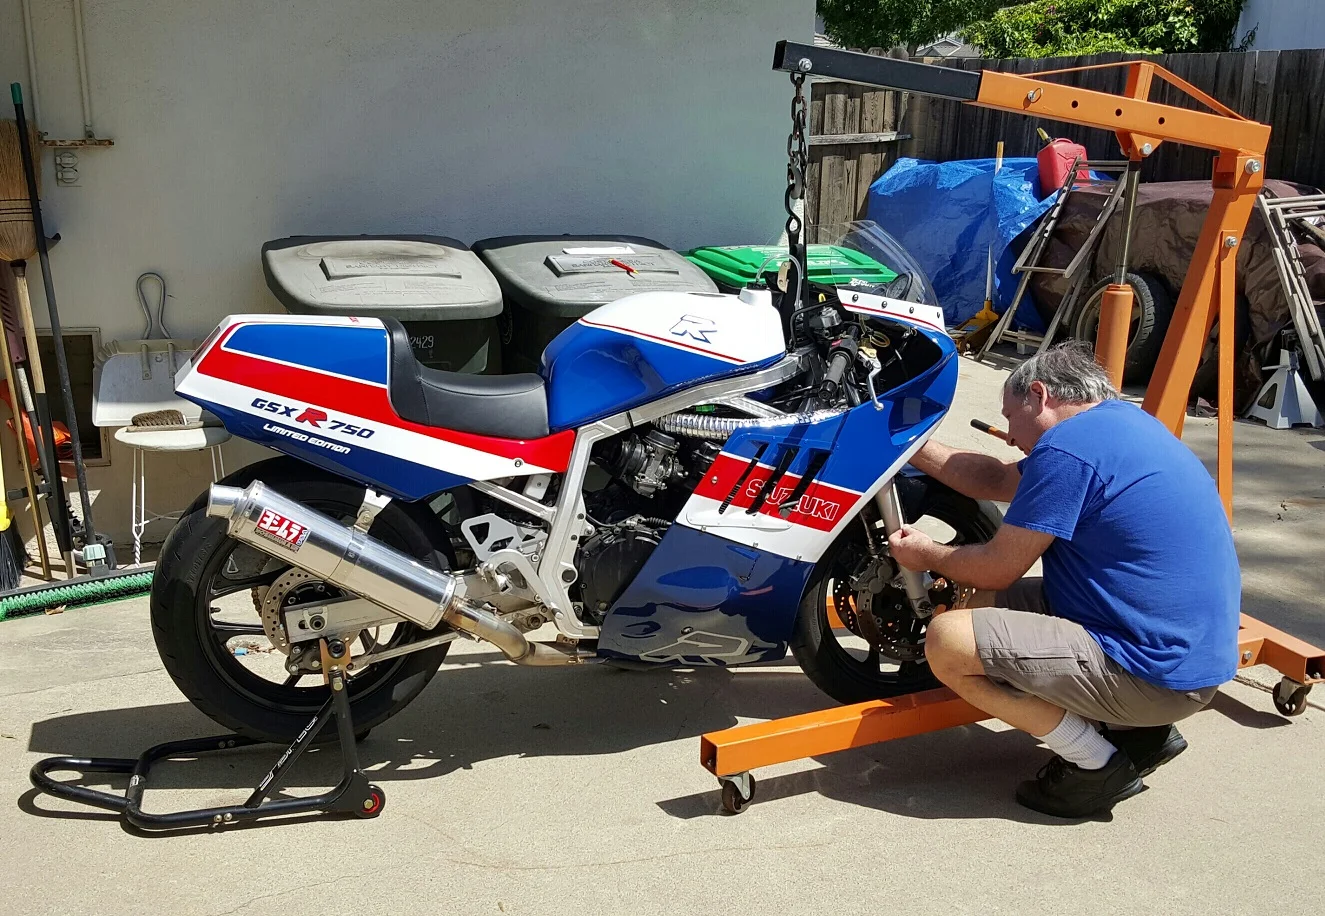
Suzuki GSX-R750 on Dyno
As the other parameters of cam and ignition timing were fixed, the air fuel ratio and throttle response were important areas of focus. Ultimately, the carbs were disassembled multiple times and the needle jets were replaced.
Period rear wheel dyno tests of the stock 1986 GSX-R750 reported about 80 HP. The 1989 GSX-R750 Slingshot engine produced about 90 RWHP. The estimate from the engine simulation was over 110 HP. The final dyno run netted 113.5 HP at 11,000 rpm with about 55 lb-ft of torque at 9,000 rpm. I considered it a victory and Mickey said that this was an impressive number coming from what was a warmed-over stock engine with original carbs.
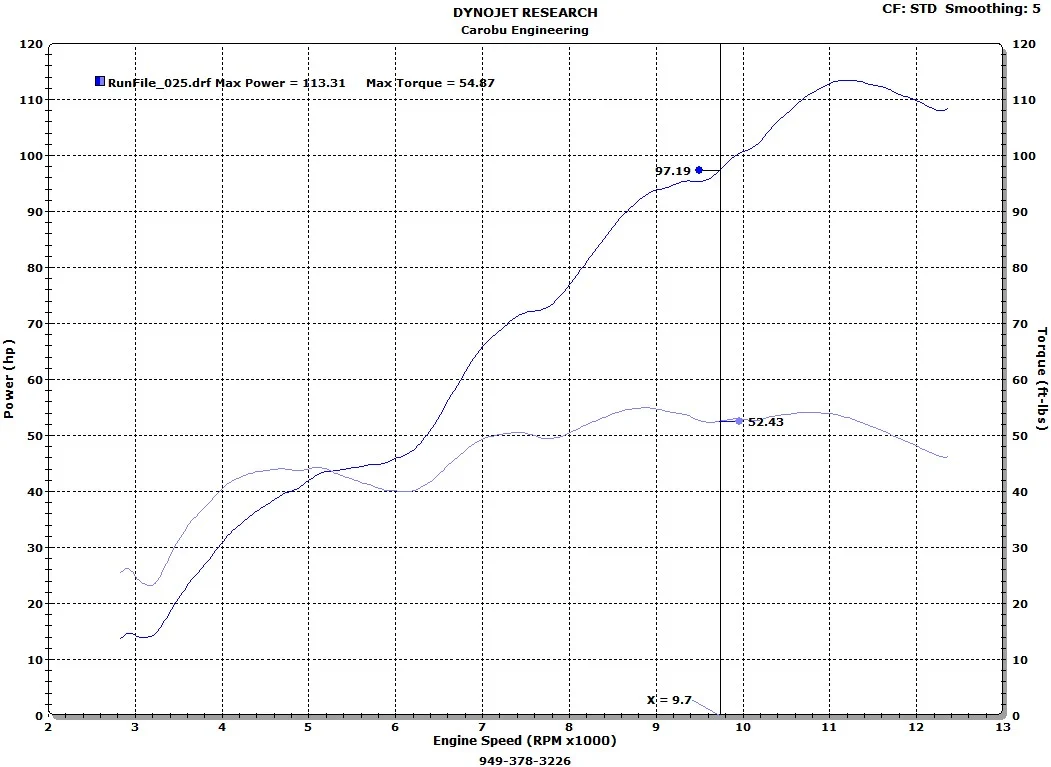
Final Dyno Run Suzuki GSX-R750
Weight is important for a track bike or should I say the lack of it. The GSX-R was weighed on electronic scales and came out at 391 lbs. without fuel in the tank. This is about 32 lbs. lighter than contemporary road tests reported for the 1986 version. For reference, the 1988 Slingshot model weighed 460 lbs. with no fuel (a 69 lbs. difference). This lighter weight was accomplished with the stock wheels and no special titanium/magnesium parts or fasteners.
The suspension was set-up before the GSX-R hit the track. The sag was set front and rear with the front pre-load setting cranked all the way down to give the highest setting of 3 available (approximately 10mm per step). In the rear, finer settings were available from the optional threaded collar added to the R1 shock.
Setting Sag on Suzuki Suspension
The rear shock rebound and compression adjusters were set in the middle of their respective adjustment ranges. Cold tire pressures initially came in at 32 /30 psi front and rear. These were adjusted later at the track after the first session.
When the bike went through the tech line for the track day at Auto Club Speedway (Fontana), it got a lot of attention. The tech inspector was impressed with the preparation and couldn’t find anything to complain about. I don’t think he had actually seen this model before.
During the first session, the GSX-R felt powerful and handled reasonably well. The steering felt good (period slow compared to modern bikes) and the suspension didn’t do anything wrong (a positive sign as a good set-up should be invisible). The pace on the front straight was strong and acceleration off of the corners surprisingly stout for a 750. The good news was that the power band had a wide area of torque with a nice hit on the top end; the engine pulled really well up to the 12,500 rpm rev-limiter.

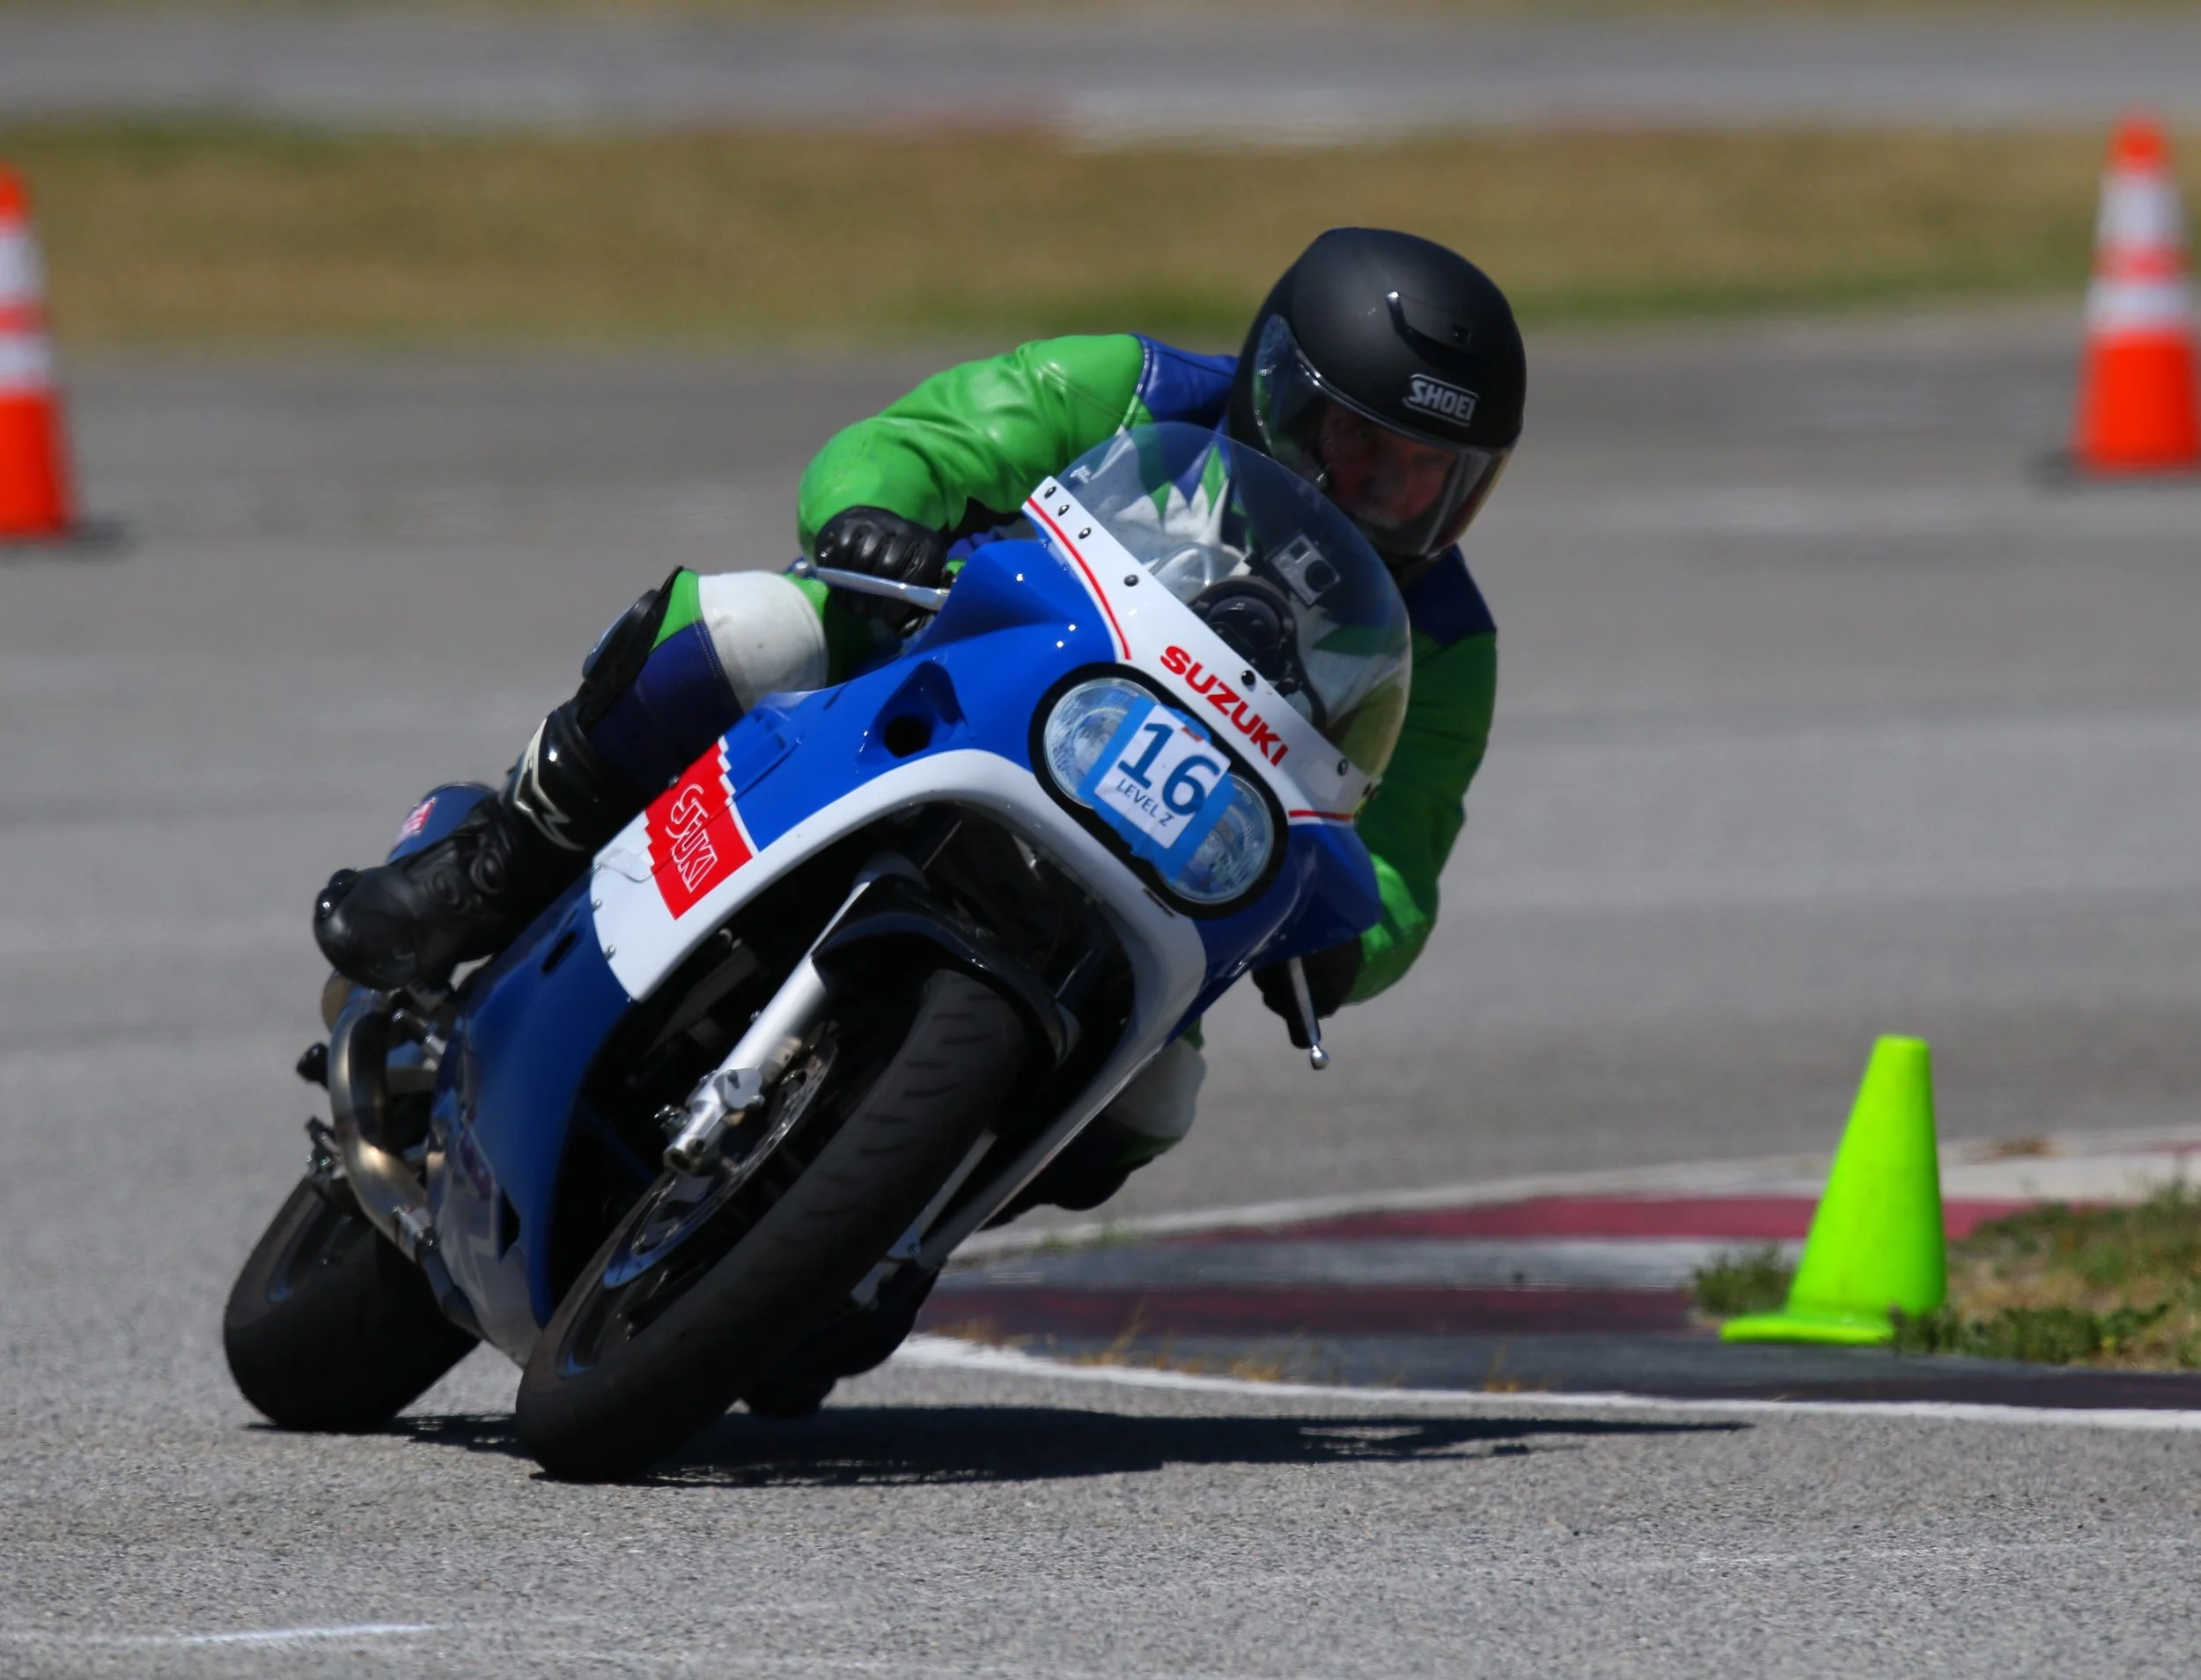
Tate Casey rides the Suzuki GSX-R750 at Auto Club Speedway
Before the second session, the tire pressure was adjusted back to 32/30 and one click was added to the rebound and compression adjusters on the rear shock. The Gixxer started to feel really good after that and ran perfectly for the rest of the day posting a best time of 1:55 in the intermediate group.
Many modern bike riders were very surprised to see an ancient superbike pass them. At the end of the day, three riders came over and asked “who was riding the old Suzuki?” They commented that they were riding new GSX-R750s and couldn’t believe the pace of the old war horse (bike and rider).
Another track day was scheduled a few months later so that the editors of Motorcyclist magazine could ride the bike and take photos for their ‘Me and My Bike’ feature. A link to the article is here. Both Ari Henning and Zack Courts rode the bike. They liked the handling, brakes and the surprising power.

Suzuki GSX-R750 at Auto Club Speedway with Zack and Tate
After the first session, they asked for less pre-load on the front and more compression/rebound on the rear. Both guys are a lot lighter (by about 50 lbs.) than I am, so the preload adjustment made sense. The first session lap times for both riders ended up in the 1:47 range which is already a lot faster than my times. For a final test, Ari went out and set a phenomenal 1:41.9 lap time which topped the sheets for that session. One guy on a modern R1 was really pissed that Ari passed him. That time is only about 10 seconds more than the fastest times of the day set by a full race bike on slicks.
This testing showed that the 1986 GSX-R750 could be made into a competitive and reliable track day bike. That two professional test riders gave it the thumbs up is impressive enough, but the speed of the bike caught us all off guard.

Ari Henning at Auto Club Speedway
Video of 1986 Suzuki GSX-R750 built by Tate Casey and ridden by Ari Henning
This bike is for sale. If you would like to buy this bike go here.